KennyB
Full Member
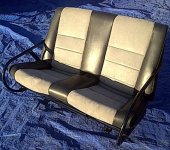
Did I ever Tell you I took '03 Convertible Seats, and Built the Frame to Be a Freestanding Bronco Seat?
I’m NOT Saying this project is for Everyone, but it blows away what you can buy! (And ANYONE Can Buy a back seat)
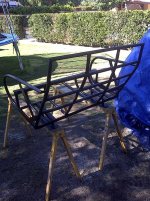
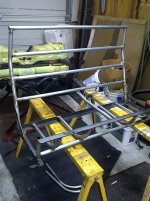
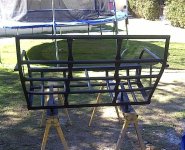
OK, Here we go... 3/4" EMT Conduit, and a Conduit Bender (about $30) Bender. I Used EMT because it's light, and it's Really Strong.
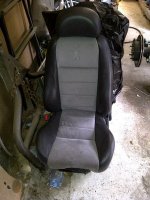
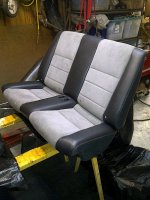
I Chose Mustang '03 Cobra Convertible because according to the Specs on www.autos.msn.com It’s the Narrowest back seat. Driver’s seat is 10 Way Power Adjustable, They are Black Leather, and Suede in the Middle. (NO, I don’t wear a skirt, but, someone might be)
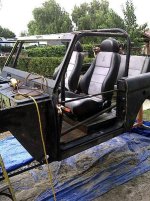
Get All your Measurements from the Bronco, you have 40” between the Fender Wells. You want this seat LOW, the bottom and back at 90*, about 4” off the Floor in the back, 7” off the Floor in the Front… you wanna rake it back a good 15* off Plumb.
Pry open the Hog Rings, peel back the Leather. You’ll hate yourself if you Burn it. ( I hate Myself)
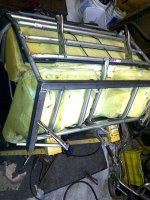
Start measuring, Cutting Conduit, Tacking to your side frame. The more I did, the more I wanted to do, to pinch a piece flat, (I don’t have a tubing cutter) I used a Vice. I used 1”x1” angle iron for the Bottom Frame. I Bent up Arm rests, I’ll prolly use MotoCross Bar pads, as arm rest pads.
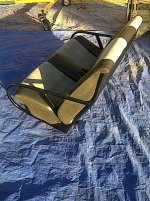
The Back of the seat has some “Hook” type mounts that wrapped right around the conduit. The Front of the bottom piece has 3/8” round Pins, that go through the Angle Iron bottom. What I forgot to Photo, was the brackets I used to Pull the seat Back Down. I Bent over some 1/8” X 1” flat stock, welded a piece of All Thread to it, grabbed the seat frame, pushed the all thread through the bottom mount, and double Nut’d it. I’ll try to draw it up in Photoshop.
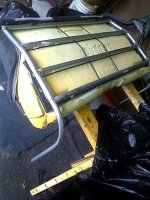
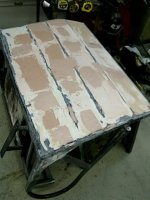
Oh, the Back of the seat is Foam, and isn’t too attractive. So, I looked up what the Stereo Guys do for woofer Boxes. I stretched a piece of Black Felt held it with Spray glue, Then I painted Resin on it, flowed by 2 layers of Glass Mat. Then a little Sanding, Bondo, A LOT of sanding, then Paint. On the frame I used Rattle Can Gloss, on the back, I used Rattle Can Bedliner Textured Spray.
The Bottom, I Used 1’, or 1.25” Flat Stock, Drilled for Stock holes. I used ¾” EMT as Risers.
On the Face, I had a Sheet metal shop roll up some 18 guage, for a finish look, I even made a Glove Box. Also, the Seat Belts Come up through the Bottom, so, If you put in a Sheetmetal Pan, Leave an area for the Seat Belts.
So, NO I wont make you one, It took a couple nights, and I had fun doing it.
I’m NOT Saying this project is for Everyone, but it blows away what you can buy! (And ANYONE Can Buy a back seat)
OK, Here we go... 3/4" EMT Conduit, and a Conduit Bender (about $30) Bender. I Used EMT because it's light, and it's Really Strong.
I Chose Mustang '03 Cobra Convertible because according to the Specs on www.autos.msn.com It’s the Narrowest back seat. Driver’s seat is 10 Way Power Adjustable, They are Black Leather, and Suede in the Middle. (NO, I don’t wear a skirt, but, someone might be)
Get All your Measurements from the Bronco, you have 40” between the Fender Wells. You want this seat LOW, the bottom and back at 90*, about 4” off the Floor in the back, 7” off the Floor in the Front… you wanna rake it back a good 15* off Plumb.
Pry open the Hog Rings, peel back the Leather. You’ll hate yourself if you Burn it. ( I hate Myself)
Start measuring, Cutting Conduit, Tacking to your side frame. The more I did, the more I wanted to do, to pinch a piece flat, (I don’t have a tubing cutter) I used a Vice. I used 1”x1” angle iron for the Bottom Frame. I Bent up Arm rests, I’ll prolly use MotoCross Bar pads, as arm rest pads.
The Back of the seat has some “Hook” type mounts that wrapped right around the conduit. The Front of the bottom piece has 3/8” round Pins, that go through the Angle Iron bottom. What I forgot to Photo, was the brackets I used to Pull the seat Back Down. I Bent over some 1/8” X 1” flat stock, welded a piece of All Thread to it, grabbed the seat frame, pushed the all thread through the bottom mount, and double Nut’d it. I’ll try to draw it up in Photoshop.
Oh, the Back of the seat is Foam, and isn’t too attractive. So, I looked up what the Stereo Guys do for woofer Boxes. I stretched a piece of Black Felt held it with Spray glue, Then I painted Resin on it, flowed by 2 layers of Glass Mat. Then a little Sanding, Bondo, A LOT of sanding, then Paint. On the frame I used Rattle Can Gloss, on the back, I used Rattle Can Bedliner Textured Spray.
The Bottom, I Used 1’, or 1.25” Flat Stock, Drilled for Stock holes. I used ¾” EMT as Risers.
On the Face, I had a Sheet metal shop roll up some 18 guage, for a finish look, I even made a Glove Box. Also, the Seat Belts Come up through the Bottom, so, If you put in a Sheetmetal Pan, Leave an area for the Seat Belts.
So, NO I wont make you one, It took a couple nights, and I had fun doing it.
Attachments
-
 Seat Mock up 1.jpg75.1 KB · Views: 111
 -
 back Seat Mock up 7.jpg131.5 KB · Views: 79
 -
 back Seat Mock up 6.jpg116.3 KB · Views: 83
 -
 back Seat Mock up 5.jpg266.5 KB · Views: 86
 -
 back Seat Mock up 4.jpg246.3 KB · Views: 91
 -
 back Seat Mock up 3.jpg254.8 KB · Views: 89
 -
 back Seat Mock up 2.jpg202.1 KB · Views: 87
 -
 Back Seat Mock up 1.jpg207.2 KB · Views: 105
 -
 back Seat Mock up 8.jpg122.9 KB · Views: 76
 -
 back Seat Mock up 11.jpg254.4 KB · Views: 76
 -
 back Seat Mock up 13.jpg76.4 KB · Views: 98
 -
 back Seat Mock up12.jpg160.7 KB · Views: 82