• Just a reminder that you won't be able to start new posts or reply to existings posts in the Archive forum.

    This is where all the old posts go so they can still be used for reference and searched.
  • Welcome to ClassicBroncos! - You are currently viewing the forums as a GUEST. To take advantage of all the site features, please take a moment to register. It's fast, simple and absolutely free. So please join our community today!
    If you have problems registering or can't log into your account, please contact Admin.

My '68 - finally a contributor

pcf_mark

Bronco Guru
Joined
Jun 11, 2010
Messages
3,647
Now that I finally paid my contributor status I thought I would exercise it a bit!

Some shots of my '68 from the summer with the top off after I painted it. I realized I have no photos with the top on tonight!
 

Attachments

  • back_qtr.jpg
    back_qtr.jpg
    151.4 KB · Views: 138
  • side.jpg
    side.jpg
    182.5 KB · Views: 146
  • three_qtr_view.jpg
    three_qtr_view.jpg
    192.1 KB · Views: 154
Joined
Dec 14, 2012
Messages
27
Loc.
Mesa, AZ
That's awesome! I have a 68 and I am in the process of stripping and painting. Was it tough? What methods did you use?
 
OP
OP
pcf_mark

pcf_mark

Bronco Guru
Joined
Jun 11, 2010
Messages
3,647
Thanks! Yes I did paint it (and all the other stuff too) myself. The interior is next because it looks lame even stock.

I have some experience painting cars doing about one every two years but to a pretty high standard. You can do it! I did not have significant exterior rust but both rockers were dented and they took a lot of time to fix. The hood and the hard top took the most time and material by far. The hardtop is silver and it looks really great installed since it is the same silver I used in the grill.

Here were my paint steps:

1) Stripped all the old paint - both rattle can/roller and Ford yellow underneath with paint stripper from Home Depot. Took off the top, hood, doors, tailgate, front fenders
2) Sanded with 180 dry
3) Metal work
Welded the rocker to the fender to eliminate the seem
Welded thin bits of sheet stock into the door jambs to make the gaps tight
Replaced bottom of tailgate (that sucked a lot)
Repaired the bottom of the doors where it was getting "thin"
The replacement front fenders suck and I had to cut them apart to make them fit. Then welded them back together and that sucked a lot of time.
4) Did body work as required, sanding 80 grit to the metal and finishing filler with 180
5) Sprayed on 3 coats of House of Kolor KP-2CF A/B
6) Block sanded that with 180 using 3m dry guide coat (that stuff is so worth the money)
7) Sprayed on 2-3 more coats of KP-2CF A/B thinning the last coat so it flowed smoother
8) Wet sanded that with 400 using 3M dry guide coat to find anything I missed
9) Painted the doors first to get my gun setting and technique in the groove. The I did the hood and fenders together. Then the tub itself.
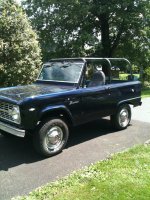
HoK Ko Seal sealer one medium coat wait 30 minutes
2-3 coats HoK Midnite Blue Metallic let it flash
2-3 coats HoK high solids clear
10) After letting the parts sit a few days I CAREFULLY sanded them with 800 wet on a block to knock off the orange peel
11) Sprayed on 2-3 more coats of HoK high solids clear.
12) Let the parts sit for a week or so then color sanded with 1000/1500 on a block to eliminate orange peel. The extra clear gives you some safety margin and great depth
13) Buffed with a wool pad, grey foam pad then white foam pad using 3M products

I used HoK because I had a lot of it around from a previous project and I wanted to use it up. You can get it online from tcpglobal for a good price. Not a paint system for anyone who wants to rush or not read the labels it is meant for creative users not production shops. I saved on the hard top by only spraying on 2 coats of HoK epoxy primer then using two quarts of Slick Sand ($60) versus two quarts of HoK ($90) and the Slick Sand is wonderful stuff.
 
Last edited:

Fireball05

Bronco Guru
Joined
Oct 7, 2012
Messages
1,822
3) Metal work
Welded the rocker to the fender to eliminate the seem
Welded thin bits of sheet stock into the door jambs to make the gaps tight

Do you have better photos showing this? Would be interested to see them. Thanks!
 
OP
OP
pcf_mark

pcf_mark

Bronco Guru
Joined
Jun 11, 2010
Messages
3,647
I'll shoot some pictures this weekend and post them. Basically I filled gap between the end of the rocker and rear fender with a thin bit of sheetmetal. Carefully welded it, ground it down and added a little filler. Cleaned it up but no one ever notices!
 

Fireball05

Bronco Guru
Joined
Oct 7, 2012
Messages
1,822
Those are the subtle touches I notice and enjoy about some of the builds on here! All the little things can add up and make for a really nice end product. As they say, the devil's in the details :)

I'm about 2 hrs away from you, so if you get the itch to paint another one, let me know!!
 
OP
OP
pcf_mark

pcf_mark

Bronco Guru
Joined
Jun 11, 2010
Messages
3,647
I also eliminated the side markers / reflectors front and rear, two toned the grille, added sport trim around the grill and windshield. The hardtop is silver metallic really pops - once you see it you will never paint another one white.
 

DonaldDouchebag

Bronco Guru
Joined
Apr 17, 2008
Messages
1,098
I also eliminated the side markers / reflectors front and rear, two toned the grille, added sport trim around the grill and windshield. The hardtop is silver metallic really pops - once you see it you will never paint another one white.

Nice ride, man. Does the top fit over your cage? Looks a bit tall to me.
 

gnsteam

Contributor
Bronco Guru
Joined
Jan 29, 2010
Messages
3,775
Loc.
Lincoln NE
Wow, looks great! Love that color:cool::cool:. Looking forward to seeing additional pictures. Oh and welcome to the site and for becoming a contributor.
 
OP
OP
pcf_mark

pcf_mark

Bronco Guru
Joined
Jun 11, 2010
Messages
3,647
The hard top top fits over the cage just barely. I am not sure about the soft top but my guess is no. It is the tall family cage and I fitted with the hard top on very close.

The master cylinder went away on my drive home then my priamry car lost a headlight. I need to take the entire bumper cover off to get at it so I have been a bit distracted!

I'll take some photos with the top on this weekend as long everything goes back together.
 
Top