• Just a reminder that you won't be able to start new posts or reply to existings posts in the Archive forum.

    This is where all the old posts go so they can still be used for reference and searched.
  • Welcome to ClassicBroncos! - You are currently viewing the forums as a GUEST. To take advantage of all the site features, please take a moment to register. It's fast, simple and absolutely free. So please join our community today!
    If you have problems registering or can't log into your account, please contact Admin.

My 77's restoration....pics inside!!

sellitall

Bronco Guru
Joined
Jul 30, 2002
Messages
1,444
Loc.
Malvern, Pennsylva
Well, I've gone and done it again. I just can't seem to get those EB's out of my system. I thought going back to my roots with the FJ40 would help, as well as jumping over to the 69-72 1st gen. blazers, but still no good. The broncos just seem to be calling me.

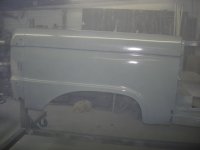
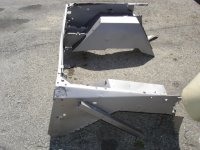
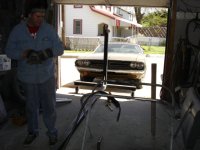
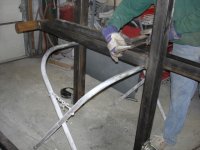
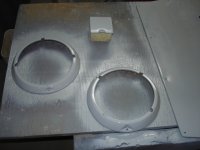
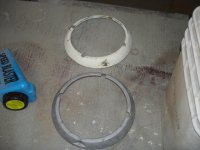
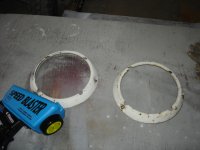
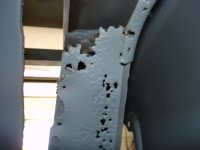
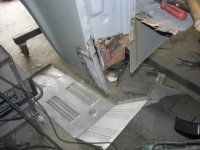
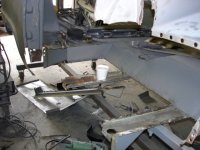
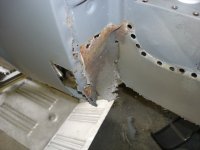
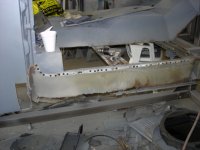
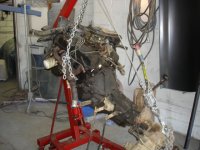
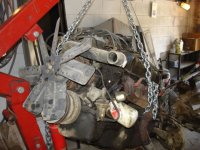
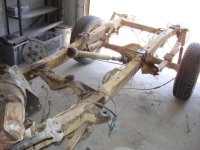
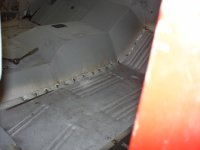
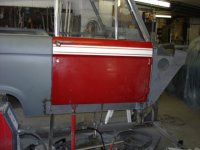
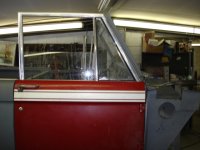
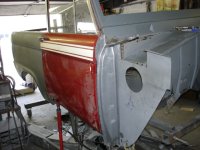
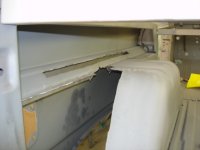
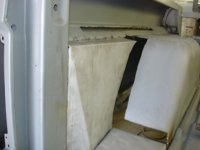
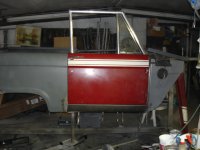
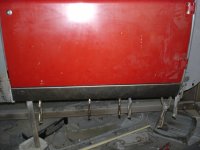
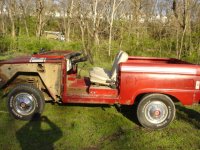
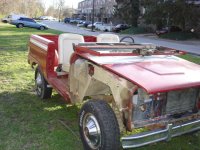
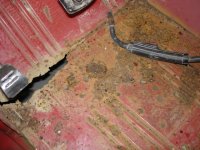
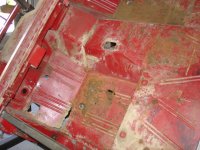
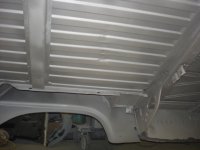
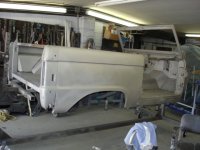
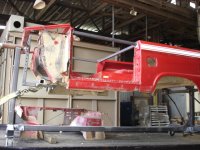
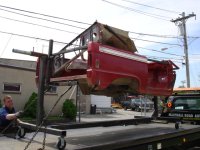
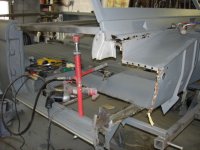
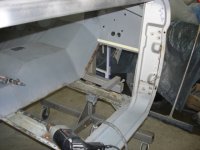
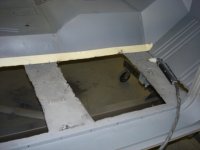
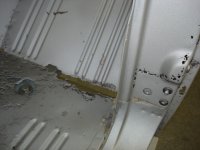
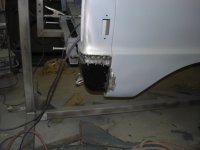
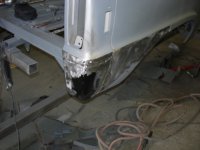
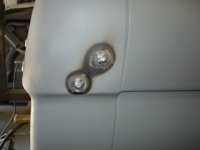
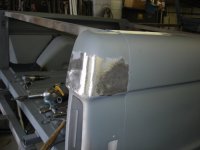
Anyway, I bought a 77 about a month and a half ago from a guy in LA. He claimed it was clean with only "minor rust". I've heard that line too many times to count, but still took his word. The pics he sent me were of its best attributes. So you can figure out their weren't many pics. My pics will tell you a different story. The only saving grace on this pig is that it's 100% original. It's never had any mods or rigs for that matter. It needs tons of sheetmetal work, but the 1/4's and rear strikers are salvageable. The front end is another story. I built a rotisserie (thanks archives), had it blasted and started cutting. Here's a few pics. Let me know what you think. I'll be updating the progress as I go.

Brian
 

Attachments

  • broncocaddypics 077.jpg
    broncocaddypics 077.jpg
    148.2 KB · Views: 503
  • broncocaddypics 079.jpg
    broncocaddypics 079.jpg
    153 KB · Views: 391
  • broncopics4-12-07 005.jpg
    broncopics4-12-07 005.jpg
    152 KB · Views: 467
  • rotisseriepics 023.jpg
    rotisseriepics 023.jpg
    145.9 KB · Views: 423
Last edited:
OP
OP
sellitall

sellitall

Bronco Guru
Joined
Jul 30, 2002
Messages
1,444
Loc.
Malvern, Pennsylva
Here's a few more. The second pic is where I had it blasted. The guy did a fabulous job. I've used him many times before, and I highly recommend him. Send me a PM or email if anyone in the South eastern PA, NJ, DE are are looking for some blasting done. I'd be willing to lend you my rotisserie after I'm done with it. It may be a long way off though ?:? .
 

Attachments

  • broncopicssandblast 041.jpg
    broncopicssandblast 041.jpg
    134.9 KB · Views: 549
  • broncopicssandblast 047.jpg
    broncopicssandblast 047.jpg
    134.3 KB · Views: 742
  • broncopicssandblast 014.jpg
    broncopicssandblast 014.jpg
    140.5 KB · Views: 588
  • broncopicssandblast 010.jpg
    broncopicssandblast 010.jpg
    145.3 KB · Views: 595
OP
OP
sellitall

sellitall

Bronco Guru
Joined
Jul 30, 2002
Messages
1,444
Loc.
Malvern, Pennsylva
...cut,cut,chisel,cut,grind,cut,cut,chisel,grind,cut!!! Oh yeah, put a plasma in front of most of those cuts. God bless that tool!!!
 

Attachments

  • 72earlybronco&restopics 14342.jpg
    72earlybronco&restopics 14342.jpg
    137.7 KB · Views: 834
  • 72earlybronco&restopics 14337.jpg
    72earlybronco&restopics 14337.jpg
    146 KB · Views: 557
  • 72earlybronco&restopics 032.jpg
    72earlybronco&restopics 032.jpg
    134.8 KB · Views: 567
  • broncopicssandblast 012.jpg
    broncopicssandblast 012.jpg
    135.3 KB · Views: 541

74fiberglass

Sr. Member
Joined
Nov 27, 2005
Messages
900
Hurry up,do the rear taillight housing so you can give me some pointers,Take Piks of it.Mine r kickin my a$$
 
OP
OP
sellitall

sellitall

Bronco Guru
Joined
Jul 30, 2002
Messages
1,444
Loc.
Malvern, Pennsylva
I just used the bottom sections of those housings. They suck!! You know they really suck when the salesman at JBG tells you they're no good. Here's a couple of pics of what I did. The first pic shows how the 1/4 doesn't match the taillight section I used, but that happened when I cut the old housing out, and seperated the 1/4 from it. I also welded up the upper spare tire carrier holes. I'll be fabbing up a tire carrier/bumper down the road so I don't need them anymore.
 

Attachments

  • 72earlybronco&restopics 14345.jpg
    72earlybronco&restopics 14345.jpg
    143.8 KB · Views: 634
  • 72earlybronco&restopics 14358.jpg
    72earlybronco&restopics 14358.jpg
    133.8 KB · Views: 581
  • 72earlybronco&restopics 14359.jpg
    72earlybronco&restopics 14359.jpg
    129.2 KB · Views: 535
  • 72earlybronco&restopics 14350.jpg
    72earlybronco&restopics 14350.jpg
    115.6 KB · Views: 572
  • 72earlybronco&restopics 14353.jpg
    72earlybronco&restopics 14353.jpg
    145.1 KB · Views: 621
Last edited:

edmond1744

Jr. Member
Joined
Apr 3, 2006
Messages
94
Loc.
los angeles
excellent work, keep it up,, post more pictures if you dont mind,, i am about to work on my floor pans,, they are all rusted.. i noticed that there was a steel pipe at the top of the tailgate section,, what is the purpose? you have done a perfect job.
 
OP
OP
sellitall

sellitall

Bronco Guru
Joined
Jul 30, 2002
Messages
1,444
Loc.
Malvern, Pennsylva
The 1 1/4" tube is there to brace the tub. I've moved this thing around alot, and with no support from the doors and hardtop, the tub will have a tendency to flex especially when you remove it from the frame. I put one there as well as in the middle of the tub behind the front seats and also in the door openings. They are attached with a couple of welds which will be removed once everything is lined up....at least I hope everthing will line up. I'll keep the pics coming. I just became a contributor the other day.
 

NicksTrix

Bronco Guru
Joined
Aug 1, 2001
Messages
6,391
i've found many of the later year eb's had the upper section in the r/r corner panel off. the panel is on right, as the lower/mid sections line up properly. it's almost as if the die got reworked and was off on the top part only. i've seen it in 76 & 77's only.
just part of the eb tollerance (+/- .250) that Ford had i'd have to guess.it's just another one of the quirky things about broncos ;)
have fun with your project. you're moving right along.
 
OP
OP
sellitall

sellitall

Bronco Guru
Joined
Jul 30, 2002
Messages
1,444
Loc.
Malvern, Pennsylva
NicksTrix said:
i've found many of the later year eb's had the upper section in the r/r corner panel off. the panel is on right, as the lower/mid sections line up properly. it's almost as if the die got reworked and was off on the top part only. i've seen it in 76 & 77's only.
just part of the eb tollerance (+/- .250) that Ford had i'd have to guess.it's just another one of the quirky things about broncos ;)
have fun with your project. you're moving right along.

I noticed the same thing a couple of weeks ago. My father pointed it out to me once I got it back from being blasted. He thought it had shifted from rust/removing the top all those years, but it had the same flaw on the other side as well. I guess you can use it as another way of identifying a 76-77 tub.
 
OP
OP
sellitall

sellitall

Bronco Guru
Joined
Jul 30, 2002
Messages
1,444
Loc.
Malvern, Pennsylva
Here's a couple more pics. I waiting for some sheetmetal from JBG. It should be in tomorrow. Here's a couple of my buddy helping me fab the rotisserie. That thing makes this job 100x's easier. Even the guy who blasted the tub thanked me for it. The last pic shos me putting the DP40LF down. I've used DP40 in the past, but this was my first time with the LF (lead free) version. They discontinued the DP40 line at least in my area. I liked the old stuff alot better. It dried quicker, and flowed even better.
 

Attachments

  • broncopicssandblast 035.jpg
    broncopicssandblast 035.jpg
    111.5 KB · Views: 388
  • broncopicssandblast 004.jpg
    broncopicssandblast 004.jpg
    153.7 KB · Views: 470
  • broncopicsebay 070.jpg
    broncopicsebay 070.jpg
    159.4 KB · Views: 530
  • broncopicsebay 068.jpg
    broncopicsebay 068.jpg
    139.4 KB · Views: 296
  • broncopicsebay 065.jpg
    broncopicsebay 065.jpg
    137.1 KB · Views: 332
OP
OP
sellitall

sellitall

Bronco Guru
Joined
Jul 30, 2002
Messages
1,444
Loc.
Malvern, Pennsylva
...................................and some more rust removal pics. The rear expansion panel is on back order, and my door post/rocker is on back order. I am at a standstill. Did some blasting with the speed blaster. I highly recommend this thing.
 

Attachments

  • morerestopics 011.jpg
    morerestopics 011.jpg
    155.5 KB · Views: 202
  • morerestopics 007.jpg
    morerestopics 007.jpg
    159.9 KB · Views: 266
  • morerestopics 006.jpg
    morerestopics 006.jpg
    144.2 KB · Views: 343
  • morerestopics 004.jpg
    morerestopics 004.jpg
    136.9 KB · Views: 223
  • morerestopics 002.jpg
    morerestopics 002.jpg
    139.6 KB · Views: 172
Last edited:

broncorick

Sr. Member
Joined
Oct 16, 2004
Messages
967
I concur on the taillight panels, they do suck. Mine have me at a stop right now debating whether to find an original quarter assembly and that is probably whai I will do. I guess the compound bends for that piece make it difficult to reproduce, but some one would sell a bunch of them if they could duplicate it, as this is probably the poorest reprocuced part right now.
 
OP
OP
sellitall

sellitall

Bronco Guru
Joined
Jul 30, 2002
Messages
1,444
Loc.
Malvern, Pennsylva
broncorick said:
I concur on the taillight panels, they do suck. Mine have me at a stop right now debating whether to find an original quarter assembly and that is probably whai I will do. I guess the compound bends for that piece make it difficult to reproduce, but some one would sell a bunch of them if they could duplicate it, as this is probably the poorest reprocuced part right now.


The salesman over at JBG told me that it was produced overaseas awhile ago using an OEM one that James Duff supplied them. I guess they didn't care too much for the small details such as tabs to mount your taillights in???? To me they are just a patch panel (not even a good one for that matter.)
 

Triggerman

Full Member
Joined
Oct 18, 2005
Messages
203
Loc.
Henderson TN
Ive got one of those Speedblasters but have had it on the shelf for a while becsuse I cant get it to work right. When I pull the trigger the air pressurizes the media res. and blows media out of the vent holes near the cap. No the ceramic nozzle is not stoped up. As soon as you let off the trigger a little media will fall out of the nozzle (?) Maybe Im using the wrong media, I have tried 2 different sizes of sand and on size of beads (cant remember the exact sizes). What suggestions could you offer. I appreciate it.
 
OP
OP
sellitall

sellitall

Bronco Guru
Joined
Jul 30, 2002
Messages
1,444
Loc.
Malvern, Pennsylva
Triggerman said:
Ive got one of those Speedblasters but have had it on the shelf for a while becsuse I cant get it to work right. When I pull the trigger the air pressurizes the media res. and blows media out of the vent holes near the cap. No the ceramic nozzle is not stoped up. As soon as you let off the trigger a little media will fall out of the nozzle (?) Maybe Im using the wrong media, I have tried 2 different sizes of sand and on size of beads (cant remember the exact sizes). What suggestions could you offer. I appreciate it.

Did you try using another valve that connects to your airhose? I have the schematics to the gun at my shop. I can take a pic of it tomorrow and post it up. Maybe something's lodged in it. It's odd though how it still lets sand fall through the front. It must be an air flow problem. The sand I use is 00n silica sand. It's $9 for a 100lb bag. You can get it at any stone/mason supply store as well as Home Depot. It can't be any heavier than 14 grit.
 
OP
OP
sellitall

sellitall

Bronco Guru
Joined
Jul 30, 2002
Messages
1,444
Loc.
Malvern, Pennsylva
Got some more work done today. Thank God we slowed down at the shop!! Too bad I'll be working on it in humid ass weather. Anyway, I got the motor out, and started ripping the rest of the pass. side sheetmetal off. I am so sick of drilling out spotwelds!!! I'm going to cheat on the bottom sections of the striker posts. Other than where I cut the rot out, they are in good shape. One less piece of aftermarket sheetmetal I'll have to buy. The good thing is I salvaged a piece of the OEM rocker to make the 1/4 lip/patch panel. Leave nothing to waste.
 

Attachments

  • motorout 043.jpg
    motorout 043.jpg
    149.1 KB · Views: 364
  • motorout 041.jpg
    motorout 041.jpg
    139.3 KB · Views: 374
  • motorout 036.jpg
    motorout 036.jpg
    157.6 KB · Views: 419
  • motorout 035.jpg
    motorout 035.jpg
    146.4 KB · Views: 434
  • motorout 031.jpg
    motorout 031.jpg
    140.1 KB · Views: 187
  • motorout 026.jpg
    motorout 026.jpg
    155.6 KB · Views: 231
  • motorout 030.jpg
    motorout 030.jpg
    156.9 KB · Views: 263
OP
OP
sellitall

sellitall

Bronco Guru
Joined
Jul 30, 2002
Messages
1,444
Loc.
Malvern, Pennsylva
Well, I got most of the sheetmetal at least lined up on the passanger side except for the rocker and right side upper cowl panel. They're in the mail as I type. I fit the door on, and I'm pretty happy with the line. It doesn't shut as good as I would like yet, but I'm almost positive it's because the door post isn't fully welded in place (I only have it tacked at the top) and the rocker isn't installed. The floor is all welded in except for the rear and so is the inner rocker. I got my 39" post to post, as well as all the other vital measurements within spec. The kick panel dropped down on me right before I took this pic because one of the lower clamps gave out. Once I get the rockers, I should be ready to button it down. I'll keep the pics coming.
 

Attachments

  • 77restoagain 003.jpg
    77restoagain 003.jpg
    136.4 KB · Views: 432
  • 77restoagain 005.jpg
    77restoagain 005.jpg
    138.5 KB · Views: 340
  • 77restoagain 002.jpg
    77restoagain 002.jpg
    131.1 KB · Views: 209
  • 77restoagain 001.jpg
    77restoagain 001.jpg
    136.1 KB · Views: 375
OP
OP
sellitall

sellitall

Bronco Guru
Joined
Jul 30, 2002
Messages
1,444
Loc.
Malvern, Pennsylva
I am jumping back and forth now, but I'm still making progress. The rear expansion filler panel went on easy, and my door is opening/closing 100%. The rocker is tacked on now, but I have to trim the patch panel I made for the rear striker post. It's not letting the bottom edge of the rocker meet the inner rocker where I drilled to spot weld it. It's an easy fix. There will obviously be more pics to come.
 

Attachments

  • 77sheetmetalpics 002.jpg
    77sheetmetalpics 002.jpg
    114.3 KB · Views: 316
  • 77sheetmetalpics 003.jpg
    77sheetmetalpics 003.jpg
    124.5 KB · Views: 333
  • 77sheetmetalpics 006.jpg
    77sheetmetalpics 006.jpg
    137.9 KB · Views: 218
  • 77sheetmetalpics 007.jpg
    77sheetmetalpics 007.jpg
    135.7 KB · Views: 277
Top