• Just a reminder that you won't be able to start new posts or reply to existings posts in the Archive forum.

    This is where all the old posts go so they can still be used for reference and searched.
  • Welcome to ClassicBroncos! - You are currently viewing the forums as a GUEST. To take advantage of all the site features, please take a moment to register. It's fast, simple and absolutely free. So please join our community today!
    If you have problems registering or can't log into your account, please contact Admin.

My build with Kentrol glass tub and fenders---UPDATE-Summer 2014

OP
OP
B

bknbronco

Bronco Guru
Joined
Jan 17, 2011
Messages
4,378
Loc.
North Metro, MN
Been in the garage "broncoing" all week again. Filed off the arms on the turn signal canceling arms. Its a fine line between not enough and too far. The roll pins would push to hard and cause the blinker lever to go to the other side rather than shutting off. http://www.stratadrome.com/bronco/steering.htm

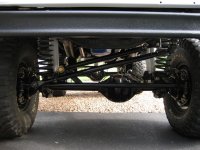
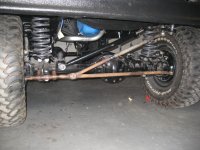
Mounted the dual doetsch DT3000 shocks all around (3403's in the front and 3368's in the rear). Also installed my 10deg shims in the rear axle. While i was back there i took a few minutes to hook up the e-brake cables to the drums (someday soon i will hook up the front cable and the brackets and lever).

Later that evening i got bored and made a glovebox from cardboard and covered it in black duct tape.

The next day i spent some time aligning the doors and shimming the body mounts. I also dropped off my windshield pattern.

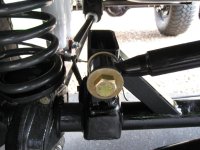
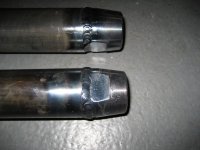
Yesterday i picked up my glass i had cut for the windshield and primed it and urethaned it in the frame. http://classicbroncos.com/forums/showthread.php?t=205788 I also got my DOM tubes back from the machine shop. My friend cut the tubes to length and added a weld bevel. He also cut a wrench slot in the weld in inserts.

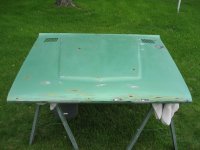
Today i preped the hood for paint, as well as a bunch of other pieces for the tailgate, and the hood latches and such. I finally got my inserts welded in the DOM for the tie rod and drag link, and preped them and the TRE for paint.

Tomarrow looks like ill prep the grill, and tailgate again. Run to the store for some paint supplies, and make sure im ready to shoot sealer.
 

Attachments

  • IMG_1838.jpg
    IMG_1838.jpg
    84.4 KB · Views: 127
  • IMG_1839.jpg
    IMG_1839.jpg
    101.9 KB · Views: 115
  • IMG_1841.jpg
    IMG_1841.jpg
    57 KB · Views: 109
  • IMG_1846.jpg
    IMG_1846.jpg
    97.1 KB · Views: 122
  • IMG_1853.jpg
    IMG_1853.jpg
    100.9 KB · Views: 107
  • IMG_1856.jpg
    IMG_1856.jpg
    83 KB · Views: 118
  • IMG_1881.jpg
    IMG_1881.jpg
    91.2 KB · Views: 104
Last edited:
OP
OP
B

bknbronco

Bronco Guru
Joined
Jan 17, 2011
Messages
4,378
Loc.
North Metro, MN
Got the hood, grill, and tailgate sealed and painted finally. The cottonwoods just started dumping there crap all over so im glad to be done with painting. (sucks painting in the backyard with all the bugs and stuff blowing around!) The underside of the hood i painted black and the rest of the parts got shot white. The FORD letters i got from broncoitis turned out sweet!! Also got the windshield frame mounted as well as the wiper arms. Reamed out the pitman arm and both knuckles and got the tie rod and drag link mounted. Next will be making a small trac bar riser bracket.
 

Attachments

  • IMG_1873.jpg
    IMG_1873.jpg
    74.3 KB · Views: 107
  • IMG_1863.jpg
    IMG_1863.jpg
    67.7 KB · Views: 105
  • IMG_1862.jpg
    IMG_1862.jpg
    123 KB · Views: 90
  • IMG_1860.jpg
    IMG_1860.jpg
    71.1 KB · Views: 100
  • IMG_1858.jpg
    IMG_1858.jpg
    69.5 KB · Views: 94
  • IMG_1883.jpg
    IMG_1883.jpg
    134.2 KB · Views: 129
Last edited:
OP
OP
B

bknbronco

Bronco Guru
Joined
Jan 17, 2011
Messages
4,378
Loc.
North Metro, MN
Finally got the trac bar riser made. Nothing fancy, but its just a dana 30. When i install my 44 ill make something a little prettyer. (Pics show the stock angles with 5.5" lilft, then the angles with cheby TRO, then TRO with tracbar riser) Also today i picked up 3 mirrors from walmart and bolted them to the windshield frame. Bronco is pretty much complete for "phase 1". Oh and i got a radio installed, complete with XM!:p
 

Attachments

  • IMG_1893.jpg
    IMG_1893.jpg
    121.1 KB · Views: 101
  • IMG_1883.jpg
    IMG_1883.jpg
    134.2 KB · Views: 103
  • IMG_1689.jpg
    IMG_1689.jpg
    115.3 KB · Views: 105
  • IMG_1892.jpg
    IMG_1892.jpg
    89.1 KB · Views: 118
  • IMG_1895.jpg
    IMG_1895.jpg
    79.8 KB · Views: 99
  • IMG_1896.jpg
    IMG_1896.jpg
    114.5 KB · Views: 123
OP
OP
B

bknbronco

Bronco Guru
Joined
Jan 17, 2011
Messages
4,378
Loc.
North Metro, MN
PHASE 1 COMPLETE!! Got 250 miles on it. Hopefully next time i update this i have alot more miles.

Phase 2 will be a full roll cage, softop, rear bench, and shoulder belts all around.
 

Attachments

  • IMG_1882.jpg
    IMG_1882.jpg
    134.4 KB · Views: 125
  • IMG_1880.jpg
    IMG_1880.jpg
    116.1 KB · Views: 126
  • IMG_1879.jpg
    IMG_1879.jpg
    132.7 KB · Views: 134
OP
OP
B

bknbronco

Bronco Guru
Joined
Jan 17, 2011
Messages
4,378
Loc.
North Metro, MN
Got tired of the exhaust stench so i had a tailpipe bend for 18 bucks. No more stink! Also took the door window frames off to see what it looks like. Up to 400 miles!
 

Attachments

  • IMG_1898.jpg
    IMG_1898.jpg
    103.7 KB · Views: 100
  • IMG_1899.jpg
    IMG_1899.jpg
    111.1 KB · Views: 115

Stutsmo

Contributor
Bronco Guru
Joined
Jan 24, 2009
Messages
2,549
I think the Bronco looks pretty cool! taking the window frames off makes it look good but I would be afraid the windshield would rattle around so bad you couldnt see what was in the rear view clearly.......

Your not waisting any time when it comes to putting miles on it LOL!
 
OP
OP
B

bknbronco

Bronco Guru
Joined
Jan 17, 2011
Messages
4,378
Loc.
North Metro, MN
actually the frame is really solid. It isnt any more solid with the frames on because the frame dont even hit the door frames. So having it like that really ant any different.

And your milage joke was funny:D 400 miles ant crap. Wish i had someware to go so i could get more on it. Its hard to get the miles to add up just driving around the neighborhood. I take it everyware i go, but i dont go anyware!%)
 

captbo

Full Member
Joined
Jan 28, 2010
Messages
183
Loc.
Southern Maryland
Man great stuff I have to get a move on,, where did you buy the brake line clips that are fastened to the chassis or did you make them ?

Thanks Bo
 
OP
OP
B

bknbronco

Bronco Guru
Joined
Jan 17, 2011
Messages
4,378
Loc.
North Metro, MN
nice popcorn referal. Them clips are from wild horses and there the only clean ones i have found like that. Stainless. The black plastic ones on the wiring loom and from pepboys. The SS clips come in a small size for break lines, and a big size for the fuel line. Or you can get a clip with both sizes in one.
 

captbo

Full Member
Joined
Jan 28, 2010
Messages
183
Loc.
Southern Maryland
Thank you! as far as Popcorn goes I am sad he took his life and I see many more "crimenal going un prosicuted for a lot worse!m what he did was survival, vs amassing a ton of weatlh, I know this because I have first hand family knowlege as to what my grandfather had to do to feed his kids in 1927. May God grant them both rest !
 
OP
OP
B

bknbronco

Bronco Guru
Joined
Jan 17, 2011
Messages
4,378
Loc.
North Metro, MN
Got the ebrake finally mounted as well as the fuse block. Changed oil after 500 miles. got 700 on it now!
 

Attachments

  • IMG_1909.jpg
    IMG_1909.jpg
    75.9 KB · Views: 117
  • IMG_1908.jpg
    IMG_1908.jpg
    110.9 KB · Views: 137
  • IMG_1913.jpg
    IMG_1913.jpg
    68.3 KB · Views: 155
  • IMG_1916.jpg
    IMG_1916.jpg
    149.9 KB · Views: 159

half cab

Contributor
Guru Bronco
Joined
Dec 8, 2010
Messages
16,306
Hey buck...how do you get your foot up there to dim the lights....;);D
 

zeus

New Member
Joined
Aug 25, 2012
Messages
1
rapor x application to glass

I have a Kentrol body I bought about 15yrs ago and it has been outside for years and now sitting on the bronco. I wanted to put something on the bottom for sound deadening and cleaning. other than sanding with 80 grit on the bottom was there another step like paint before applying Rator x? I was concerned with bonding and reaction to the galss. Any other helful tips on this project would be greatly appreciated. Thanks
 
OP
OP
B

bknbronco

Bronco Guru
Joined
Jan 17, 2011
Messages
4,378
Loc.
North Metro, MN
Added a quart of oil and didnt put the plug wires back where they were and melted the #5 wire. DOHHHHH! Taped it up and added some clips and zip ties to keep everything in place and off the exhaust manifolds.

Also got a overflow/washer bottle from the wrecking yard from a 92 F150.

Up to 1700 miles!

A few weeks ago i blasted and painted a 44 and a BB 9". Sourced some parts for a ford disk conversion from a 79 F150. Also picked up a power steering box from another 79 F150. Blasted and painted all that stuff also.
 

Attachments

  • IMG_1976.jpg
    IMG_1976.jpg
    49.6 KB · Views: 92
  • IMG_1975.jpg
    IMG_1975.jpg
    122 KB · Views: 82
  • IMG_1974.jpg
    IMG_1974.jpg
    144.1 KB · Views: 85

half cab

Contributor
Guru Bronco
Joined
Dec 8, 2010
Messages
16,306
Looking good man and I think you've done a top shelf job.
 
OP
OP
B

bknbronco

Bronco Guru
Joined
Jan 17, 2011
Messages
4,378
Loc.
North Metro, MN
Ya not bad for a out of work carpenter huh? My bronco is the only thing i own of any value! Next in line to that is my fish house. You really should see my ice fishing house!
 

Attachments

  • IMG_0781.jpg
    IMG_0781.jpg
    95.2 KB · Views: 115
  • IMG_0778.jpg
    IMG_0778.jpg
    88.5 KB · Views: 116
  • IMG_0860.jpg
    IMG_0860.jpg
    53.8 KB · Views: 124
  • IMG_1715.jpg
    IMG_1715.jpg
    116.4 KB · Views: 124
  • IMG_1752 - Copy.jpg
    IMG_1752 - Copy.jpg
    128.1 KB · Views: 128
  • IMG_0863.jpg
    IMG_0863.jpg
    107.6 KB · Views: 123
  • IMG_0837.jpg
    IMG_0837.jpg
    50.7 KB · Views: 111
  • newyears09-7.JPG
    newyears09-7.JPG
    14.7 KB · Views: 100
Last edited:
Top