• Just a reminder that you won't be able to start new posts or reply to existings posts in the Archive forum.

    This is where all the old posts go so they can still be used for reference and searched.
  • Welcome to ClassicBroncos! - You are currently viewing the forums as a GUEST. To take advantage of all the site features, please take a moment to register. It's fast, simple and absolutely free. So please join our community today!
    If you have problems registering or can't log into your account, please contact Admin.

My First Bronco Build

ChappDogg

New Member
Joined
Apr 7, 2005
Messages
40
Loc.
Fargo for now
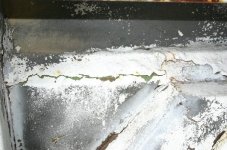
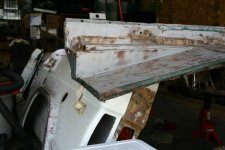
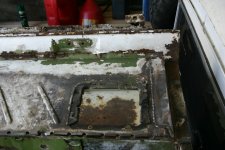
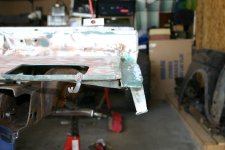
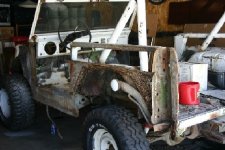
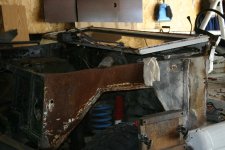
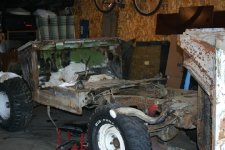
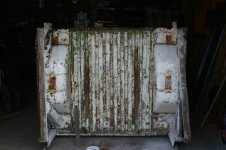
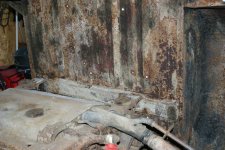
Well here are some pictures of my first Bronco build. It is a rusty Steed, But hopefully I'll be able to return it to its glory. I have received my last replacement parts. So it's off to the sandblaster. I will wire brush the frame and than POR15 it; since everyone seems to think it's the best, I'll try it. Then it will be peicing back the body. Wish me luck! If anyone has front clip measurements please send them my way. The only original body part I'm keeping is the firewall. Everything else is new or good used parts. I'll have more pictures later.

Chappdogg
 

Attachments

  • IMG_0420.JPG
    IMG_0420.JPG
    112.7 KB · Views: 141
  • IMG_0423.JPG
    IMG_0423.JPG
    114.4 KB · Views: 84
  • IMG_0458.JPG
    IMG_0458.JPG
    150 KB · Views: 92
  • IMG_0459.JPG
    IMG_0459.JPG
    119.7 KB · Views: 82
  • IMG_0460.JPG
    IMG_0460.JPG
    151.1 KB · Views: 70

2badrotties

Just a Bronco guy !
Joined
Sep 10, 2002
Messages
6,854
Loc.
Niskayuna N.Y.
Looks as if you are going to have plenty to keep you busy for a while. Check out my thread and you may find something useful.

http://www.classicbroncos.com/forums/showthread.php?t=57719&highlight=bronco+project+starting

The front sheetmetal isn't too bad to do but it all depends on how good your aftermarket parts come through. If you hold a tape measure over that lip on top of the front edge of cowl and measure straight out to the back side of the radiator support it is going to be just about 34 inches on the button. If you measure from the rear fender bolt hole across to the hood bumper on the front of the other side it will get you centered BUT you can pretty much look at the space you have between your lower radiator mounts and the frame and get it pretty even. Good luck with you project, keep us posted as you go along. :)
 
OP
OP
ChappDogg

ChappDogg

New Member
Joined
Apr 7, 2005
Messages
40
Loc.
Fargo for now
Thanks for the info

Your thread will surely be a life saver. Thanks again for the measurements they will help out. I will keep everyone updated as I go.
 

NicksTrix

Bronco Guru
Joined
Aug 1, 2001
Messages
6,389
man you've got a lot of work ahead of you. take your time and do it right. congrats on keeping one alive rather than being recycled.
 
OP
OP
ChappDogg

ChappDogg

New Member
Joined
Apr 7, 2005
Messages
40
Loc.
Fargo for now
Some Rusty Pictures

A few rusty pictures
 

Attachments

  • Picture 456.jpg
    Picture 456.jpg
    19.8 KB · Views: 45
  • Picture 447.jpg
    Picture 447.jpg
    26.9 KB · Views: 23
  • PICT0056.JPG
    PICT0056.JPG
    63.3 KB · Views: 26
  • IMG_0377.JPG
    IMG_0377.JPG
    123.1 KB · Views: 28
  • IMG_0376.JPG
    IMG_0376.JPG
    155.5 KB · Views: 26
  • IMG_0375.JPG
    IMG_0375.JPG
    134.9 KB · Views: 36
  • P1010019.JPG
    P1010019.JPG
    129.1 KB · Views: 33
  • IMG_0371.JPG
    IMG_0371.JPG
    121.8 KB · Views: 40

4xfloored

Bronco Guru
Joined
Jun 24, 2004
Messages
1,043
Loc.
San Bernardino
good luck with your project :) hope you can wheel it sooner than later....make sure you post pics as you progress...
 
OP
OP
ChappDogg

ChappDogg

New Member
Joined
Apr 7, 2005
Messages
40
Loc.
Fargo for now
Start with the cowl assy.

I will start with the cowl assemble, here are a few pictures of what I have to work with. The first is of the old and than the replacement. I'll have to do minor repair to the replacement.
 

Attachments

  • IMG_0525.JPG
    IMG_0525.JPG
    115.4 KB · Views: 45
  • P1010004.JPG
    P1010004.JPG
    144.7 KB · Views: 40
  • aIm001768.jpg
    aIm001768.jpg
    64.9 KB · Views: 33
  • IMG_0520.JPG
    IMG_0520.JPG
    134.7 KB · Views: 32
  • IMG_0519.JPG
    IMG_0519.JPG
    152.2 KB · Views: 42
  • IMG_0526.JPG
    IMG_0526.JPG
    103.5 KB · Views: 38

crawln68

Bronco Guru
Joined
Oct 8, 2004
Messages
3,045
Your cowl work is looking good. The best advice that I can give you is, just take your time! Don't get in a hurry and everything will come out great. Until a couple of weeks ago, when I started on my cowl replacement, I had never even touched any sheet metal work. I just took my time and worked my way through it. Most of it is pretty self explanatory once you get in there and start working. It looks like you are well on your way and doing a fine job. Good luck and have fun. :cool:
 
Top