• Welcome to ClassicBroncos! - You are currently viewing the forums as a GUEST. To take advantage of all the site features, please take a moment to register. It's fast, simple and absolutely free. So please join our community today!
    If you have problems registering or can't log into your account, please contact Admin.

New drivetrain build thread; 351W firewall clearance w/ various motor mounts

mattt

Bronco Guru
Joined
Sep 23, 2006
Messages
3,810
What is the minimum firewall clearance I should have on the driver's side?

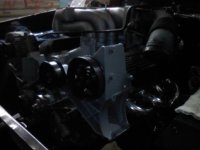
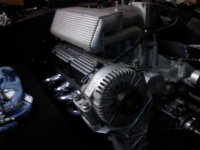
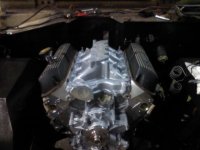
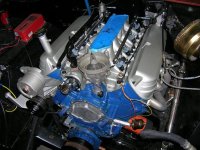
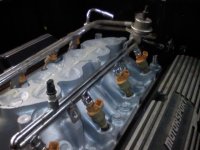
I dropped the new 351W/AOD in yesterday and I'm looking at ~3/16" clearance from the drivers side head/valve cover to the firewall. I'm using WestCoast Broncos, Wild Horses Extreme motor mounts. No body lift but fresh body mount bushings. Prior to installing the motor mounts, I measured them vs. a stock type motor mount and it appears they are 3/8" higher than stock. I measured them because I had heard varying numbers in how much they raise the engine over stock. I'm thinking a stock type motor mount will improve the clearance at the firewall.....but I don't think it will be 3/8" for 3/8" improvement at the firewall......right?

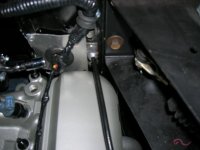
Not only is the engine close to the firewall, it also looks like it will conflict with the wiring harness plugs coming from behind the fuse box thru the firewall right at the valve cover. Anyone else been down this road already and had to move these?


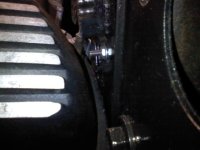
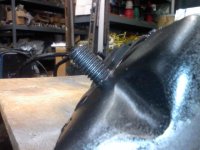
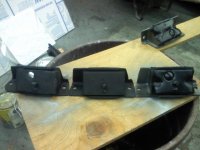
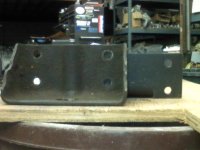
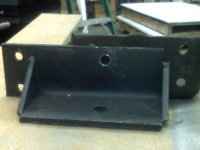
For the drivetrain end, I've got Tom's modified cross member. The frame brackets that came with the crossmember seem to have some forward/back rake to them that I don't remember the stock ones having.
 

Attachments

  • 0320102008.jpg
    0320102008.jpg
    51.7 KB · Views: 155
Last edited:

70EB

Bronco Guru
Joined
Aug 31, 2003
Messages
1,621
Loc.
Gig Harbor
Mine is tight enough that I "clearanced" the firewall a little with a BFH. It is close enough to make valve cover changes interesting. You can add a spacer to the trans mount to tilt the engine forward a little to gain a little clearance. Impact on this is less space between fan and radiator.

I have stock replacement engine mounts and 1" body lift. I am using the Painless harness so avoided the plug issue but as you can see, space is crowded.
 

Attachments

  • Lower Finished.JPG
    Lower Finished.JPG
    79.1 KB · Views: 163
  • Tight VC clearance.JPG
    Tight VC clearance.JPG
    38.5 KB · Views: 187
OP
OP
M

mattt

Bronco Guru
Joined
Sep 23, 2006
Messages
3,810
Thanks for the reply. I might try spacing up the rear crossmember mount a tad. I'm also thinking I'm going to have to change to standard engine mounts and not use the Extreme engine mounts. Really I started this thread to see if anyone else put this combo together and made it all work together well.

With the Painless harness where does the wiring for the lights and engine pass thru into the engine compartment? I'm assuming you mean the Painless body harness, and not the Painless EFI harness. I mention that because the plugs I'm having issues with are for headlights, turn signals, and basic engine wiring(oil pressure, water temp, etc)

I suppose I could just throw a 1" body lift on there.....I've never been a fan of body lifts so I'm trying to not bother with one.

On BC Broncos site here http://www.bcbroncos.com/fuelefi.html it says.......C: Ford truck Lightning (GT40) 351W/5.8L (1993-1996) This manifold combo will fit under the stock hood but is hard to find and expensive due to the fact that they are Ford high performance parts.

Has anyone made this fit under a stock hood? By my measuring tape.....I don't see that statement being true, but perhaps I don't have the right combo of parts to make it fit under a stock hood. Both Chuck and Jason have mentioned a short motor mount from a late 70's van in the past, but I've never found one that fits the bill and that will work on the Bronco.
 

JWMcCrary

Contributor
Bronco Guru
Joined
Oct 14, 2004
Messages
5,001
It helped when I added body lift to mine. When I first installed the 351w I had to trim the lip of the valve cover to get the bolt holes to line up on the drivers side, I had just enough clearance to where it wasn't touching.
 
OP
OP
M

mattt

Bronco Guru
Joined
Sep 23, 2006
Messages
3,810
It helped when I added body lift to mine. When I first installed the 351w I had to trim the lip of the valve cover to get the bolt holes to line up on the drivers side, I had just enough clearance to where it wasn't touching.

How much body lift improved the clearance on your end? I'm trying to minimize the amount of body lift I use....hope none.
 

JWMcCrary

Contributor
Bronco Guru
Joined
Oct 14, 2004
Messages
5,001
How much body lift improved the clearance on your end? I'm trying to minimize the amount of body lift I use....hope none.

1 inch body lift makes changing a valve cover gasket a lot less painful, lol. When I moved up to 37" tires I added another inch of body lift, 2 inches total, and now it has ample clearance.
 
OP
OP
M

mattt

Bronco Guru
Joined
Sep 23, 2006
Messages
3,810
I had a chance to snap some pics of the different motor mounts I ran across during my search for lower motor mounts. I initially installed WCB, WH Extreme motor mounts, but that lead to a drivers side head waaay too close to the firewall and causing conflicts with wiring harness plugs, throttle cable, & valve cover.

Since I'm trying to stay away from a body lift, I went on the hunt for stock type motor mounts. What I found at local auto parts stores is that not all motor mounts(or auto parts for that matter) are created equal. After hitting multiple stores, I ended up with 3 distinct motor mounts that are all supposedly the same part and part #....but they're not! What I found is it depends upon where the motor mount was manufactured. These are all "Anchor Brand" motor mounts. I have a made in USA set, made in China set, & made in India set.

In the pics below you can see the differences. In the first pic, the one on the left is from China, the middle one is India, and the one on the right is USA made. The China one looks like ok quality, has a rivet to hold it together, but is TALLER than the other two. The height difference can be seen in pic 2....it is farthest from the camera in the lineup. The China one is basically the same height as the WCB/WH motor mount.
The India one(middle of the pic) is a definite no go in my opinion. It has no rivet to hold it together, and it looks to be poorer quality than the other two.
The USA made one is on the right. It has an exposed additional metal plate that sandwiches the rubber with the mount bracket, has the safety rivet to hold it together and overall looks like the best mfg. I installed these on the Bronco and the clearance improvement is substantial vs. the Extreme engine mounts. I just hope these hold up well since I don't think I'll be able to get another set in the future.
I found that when hitting the various parts stores that the USA made ones are older, and the India ones are the newest version available. I also found a set that was made in Korea....it looked like the China made one. The USA ones had a lot of dust on the box, so I think they'd been sitting on the shelf for a few years....which probably means no longer available in the future.

The other pics show the difference in clearance at the firewall with the head, valve cover, wire harness plugs, etc with the stock type motor mount vs. the Extreme motor mount.

Now that the motor mount issue is behind me, I have a whole 'nother round of issues to contend with.......

1. Modifying, bending the fuel rail return line away from the firewall without ruining it
2. Valve cover to upper intake clearance at the PCV fitting and oil cap filler tube. Without an intake spacer, the fitting off the bottom of the upper intake hits the valve covers and the upper intake hits the oil cap fill tube.

Anyone been thru these issues? I'm all ears on suggestions how to work around these problem areas.
 

Attachments

  • 0408102122.jpg
    0408102122.jpg
    58.4 KB · Views: 114
  • 0325102047a.jpg
    0325102047a.jpg
    50.9 KB · Views: 108
  • 0325102039.jpg
    0325102039.jpg
    63 KB · Views: 116
  • 0413102140a.jpg
    0413102140a.jpg
    45.8 KB · Views: 124
  • 0325102038.jpg
    0325102038.jpg
    47.4 KB · Views: 123
  • 0413102003.jpg
    0413102003.jpg
    66.8 KB · Views: 122
  • 0413102004a.jpg
    0413102004a.jpg
    59.8 KB · Views: 173
OP
OP
M

mattt

Bronco Guru
Joined
Sep 23, 2006
Messages
3,810
On the tranny cross member end, my suspicions were correct about the Tom's AOD crossmember frame brackets being different height than stock frame crossmember brackets.
In the pics, it shows a stock frame bracket up against the Tom's AOD frame bracket. It shows the bolt holes are ~1/2" lower which tilts the engine and trans down/back at the crossmember. The more it tilts/drops there...the closer the engine gets to the firewall. I pulled a tape measure with the Tom's bracket installed in the Bronco to verify what I saw, and the tape measure confirms what the picture shows....the Tom's frame brackets drop everything ~1/2".

So, for that reason I'm leaning towards just modifying my stock crossmember and brackets for AOD use.

When modifying the stock crossmember, I get the notch part in the crossmember itself...easy peazy.

However, how has anyone else moved or extended the stock frame brackets back to correct location?

I suppose I could just move the frame brackets back and re-drill the frame for the new location, but I'd be losing the backing inside the frame for these bolts where they thread in.
I searched here and found one pic where the guy just re-drilled the mounting hole in the crossmember and left the frame brackets in their stock position. Seems like the crossmember should sit centered on the frame brackets though. I was reading the Advance Adapters instructions on this adapter recently, and they claim the AOD/Dana 20 combo is only ~3/8" longer than a stock Bronco V8 drivetrain, so the only mod is to the crossmember itself. Uh....mine is about 1.5" longer than the C4/Dana 20 that came out of the Bronco. Surprising that AA could be that far out in left field...

Again...I'm all ears from the experts here. Thanks.
 

Attachments

  • 0413102142.jpg
    0413102142.jpg
    59.5 KB · Views: 68
  • 0413102141.jpg
    0413102141.jpg
    52.5 KB · Views: 66

Viperwolf1

Contributor
electron whisperer
Joined
Aug 23, 2007
Messages
24,337
Don't worry about the L-brackets. Shim the crossmember up 1/2".
 
OP
OP
M

mattt

Bronco Guru
Joined
Sep 23, 2006
Messages
3,810
Another one.....I've sorta jimmy'd the Thorley long tubes that were on the 302 into position as best I could. Not too sure they are going to work on the 351. Has anyone successfully ran Thorley long tube headers with a 351 on stock motor mounts and no body lift? Or...do I need to start saving the pocket change and then some for a new set of BC headers.......
 

Viperwolf1

Contributor
electron whisperer
Joined
Aug 23, 2007
Messages
24,337
Oh almost forgot. You're going to need at least 1" of body lift to fit under a stock hood with that engine/intake if you use stock mounts.
 
OP
OP
M

mattt

Bronco Guru
Joined
Sep 23, 2006
Messages
3,810
Oh almost forgot. You're going to need at least 1" of body lift to fit under a stock hood with that engine/intake if you use stock mounts.

I'm surprised to hear this will fit under a stock hood with even a 1" body lift. I haven't stuck a stock hood on it, but it seems like it's sitting high up above the cowl for a stock hood.
I currently have a fiberglass hood on it, but I'm thinking of running a Highlander 'glass hood in the end. I just hate to buy one and then it not fit. It would be nice to be able to test fit before laying out the coin.

What is the best way to bend fuel rail tubes without kinking or crushing them in the process?
 

70_Steve

Old Guy
Joined
Dec 13, 2002
Messages
8,317
I just hate to buy one and then it not fit. It would be nice to be able to test fit before laying out the coin.

What is the best way to bend fuel rail tubes without kinking or crushing them in the process?
I made some careful measurements to make sure the Explorer upper would fit under my raised cowl style 'glass hood, sitting on top of the GT40lower with a 1" spacer. No problem, as I measured 2-3" clearance from the middle of the manifold up to the hood. However, I forgot that I had an EGR spacer, throttle body and intake ducting coming off the side. Starting about at the throttle body, this did not fit past the edge of the raised cowl. :(:-[:mad: It did fit with a 3/8" spacer. :p

I actually used a tubing bender to form the bends around, and keep the tubing from kinking.
 
OP
OP
M

mattt

Bronco Guru
Joined
Sep 23, 2006
Messages
3,810
What you describe appears to be a problem with my existing 'glass hood. Height wise it fits, but width wise, it does not. I have the "Classic scoop hood" on there now. I'm shooting for the least amount of hood rise as possible which is why the Highlander appeals to me. I even wonder if a stock appearing 'glass hood has more inside clearance that a stock steel hood?

If I could get a tubing bender in where I need the tube bent that would work, but I need to bend the short tube coming off the regulator body block. That tube is about ~4" long. I'm thinking of looking for a hose or speed shop that can take the existing one out and braze a new one with the bend in it's place. However, I have no idea of anyone local that could work on fuel rails.
 

70_Steve

Old Guy
Joined
Dec 13, 2002
Messages
8,317
If I could get a tubing bender in where I need the tube bent that would work, but I need to bend the short tube coming off the regulator body block. That tube is about ~4" long. I'm thinking of looking for a hose or speed shop that can take the existing one out and braze a new one with the bend in it's place. However, I have no idea of anyone local that could work on fuel rails.
I didn't use all of the tubing bender (both halves) I have a bender similar to the one in the pic. It has a latch that keeps the tubing in place in the "mandrel?" and the "other lever thing" that forces the tubing around the mandrel. All I did was use the latch to hold the tubing in the mandrel, then just used my hands, fingers, whatever, to force the tubing around the mandrel, to keep it from kinking or colapsing.
 

Attachments

  • tubing bender.jpg
    tubing bender.jpg
    21.5 KB · Views: 26
OP
OP
M

mattt

Bronco Guru
Joined
Sep 23, 2006
Messages
3,810
Starting to come together now....stock motor mounts with a rivet holding them together, BC headers to ease installation and fit...and oh yeah they look great too! Started bolting on accessories now...lots more "details" to hear this thing fire off.

I'm guessing how to convert the stock wiring for the Explorer alternator is in the tech write up?

I'd also like to ditch my old starter and external(fender mounted) solenoid if possible. I have a stock Ford starter that came with the '94 Lightining engine that this build started as. I also have a '96 Explorer starter in the pile. They appear to be the same. Is there a write up how to clean up the wiring in the engine bay when using this small newer generation starter? Would the '94 or '96 be what I've read is a "gear reduction" starter?
 

Attachments

  • 0528102231.jpg
    0528102231.jpg
    41.8 KB · Views: 40
  • 0528102232.jpg
    0528102232.jpg
    47.2 KB · Views: 44

Viperwolf1

Contributor
electron whisperer
Joined
Aug 23, 2007
Messages
24,337
BCB has good instructions for the 3G. Just disregard the wht-blk wire for your 4G. http://www.bcbroncos.com/3G 3 wire with water mark.pdf

The explorer and lightning starters should be the same (both auto). F150 w/manual trans around that time had the manual version of that gear reduction starter. Easy way to tell the difference is to look at the pinion gear and see if it protrudes past where the mounting holes are. Manual starter pinion is recessed. You can eliminate the solenoid completely but I find it's a good place to attach high current accessories. Just run your positive battery cable down to the gr starter along with your start wire which goes to the tab terminal.
 
OP
OP
M

mattt

Bronco Guru
Joined
Sep 23, 2006
Messages
3,810
I did some searching and reading about the starter solenoid issue....I read a few posts that said to not eliminate the one on the fender because of a retracting issue with the starter pinion. Also mentioned heat on the starter mounted solenoid from the exhaust. Is it best to not eliminate the fender mounted one....other than for a high current power source for other accessories?

I know my old setup with the fender mounted solenoid/relay, and big starter had more than two wires. There was the large gauge cable from the battery to the solenoid/relay, then another from the solenoid/relay to the starter. In addition, I think there were two wires going to the posts on the solenoid/relay.

Which wire(color ID would be nice) do I need to pick up from the Bronco harness to go to the tab terminal on the new starter? What about the other wire that was on the post?
 

Viperwolf1

Contributor
electron whisperer
Joined
Aug 23, 2007
Messages
24,337
Red-blue is the start wire to go to the tab. The brown wire to the "I" terminal (old solenoid) can be eliminated. It isn't needed with EFI.

You probably have a large black-red wire (with fusible link) and maybe a couple more wires on the positive side of the solenoid. Those will need to go to a high current 12V source like the battery or a power distribution stud.

I haven't had any issues with heat and the gear reduction starter. Most people that keep the old solenoid seem to bypass it when running the heavy cable down to it so it really isn't any different than not having it. I'm actually using the old solenoid and have the high current cables routed through it. It works just like it's supposed to for me.
 
Top