• Just a reminder that you won't be able to start new posts or reply to existings posts in the Archive forum.

    This is where all the old posts go so they can still be used for reference and searched.
  • Welcome to ClassicBroncos! - You are currently viewing the forums as a GUEST. To take advantage of all the site features, please take a moment to register. It's fast, simple and absolutely free. So please join our community today!
    If you have problems registering or can't log into your account, please contact Admin.

'Ol Blue Build, no longer topless

OP
OP
boonz28

boonz28

Contributor
Sr. Member
Joined
Aug 28, 2011
Messages
477
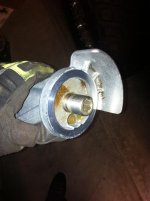
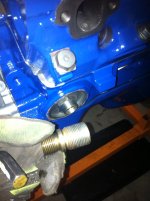
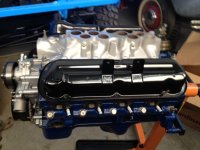
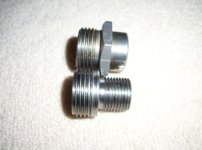
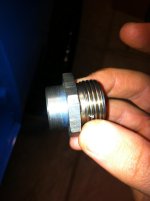
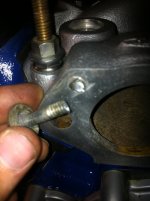
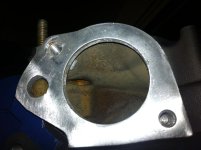
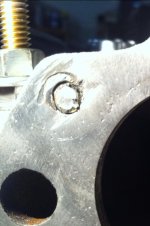
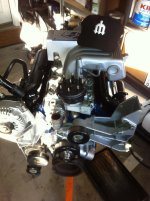
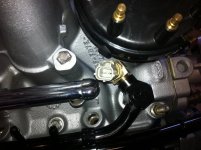
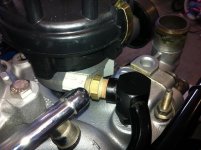
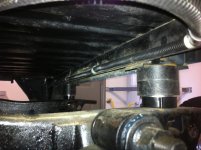
The explorer engine came with this long neck on it between the block and the oil filter. After talking with Tito i found out that the neck would hit the frame and that i needed to remove this threaded nipple and install it into the block so the oil filter can butt up against the block like most engines.
 

Attachments

  • iphone 088.jpg
    iphone 088.jpg
    70.1 KB · Views: 88
  • iphone 089.jpg
    iphone 089.jpg
    81.5 KB · Views: 90
  • iphone 091.jpg
    iphone 091.jpg
    72.9 KB · Views: 89

Tito

CB Fire Starter
Joined
Jan 29, 2006
Messages
10,781
Loc.
Bakersfield, CA
I think you have to take the piece out of the block still and then put the one you screwed in in. Find a filter to test and you'll see. Oh and I've got a fan here for you.
 
OP
OP
boonz28

boonz28

Contributor
Sr. Member
Joined
Aug 28, 2011
Messages
477
I got home pretty late last night but i still managed to get the rocker arms and lower intake bolted down before bed.
 

Attachments

  • bronco engine 049.jpg
    bronco engine 049.jpg
    112.6 KB · Views: 68
  • bronco engine 053.jpg
    bronco engine 053.jpg
    133 KB · Views: 66
  • bronco engine 055.jpg
    bronco engine 055.jpg
    78.8 KB · Views: 63
  • bronco engine 056.jpg
    bronco engine 056.jpg
    95.9 KB · Views: 61
OP
OP
boonz28

boonz28

Contributor
Sr. Member
Joined
Aug 28, 2011
Messages
477
Last night i installed the water pump, harmonic balancer, and some spark plugs.
 

Attachments

  • bronco 107.JPG
    bronco 107.JPG
    156.1 KB · Views: 67
  • bronco 104.jpg
    bronco 104.jpg
    83.7 KB · Views: 68
  • bronco 106.jpg
    bronco 106.jpg
    77.6 KB · Views: 61
  • bronco 059.jpg
    bronco 059.jpg
    70.9 KB · Views: 65
OP
OP
boonz28

boonz28

Contributor
Sr. Member
Joined
Aug 28, 2011
Messages
477
I was also trying to figure out this oil filter adapter situation last night. With the adapter set up the way i had it there was about a 1/4" gap between the oil filter and the block (picture 1)
I pulled the adapter out of the block (picture 2) and was hoping the the one from the oil cooler would screw right into the block (picture 3) but it wasn't big enough.
After a quick phone conversation with Tito he told me that i needed to get an entirely different adapter like the one on the botom of picture 4. I'm going to try to get by the Ford dealership on my way home and hopefully pick one up.
 

Attachments

  • oil filter adapter.JPG
    oil filter adapter.JPG
    42.1 KB · Views: 61
  • bronco 048.jpg
    bronco 048.jpg
    80.5 KB · Views: 48
  • bronco 049.jpg
    bronco 049.jpg
    46.5 KB · Views: 48
  • bronco 047.jpg
    bronco 047.jpg
    66 KB · Views: 44
OP
OP
boonz28

boonz28

Contributor
Sr. Member
Joined
Aug 28, 2011
Messages
477
I was also going to install the thermostat and housing last night but when i was torqing down the bolts i sheered one off in the manifold. :mad:
If you look closely at the 2nd picture you'll see that the PO must have broken off a bolt in the manifold and then drilled/ tapped a new (smaller hole) which is why the bolt broke off on me.
Looks like i have some drilling and tapping to do tonight.%)
 

Attachments

  • bronco 051.jpg
    bronco 051.jpg
    71.4 KB · Views: 68
  • bronco 053.jpg
    bronco 053.jpg
    85.8 KB · Views: 79

Crawdad

Bronco Guru
Joined
Feb 16, 2011
Messages
3,635
Drill and extract it out the smaller bolt. The other bolt is seized up in there by corrosion. A pencil grinder, lots of bits, and a lot of patience may get the other bolt out from the inside out, leave the original threads alone! If it was a cast iron manifold I'd say add some heat to it, but looks like u have aluminum. If you jack up threads then get out as much of the old bolt out and re-tap to the next larger bolt. if its a 3/8" then go to 7/16".
I had to do stuff like that on AGE equipment with 1/4" stainless steel bolts. It takes a long time but u will be happy you did. Be sure to add antisieze thread compound when steel meets aluminum.
 
OP
OP
boonz28

boonz28

Contributor
Sr. Member
Joined
Aug 28, 2011
Messages
477
Thanks Georgelas and Crawdad,
I ended up getting both bolts out last night but the origional threads were already toast from the fix that the PO did so i went up to the next size and tapped some new threads. I'll definitely be adding some antisieze because i don't want to do this fix again some day with the engine in the bronco.

The new threads look a little funky in the pictures but its just the lighting.
 

Attachments

  • bronco 284.jpg
    bronco 284.jpg
    84.3 KB · Views: 76
  • bronco 287.jpg
    bronco 287.jpg
    83.8 KB · Views: 78
  • bronco 283.jpg
    bronco 283.jpg
    107.2 KB · Views: 71
  • bronco 286.jpg
    bronco 286.jpg
    57.8 KB · Views: 69
OP
OP
boonz28

boonz28

Contributor
Sr. Member
Joined
Aug 28, 2011
Messages
477
Yeah once my cordless drill charged. lol %)

Thanks again for all your help Josh!

I took the o-rings and filters out of those injectors last night and they're soaking in chemtool right now.
 
OP
OP
boonz28

boonz28

Contributor
Sr. Member
Joined
Aug 28, 2011
Messages
477
Progress Update!

Installed the thermostat housing (after drilling and tapping), installed the serpentine brackets and alternator, then i painted the the recessed parts of the upper manifold plate blue and gave it a brushed finish.
 

Attachments

  • bronco 056 (2).jpg
    bronco 056 (2).jpg
    97.1 KB · Views: 104
  • bronco 051 (2).jpg
    bronco 051 (2).jpg
    94.9 KB · Views: 104
OP
OP
boonz28

boonz28

Contributor
Sr. Member
Joined
Aug 28, 2011
Messages
477
This pic is for you Tito! ;D

Missing something?
 

Attachments

  • bronco 057 (2).jpg
    bronco 057 (2).jpg
    94.8 KB · Views: 114

Tito

CB Fire Starter
Joined
Jan 29, 2006
Messages
10,781
Loc.
Bakersfield, CA
Yeah, I was wondering where that went, not in the habit of wearing hats right now so I didnt notice till we were down the road.


Looking great!
 
OP
OP
boonz28

boonz28

Contributor
Sr. Member
Joined
Aug 28, 2011
Messages
477
When converting the 5.0 over to the OBDI system you have to ditch the coil packs and use a TFI Distributor. This creates a problem with the ECT (Engine Coolant Temp) sensor though because it's pointed directly into the side of the distributor (pic 1). So a good solution is to get a 3/8" MIP - 3/8" FIP 90* fitting (you can get this at LOWES) to relocate the sensor (pics 2 & 3). It clears the distributor and fuel rail perfectly.
 

Attachments

  • bronco 061.jpg
    bronco 061.jpg
    112.6 KB · Views: 83
  • bronco 062.jpg
    bronco 062.jpg
    93.7 KB · Views: 85
  • bronco 066.jpg
    bronco 066.jpg
    99.8 KB · Views: 84
Last edited:
OP
OP
boonz28

boonz28

Contributor
Sr. Member
Joined
Aug 28, 2011
Messages
477
Thanks Josh,
I didn't see your hat until the next day so i figured i'd just let you see it on here. lol
 
OP
OP
boonz28

boonz28

Contributor
Sr. Member
Joined
Aug 28, 2011
Messages
477
Wiring

I've also been making some progress on the Centech harness.

I started by laying out the harness and running it through the firewall. Then mounting the fuse panel in the glovebox. This is a lot easier with the glovebox out of the dash.
 

Attachments

  • iphone 585.jpg
    iphone 585.jpg
    115 KB · Views: 60
  • iphone 586.jpg
    iphone 586.jpg
    101.8 KB · Views: 60
  • iphone 592.jpg
    iphone 592.jpg
    129.1 KB · Views: 66
  • iphone 593.jpg
    iphone 593.jpg
    96.1 KB · Views: 60
OP
OP
boonz28

boonz28

Contributor
Sr. Member
Joined
Aug 28, 2011
Messages
477
I forgot to take pictures of most of the dash harness install but it would've been hard to get a camera in there anyways.

I got it all hooked up though without any real problems.

Today i hooked up the gauge cluster, reinstalled it in the dash, and mounted the dash back on the firewall!!!

It's nice to see the interior coming back together.
 

Attachments

  • bronco 077.jpg
    bronco 077.jpg
    118.9 KB · Views: 70
  • bronco 078.jpg
    bronco 078.jpg
    49.3 KB · Views: 72
OP
OP
boonz28

boonz28

Contributor
Sr. Member
Joined
Aug 28, 2011
Messages
477
Luckily when i removed my old harness i kept it instead of throwing it away.

There are a few things you'll need from the old harness. If you're keeping your stock ignition switch you'll need a piece off the harness and the Centech harness also doesn't come with a brake warning light so you'll have to cut that off the origional harness and solder it into the new one.
 
OP
OP
boonz28

boonz28

Contributor
Sr. Member
Joined
Aug 28, 2011
Messages
477
Next was to run the rear harness.

Its really simple. Just run it to the back of the truck and secure it.

Here's how i secured it in the back:
 

Attachments

  • bronco 050 (2).jpg
    bronco 050 (2).jpg
    88.7 KB · Views: 101
Last edited:
Top