• Welcome to ClassicBroncos! - You are currently viewing the forums as a GUEST. To take advantage of all the site features, please take a moment to register. It's fast, simple and absolutely free. So please join our community today!
    If you have problems registering or can't log into your account, please contact Admin.

Ongoing Floor Pan Question (check latest)

ObscureMachine

Seatbelt Orifice Officer
Joined
Sep 28, 2006
Messages
3,998
Loc.
World Headquarters
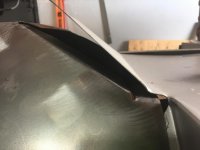
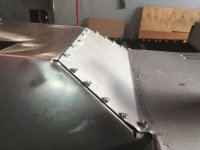
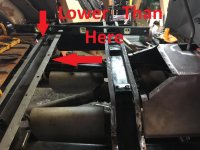
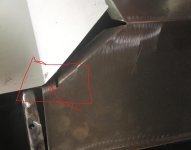
So does Tab A fit into Slot B? Does this tab go OVER the platform "flap", or under it? If it goes under it, what do I do with the gap between the tab and the tunnel. The platform is as forward as it will go, and the tunnel is as far back as it will go.

Thanks for help!

Extra Thanks for Pictures!

- Jim
 

Attachments

  • seat platform.jpg
    seat platform.jpg
    61.1 KB · Views: 170
Last edited:

bronkenn

Contributor
Bronco Guy
Joined
Apr 27, 2017
Messages
2,683
Loc.
Southeast Ohio
It will get welded on top. Might have to put a new break in the pan. I have had to flatten and rebend a few of the floor pieces. Ken
 
OP
OP
ObscureMachine

ObscureMachine

Seatbelt Orifice Officer
Joined
Sep 28, 2006
Messages
3,998
Loc.
World Headquarters
It will get welded on top. Might have to put a new break in the pan. I have had to flatten and rebend a few of the floor pieces. Ken

What exactly do you mean "a new break in the pan?" What would that look like / where would it go? Sorry, I'm new to metal work! ;D - Jim
 

bronkenn

Contributor
Bronco Guy
Joined
Apr 27, 2017
Messages
2,683
Loc.
Southeast Ohio
The break line you have circled in your pic. If that doesn't line up right you may have to flatten that back out and rebend it to fit. Hopefully it will fit like it is with a bit of persuasion. Ken
 
OP
OP
ObscureMachine

ObscureMachine

Seatbelt Orifice Officer
Joined
Sep 28, 2006
Messages
3,998
Loc.
World Headquarters
Another angle. I don't know how to move those closer together.

"If that doesn't line up right you may have to flatten that back out and rebend it to fit." I have no idea how to do that without it looking like 7 monkeys put it together.
 

Attachments

  • IMG-4387.jpg
    IMG-4387.jpg
    72 KB · Views: 140

bronkenn

Contributor
Bronco Guy
Joined
Apr 27, 2017
Messages
2,683
Loc.
Southeast Ohio
Looks like the break line needs to be about 1/2 inch forward. Need to flatten it out an clamp a piece of metal to it and rebend it.Ken
 

Rustytruck

Bronco Guru
Joined
Feb 24, 2002
Messages
10,875
Is it possible to push it forward from below with a piece of 2x4 and a jack against the cross member. Either that or move the transmission tunnel back. Especially both sides come up short from closing up on the weld flange.
 

rydog1130

Sponsor/Vendor
Bronco Guru
Joined
Jun 19, 2014
Messages
4,110
you could knotch it a bit so it slides forward more, it looks like you have 3/8"-1/2" of play
 
OP
OP
ObscureMachine

ObscureMachine

Seatbelt Orifice Officer
Joined
Sep 28, 2006
Messages
3,998
Loc.
World Headquarters
Well, this is where it ended up. But I'm not terribly pleased with the gap between the tunnel and the firewall. But I can work that out.
 

Attachments

  • IMG-4389.jpg
    IMG-4389.jpg
    65.8 KB · Views: 154

luke

Sr. Member
Joined
Sep 19, 2010
Messages
370
Do you have a body hammer and dolly kit? Harbor freight has one for like $25 and it is nice. Helps a lot for persuading and getting into corners to bend them down.
 

luke

Sr. Member
Joined
Sep 19, 2010
Messages
370
Looks like it will turn out great. Things that look not exact when you are nose to nose with it always look great when you step back for a couple minutes and take it in as a whole. Don't stop!
 
OP
OP
ObscureMachine

ObscureMachine

Seatbelt Orifice Officer
Joined
Sep 28, 2006
Messages
3,998
Loc.
World Headquarters
Do you have a body hammer and dolly kit? Harbor freight has one for like $25 and it is nice. Helps a lot for persuading and getting into corners to bend them down.

Yep! It was this main connection between the tunnel cover and the seat platform that had me worried. Everything else I feel good about. Well, except for the rotted rear door posts. But I have a guy for that!

Thanks! - Jim
 

Rustytruck

Bronco Guru
Joined
Feb 24, 2002
Messages
10,875
Beginning to look like you are the guy for the rear posts. its just more of the same. Brace the old. Cut out rust and weld in new stuff.
 
OP
OP
ObscureMachine

ObscureMachine

Seatbelt Orifice Officer
Joined
Sep 28, 2006
Messages
3,998
Loc.
World Headquarters
When I lay the pass rear floor pan in, and the upper seat platform is in it's correct place, the floor pan edge (towards the front) completely covers the brace, so there's not space for the front floor pan to attach. If I cut the the edge of the rear floor pan, it won't line up correctly towards the middle (by the tunnel).

How are the floor pans supposed to line up and attach to each other or the brace?
 

Attachments

  • IMG-4402.jpg
    IMG-4402.jpg
    66.4 KB · Views: 114

rydog1130

Sponsor/Vendor
Bronco Guru
Joined
Jun 19, 2014
Messages
4,110
When I lay the pass rear floor pan in, and the upper seat platform is in it's correct place, the floor pan edge (towards the front) completely covers the brace, so there's not space for the front floor pan to attach. If I cut the the edge of the rear floor pan, it won't line up correctly towards the middle (by the tunnel).

How are the floor pans supposed to line up and attach to each other or the brace?

Can you provide another picture but not so close up? it's hard to picture what youre describing
 
OP
OP
ObscureMachine

ObscureMachine

Seatbelt Orifice Officer
Joined
Sep 28, 2006
Messages
3,998
Loc.
World Headquarters
Well, all the sheet metal I was putting in was wonky, so I took the floor pieces back out and started looking at the crossrails.

(see pics) The 'front of seat" platform support is much lower than the one behind it (bed support), and slightly lower than the front floor pan support. It was sagging before and I worked on it, but it's way off and the floor isn't close to level (higher back to front).

Another Question: on the front of bed support (see Pic), the support itself is not level front to back. The rear side of the support (bed side) is lower than the front platform side. Is the front of bed support supposed to be level, or the bed side lower so it can fit under the platform side?

Has my 2" BL jacked everything up?
 

Attachments

  • IMG_4403.jpg
    IMG_4403.jpg
    87.6 KB · Views: 109
  • IMG_4404.jpg
    IMG_4404.jpg
    53.8 KB · Views: 88
  • IMG_4405.jpg
    IMG_4405.jpg
    92.8 KB · Views: 109

rydog1130

Sponsor/Vendor
Bronco Guru
Joined
Jun 19, 2014
Messages
4,110
Well, all the sheet metal I was putting in was wonky, so I took the floor pieces back out and started looking at the crossrails.

(see pics) The 'front of seat" platform support is much lower than the one behind it (bed support), and slightly lower than the front floor pan support. It was sagging before and I worked on it, but it's way off and the floor isn't close to level (higher back to front).

Another Question: on the front of bed support (see Pic), the support itself is not level front to back. The rear side of the support (bed side) is lower than the front platform side. Is the front of bed support supposed to be level, or the bed side lower so it can fit under the platform side?

Has my 2" BL jacked everything up?

hmmm, is your frame level? if so maybe the lip on your flange is bent to far down? Do you have new body mount bushings? If not your old ones could be worn
 
Top