• Welcome to ClassicBroncos! - You are currently viewing the forums as a GUEST. To take advantage of all the site features, please take a moment to register. It's fast, simple and absolutely free. So please join our community today!
    If you have problems registering or can't log into your account, please contact Admin.

Paint time!!

Torkman66

Contributor
Sr. Member
Joined
Apr 3, 2022
Messages
459
Long road to get to this point. So much rust, welding, blocking, epoxy, high build work!!! But she is flat as glass. Sealer, base, clear. New booth worked amazing. Best part is the walls roll up and store on the ceiling. Tomorrow doors, fenders, and top of hood.
IMG_8315.jpeg
IMG_8314.jpeg
IMG_8313.jpeg
 

Attachments

  • IMG_8312.jpeg
    IMG_8312.jpeg
    156.3 KB · Views: 48
OP
OP
Torkman66

Torkman66

Contributor
Sr. Member
Joined
Apr 3, 2022
Messages
459
Fumes were very low inside and out. I have filters for incoming air (5 on back wall) and two large ones on exhaust fans. I live on a little over an acre so lots of separation from neighbors :) The clear made a bit more of a fog. Could use an additional exhaust fan for the clear but it never got too bad. Pause a minute between parts and it cleared nicely. The pics are after the first coat of clear. By the fourth and final coat, all the texture was nearly gone and it ran out very flat. Most of these parts will not require any cut and buff. Did get two small little runs on the final wet coat of clear, but they will nib out and buff fine. So far so good. I actually went to the paint store asking for Boxwood Green, but there are two variants. One is considerably darker than the other. I had him spray a test card and then opted for a shade lighter. The top will be standard white but instead of the Wimbledon which has a bit of a yellow tint in it, I went with a brighter white. Hoping the white pops well. All the white will be single stage (grill, dash, top).
 
OP
OP
Torkman66

Torkman66

Contributor
Sr. Member
Joined
Apr 3, 2022
Messages
459
Thanks. The booth turned out very nice. It is made out of 6 mil 10x100" plastic. Pretty heavy duty. I laid it out the length of a wall (16 foot) and then used 1x2" pine 8 feet long (used two end to end) and rolled them a full turn and stapled plastic to the 1x2s. I then screwed the 1x2s to the ceiling. Where the plastic hits the ground at bottom of wall, I used two more 1x2" board all along the bottom to weight down the plastic and hold the wall to the ground. The whole thing is 16x16. In the back I used 5- 20" square filters velcroid to the plastic. On opposite front wall I used two cardboard boxes with fans mounted and taped in one end and a filter in the other. Each corner has an extra foot of plastic which I roll together and use hand clamps at top, middle, and bottom. Totally sealed. When you turn on the fans the walls all suck in a bit. You can adjust the internal pressure by what you set the fans to. What's really nice is that when done, the walls roll up and are held on the ceiling with small straps. I clean the floor good, wet down the floor, and then turn on the fans for a couple hours before painting to clear the air of any dust. I had almost no pollution in the paint. If interested, I can post a separate thread with greater details and pictures for how to build it.
 
OP
OP
Torkman66

Torkman66

Contributor
Sr. Member
Joined
Apr 3, 2022
Messages
459
After epoxy on sand blasted metal I used UP2253 for high build. I like it because it is a DTM primer (High Build, Surfacer, Sealer) depending on how much it is reduced. Day of paint I use the same product 4:1:2 as a sealer. I STRONGLY advice a wet-on-wet sealer coat. It provides a uniform surface, covers any bare metal burn throughs, and lays super flat. Put it on just like it is the first coat of base, flash 15 min or so, and then apply the base. I used Sunfire PRO Premium for the base and Finish 1 (FC720) clear. I really like both the bc and the cc products. I bought 1 gallon of Ready to Shoot base and then went and got 1 additional ready to shoot quart. I ended up reshooting the grill and still have the four fender flares to do. But when done I'll likely have that extra quart left over. Just didn't want to run short. Nothing worse than running out of base at the very end when you need one more coat. I bought 2 gallons of clear. You can easily do the entire bronco with 1 gallon of clear if your doing 2 coats. But I spray 2 or 3 coats, let it set a week, block it flat with 800-1000, and then reshoot another 3 coats. It looks amazing at that point but I then cut 1000, 1500, 2000 then buff first with wool pad and then three step foam on a rotary. I have enough clear on it to really flatten it when cutting and don't worry too much about burn throughs, although I still avoid edges. The top is done last and it will be sprayed in SS white with 2 coats of clear for light cut and buff. Overall all the paint (epoxy, primers, bc/cc) cost about 2k.

The plastic is just 3m pre-taped masking roles. easy to use to mask off large areas.

Geez, just typing that made me tired remembering all the work it takes to prep the body for paint. Don't even ask how many hours of metal cutting, welding, blocking...but hey, its a hobby for this old retired guy and I love doing it. Once its done it will hopefully go to a new owner who appreciates it and I'll find another one to do :)
 

markw

Contributor
Bronco Guru
Joined
Sep 10, 2009
Messages
2,053
Wow! Having done a couple of Bronco paint jobs at home I can appreciate the work you put into that! Beautiful!!!


Sent from my iPhone using Tapatalk
 

Ether

Contributor
Jr. Member
Joined
Jan 30, 2007
Messages
333
Loc.
Tulsa
The seams and transitions are a thing of beauty! Wonderful details.


Sent from my iPhone using Tapatalk
 
OP
OP
Torkman66

Torkman66

Contributor
Sr. Member
Joined
Apr 3, 2022
Messages
459
Thanks for all the compliments. I depend on this forum to figure a lot of it out! Truly a team effort.
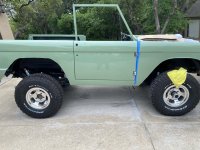
Pass door installed. Spent so much time in body work getting gaps perfect. They look good painted. Cut and buff hood next. I put plenty of clear on it during flow coat so should be easy to cut with 1500 then buff with m105 then M205. Here is the passenger side.
IMG_8364.jpeg
IMG_8365.jpeg
 
Top