• Just a reminder that you won't be able to start new posts or reply to existings posts in the Archive forum.

    This is where all the old posts go so they can still be used for reference and searched.
  • Welcome to ClassicBroncos! - You are currently viewing the forums as a GUEST. To take advantage of all the site features, please take a moment to register. It's fast, simple and absolutely free. So please join our community today!
    If you have problems registering or can't log into your account, please contact Admin.

Project Swiss Cheese

OP
OP
hawkgt

hawkgt

Full Member
Joined
Sep 22, 2003
Messages
202
Loc.
Leesburg, VA
Time flies...

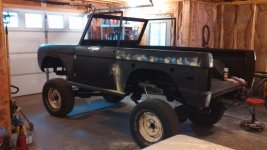
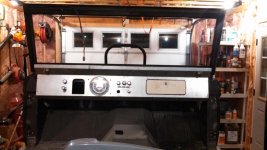
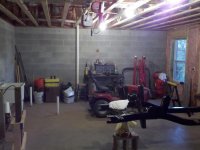
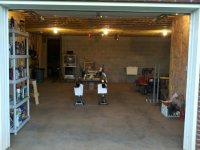
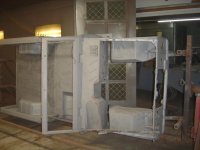
Wow, it's been over a year and a half since my last post and unfortunately there hadn't been that much progress, until now! So what have I been doing all this time? Soon after my last post we decided to sell our house, which meant the garage needed to be cleaned up and out. Everything was put in storage or sent to a nice dry barn. Part of the deciding point on the new home was building a walkout basement with over a third of it dedicated to a workshop/garage! (link to bog of new house) We have now been in the new house since spring and the bronco has a new home. Wow, what a difference to have a dedicated work space that is separate from the main garage. Plus, being in a basement it stayed reasonably cool during the hottest days of the summer. Still lots to do to finish out the bronco garage but one step at a time. Here is a picture back during construction before insulation and wiring were completed. I'l try and get an current picture this weekend.
 

Attachments

  • IMG_1621.jpg
    IMG_1621.jpg
    106 KB · Views: 50
OP
OP
hawkgt

hawkgt

Full Member
Joined
Sep 22, 2003
Messages
202
Loc.
Leesburg, VA
Since I moved the Bronco to the new house I have completely disassembled the rolling chassis. The motor, tranny, transfer case, axles, and suspension were all removed and placed in storage in other rooms in the basement. I first took a putty knife to the frame to start scraping the dirt, grease, paint, ...? that had accumulated over the last 30+ years. Next came a pressure washing with straight industrial degreaser, which still didn't cut a lot of the remaining grease. Next I scoped out several sandblasting shops to gets quotes on stripping the frame. Most of the quotes came in around $300, however Automotive Sandblasting and Restoration in Friendsville, TN stood out based on experience, professionalism, and use of multiple media types. Being the tight wad DIY kind of guy I am, I first tried to blast it myself with a 100lb diy sandblaster from TSC. I like the design but the sand I got from Home Depot had a lot of moisture in it. Once I got the sand in it I can't get it to operate because it only clogs. After three weeks of trying to dry the sand while inside the tank, because I can't even dump the sand back out, I finally gave up and visited ASR. I did make use of this time to order up a Stone Crusher radius arm extension which I welded up. I also removed the radius arm brackets and moved them to their new position and indexed them to the lifted suspension height. Today I took the frame to ASR along with some of the chassis components. I planned on painting the frame later in the day with POR-15 and POR Chassis Black, however the guys at ASR told me that they have had nothing but horrible experience with the product. I have done enough research to know that most of the bad experiences are due to not following the directions. They pushed me towards getting the frame powder coated ($250) which they said could be done by a local shop the same day. I have always liked the idea of powder coating but was reluctant due to the always possible future mod to the frame. I finally agreed to the powder coating due to having all the current welding on the frame done and they convinced me that I can always touch up welded or scuffed up areas with a high quality chassis black paint. I got the call around noon that the frame and components were complete and ready to go to powder coating. The guys at ABJ Custom Powder coating in Maryville, TN let me wait around the shop while they worked on the frame. The guy doing the paint work even blew powder in each hole in the frame and from each frame horn to coat the inside of the frame! I totally didn't expect this but makes me feel much better about going this route. I read a lot about the Defender 90 guys getting their frames hot dip galvanized as a means to coat the inside of the frame, but I just never was convinced with this approach. Three hours later and the frame was out of the oven and cool enough to load up for the ride home. The finish is smooth and the coverage is fantastic. The transmission cross member and brackets look like they are better than new!

All that said, I am psyched to have a nice place to finally work on the Bronco and to have all the rust and grease off the truck. I'm sure I will still find some rust hiding somewhere as I go, however that should be few and far between going forward. Enjoy the pics!
 

Attachments

  • 2010-09-18_09-16-11_977.jpg
    2010-09-18_09-16-11_977.jpg
    127.4 KB · Views: 82
  • 2010-09-18_09-16-27_320.jpg
    2010-09-18_09-16-27_320.jpg
    128.4 KB · Views: 81
  • 2010-10-01_12-45-38_998.jpg
    2010-10-01_12-45-38_998.jpg
    126 KB · Views: 89
  • 2010-10-01_12-46-09_349.jpg
    2010-10-01_12-46-09_349.jpg
    114.2 KB · Views: 79
  • 2010-10-01_14-40-14_247.jpg
    2010-10-01_14-40-14_247.jpg
    83.4 KB · Views: 84
OP
OP
hawkgt

hawkgt

Full Member
Joined
Sep 22, 2003
Messages
202
Loc.
Leesburg, VA
Here are a few more pictures of the frame
 

Attachments

  • 2010-10-01_19-17-03_811.jpg
    2010-10-01_19-17-03_811.jpg
    75.6 KB · Views: 63
  • 2010-10-01_19-14-36_0.jpg
    2010-10-01_19-14-36_0.jpg
    78.8 KB · Views: 64
  • 2010-10-01_19-14-02_514.jpg
    2010-10-01_19-14-02_514.jpg
    82.1 KB · Views: 73
  • 2010-10-01_19-43-26_155.jpg
    2010-10-01_19-43-26_155.jpg
    66.7 KB · Views: 75
  • 2010-10-01_19-42-48_994.jpg
    2010-10-01_19-42-48_994.jpg
    67.3 KB · Views: 70
  • 2010-10-01_19-13-25_578.jpg
    2010-10-01_19-13-25_578.jpg
    78 KB · Views: 70
OP
OP
hawkgt

hawkgt

Full Member
Joined
Sep 22, 2003
Messages
202
Loc.
Leesburg, VA
Several more years have passed and I have made slow progress. Since my last post we have gone from no children to three, all currently under the age of 20 months! Time to work on the bronco has become very scarce.

Once the frame came back from powder coating I rebuilt and reassembled the chassis. Front and rear axles had all new bearings, seals, and ball joints installed. The rear was upgraded to disc brakes using Caddy calipers, a weld on bracket, and Bronco front discs.

I also started searching for a new motor. I ran across a 92 351w at a salvage yard that was supposedly just rebuilt before the van was totaled. I took a chance and picked it since the freeze plugs looked new. Once I cleaned it up and disassembled it I found that it was .030 over and the cross hatch in the cylinders looked fresh.
 

Attachments

  • 2011-05-14_17-44-48_182.jpg
    2011-05-14_17-44-48_182.jpg
    90.1 KB · Views: 55
  • 2011-05-15_14-14-00_344.jpg
    2011-05-15_14-14-00_344.jpg
    77.2 KB · Views: 59
  • 2011-09-17_07-23-43_513.jpg
    2011-09-17_07-23-43_513.jpg
    69.8 KB · Views: 54
  • 2011-09-17_12-47-44_140.jpg
    2011-09-17_12-47-44_140.jpg
    65.1 KB · Views: 58
  • IMG_0097.jpg
    IMG_0097.jpg
    98.6 KB · Views: 54
  • IMG_0094.jpg
    IMG_0094.jpg
    77 KB · Views: 49
  • IMG_0070.jpg
    IMG_0070.jpg
    102.2 KB · Views: 47
Last edited:
OP
OP
hawkgt

hawkgt

Full Member
Joined
Sep 22, 2003
Messages
202
Loc.
Leesburg, VA
Next a few buddies came over and we took the body off the dolly and rejoined it to the frame. It had been a number of years since I had seen the two back together so it was good to finally get the space back that it took to store both separately.

I ordered the full exhaust from headers back from BC and painted the block. Before putting the body on I installed a Carter electric fuel pump with new stainless fuel and brake lines along the frame.
 

Attachments

  • 2012-02-27_21-07-02_432.jpg
    2012-02-27_21-07-02_432.jpg
    84.1 KB · Views: 48
  • 2012-02-27_21-06-26_276.jpg
    2012-02-27_21-06-26_276.jpg
    81.5 KB · Views: 50
  • IMG_20121111_153243_641.jpg
    IMG_20121111_153243_641.jpg
    75.9 KB · Views: 42
  • IMG_20121111_153253_496.jpg
    IMG_20121111_153253_496.jpg
    59.6 KB · Views: 46
Last edited:
OP
OP
hawkgt

hawkgt

Full Member
Joined
Sep 22, 2003
Messages
202
Loc.
Leesburg, VA
Next step was to build the roll cage. I purchased Procar Elite seats, a center console, rear flip forward bench, and new three point seat belts mounted to the cage. Since I took these pictures I added a rear seat platform to the cage.

I also cut out the rocker panels and welded in some rock skiis. I used 2/6 tube welded and braced to the the front and rear door posts.
 

Attachments

  • IMG_20121111_153139_835.jpg
    IMG_20121111_153139_835.jpg
    76 KB · Views: 46
  • IMG_0479.jpg
    IMG_0479.jpg
    110.5 KB · Views: 43
  • IMG_0477.jpg
    IMG_0477.jpg
    111.9 KB · Views: 45
  • IMG_20121111_153033_063.jpg
    IMG_20121111_153033_063.jpg
    68.4 KB · Views: 46
  • IMG_20121111_153120_728.jpg
    IMG_20121111_153120_728.jpg
    64 KB · Views: 41
OP
OP
hawkgt

hawkgt

Full Member
Joined
Sep 22, 2003
Messages
202
Loc.
Leesburg, VA
I picked up an Explorer Serpentine setup for the 351W. I wasn't sure this was really needed and hesitated spending the money since the van 351W already had a serpentine setup on it. I held up some of the brackets and measured to see how much shorter the Explorer setup really was.
 

Attachments

  • IMG_20121208_134835_434.jpg
    IMG_20121208_134835_434.jpg
    54.7 KB · Views: 26
  • IMG_20121208_134815_515.jpg
    IMG_20121208_134815_515.jpg
    53.7 KB · Views: 29
  • IMG_20121208_134851_028.jpg
    IMG_20121208_134851_028.jpg
    54.8 KB · Views: 28
OP
OP
hawkgt

hawkgt

Full Member
Joined
Sep 22, 2003
Messages
202
Loc.
Leesburg, VA
About two months ago a was finally ready to send the body off to be media blasted and primed. I used the same company (ASR Restorations in Friendsville TN) that did the frame as I was very happy with them and the price was right. I dropped it off on Friday and picked it up a week later. While it was on the rotisserie they shot the bottom with Raptor liner.
 

Attachments

  • IMG_20130120_122534_608.jpg
    IMG_20130120_122534_608.jpg
    98.2 KB · Views: 64
  • IMG_20130120_122447_764.jpg
    IMG_20130120_122447_764.jpg
    131.8 KB · Views: 48
  • IMG_20130111_120659_577.jpg
    IMG_20130111_120659_577.jpg
    138.5 KB · Views: 55
  • DSC01385.jpg
    DSC01385.jpg
    85.4 KB · Views: 66
  • DSC01376.jpg
    DSC01376.jpg
    79 KB · Views: 61

fatboy

Contributor
Glad to be here.
Joined
May 15, 2006
Messages
7,020
Loc.
New Hampshire
Looking good, glad to see you back on it. Slow and steady wins the race so good going. What rotors did you use on the rear 9" set up with the caddy calipers?
 

Hank_

Bronco Guru
Joined
May 9, 2010
Messages
1,915
What you have done looks great. Glad to see you getting some work done. Time to take a break from the baby making and finish the bronco.:)

Henry
 
OP
OP
hawkgt

hawkgt

Full Member
Joined
Sep 22, 2003
Messages
202
Loc.
Leesburg, VA
I guess it's time to update this thread with some of my continued slow yet steady work on the Bronco. First up was a little body work now that the truck is primed. It doesn't need anything significant but for a novice it has taken some time. I welded up all of the body line trim and there was some light damage where the spare tire carrier mounted and on the grill. I picked up some lift off door hinges so I had to test fit those as well.
 

Attachments

  • IMG_20130311_160750_977.jpg
    IMG_20130311_160750_977.jpg
    67.1 KB · Views: 56
  • IMG_20130311_160811_926.jpg
    IMG_20130311_160811_926.jpg
    65.3 KB · Views: 48
  • IMG_20130311_160820_062.jpg
    IMG_20130311_160820_062.jpg
    69.9 KB · Views: 45
OP
OP
hawkgt

hawkgt

Full Member
Joined
Sep 22, 2003
Messages
202
Loc.
Leesburg, VA
I have been waiting for YEARS to order a nice set of wheels for not just this Bronco, but my last one as well. I went ahead and ordered a set of 17" Walker Evans beadlocks and 35" BF Goodrich KM2 tires. I love the look of the 17" wheels with the 35" tires. I also went ahead and ordered up a American Auto Wire harness to start rewiring once the truck is painted.
 

Attachments

  • IMG_20130323_140433_046.jpg
    IMG_20130323_140433_046.jpg
    63 KB · Views: 62
  • IMG_20130914_203129_075.jpg
    IMG_20130914_203129_075.jpg
    70.8 KB · Views: 56
  • IMG_20130914_203119_445.jpg
    IMG_20130914_203119_445.jpg
    75.1 KB · Views: 58
OP
OP
hawkgt

hawkgt

Full Member
Joined
Sep 22, 2003
Messages
202
Loc.
Leesburg, VA
The last two weekends I have been laying out a new dash using a BC Broncos blank dash. Years ago I starting modding a factory dash to move the glovebox over but decided I would prefer a blank canvas. The gauge cluster is mounted on the right side of the steering wheel. Heater, fan, and ignition controls are centered. Headlight and wiper controls are left of the steering wheel like most modern vehicles. I ordered a set of MB Quart 6.5" components which will be mounted on the far right and left side. I want to maintain a classic look so the speakers will be mounted behind the dash and I am laying out built-in speaker grill. The glovebox is moved over to clear the roll cage and speaker.
 

Attachments

  • IMG_20130914_203042_523.jpg
    IMG_20130914_203042_523.jpg
    75.9 KB · Views: 59
  • IMG_20130914_224716_948.jpg
    IMG_20130914_224716_948.jpg
    49.8 KB · Views: 47
OP
OP
hawkgt

hawkgt

Full Member
Joined
Sep 22, 2003
Messages
202
Loc.
Leesburg, VA
Lots of progress since September. Took my girl to the body shop in January and they have been working on it on the side. I took the C4 to a tranny shop in January and pulled it apart and found a lot of damage. It was completely rebuilt. After much internal debate i broke down and ordered a new cam and installed it. The body was placed on a rotisserie for paint. After struggling with how to coat the roll cage I cheaped out and rattle can hammertoned it silver. I'm not totally happy with how it turned out. I took the opportunity to mount the engine, tranny, and transfer case. Finished the motor off with a Jet rebuilt quadrajet. This morning I stopped by the bodyshop and picked up the first painted pieces. It is 2014 sterling metallic gray. I am very happy with the color choice. The body was painted today. The owner said he would have the color matched raptor liner sprayed by mid week. I'm so excited I can't stand it. After 8 years its starting to come together!
5e3ahebu.jpg
6y4uduhe.jpg
ybuhyzu4.jpg
 

broncoitis

Bronco Guru
Joined
Jul 23, 2010
Messages
4,449
Great job with the buildup! Your patience is gonna pay off with a pretty sweet ride. Good job with the cage and the dash is lookin good as well. The wheels that you went with are Sick and I like them alot. Serious case of Jealousy! LOL!

Anyway, can't wait to see it when you get it back from paint. Gonna be NICE! Slow and steady will git'r'done!!!!!! ;D
 
OP
OP
hawkgt

hawkgt

Full Member
Joined
Sep 22, 2003
Messages
202
Loc.
Leesburg, VA
9uqu4yte.jpg
Motor,transmission, transfer case, and fuel system are assembled and heading back to the body shop to be mated with the painted body. The body interior and exterior were finished. They only have the tailgate, hood, and door insert left to finish this week. They said the would have the body on the frame by Wednesday so I can have it back for the long holiday weekend.
 
OP
OP
hawkgt

hawkgt

Full Member
Joined
Sep 22, 2003
Messages
202
Loc.
Leesburg, VA
Final assembly of my restored gauge cluster with voltmeter. I'm really happy with how it turned out!
zata6u2y.jpg
 

xfalcon

Sr. Member
Joined
Apr 13, 2013
Messages
452
how about an update?
saw in another thread that its finished?
lets see it:cool:
 
OP
OP
hawkgt

hawkgt

Full Member
Joined
Sep 22, 2003
Messages
202
Loc.
Leesburg, VA
I'm still finishing up on a number of loose ends, but I took her out on her maiden voyage this weekend. First REAL drive since I bought her 10 years ago. She developed a coolant leak at the thermostat housing, butthats an easy fix. The C4 was taking way to long to shift but I didn't have the vacuum line hooked up to the modulator (?) on the tail of the tranny. I have new plate style bumpers which I started painting but still have to finish. Trying to have everything sorted out by super celebration in April. uploadfromtaptalk1425897136611.jpg
 

Attachments

  • uploadfromtaptalk1425897163618.jpg
    uploadfromtaptalk1425897163618.jpg
    79.8 KB · Views: 37
  • uploadfromtaptalk1425897196794.jpg
    uploadfromtaptalk1425897196794.jpg
    95.6 KB · Views: 31
Top