• Welcome to ClassicBroncos! - You are currently viewing the forums as a GUEST. To take advantage of all the site features, please take a moment to register. It's fast, simple and absolutely free. So please join our community today!
    If you have problems registering or can't log into your account, please contact Admin.

Project "Tanner"

rheiser

Newbie
Joined
Jun 7, 2009
Messages
22
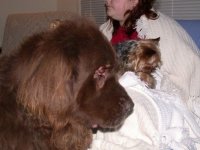
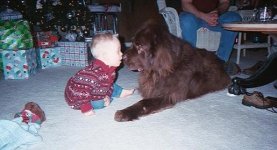
I bought my '69 in 1994 coincident with getting a brown Newfoundland puppy that I named "Tanner". It was really a rolling dog carrier, since I imagined that a 140 lb. dog would have trouble squeezing into my '93 RX-7 at the time. Hence the name of my project. He, of course, ended up riding in both vehicles. I'm sure my current dog will be fine with the project name, if he ever figures out how to read and finds this thread.

Back then, I remember being a mostly lurking member of the old Bronco mailing list, which I can't remember the name of. I recognize a few names from way back then on these forums. Was there also a Usenet newsgroup for Broncos? My memory's a little hazy on that one.

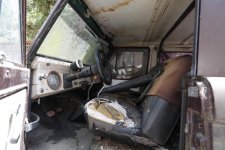
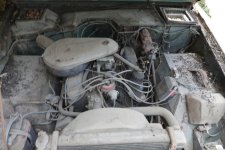
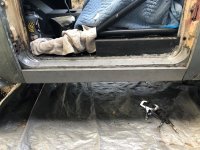
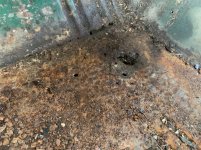
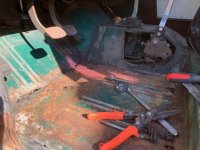
The latest registration tags are from 2003, which is a pretty accurate indication of how long it's been sitting in my backyard waiting for some attention. I'm pretty sure it still ran when I parked it. I remember doing a compression test at one point and not being overly happy about the numbers. This thread is an attempt to keep me accountable to the project now that my attention has turned to it. Let's hope it works.

A few facts about it:
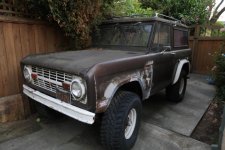
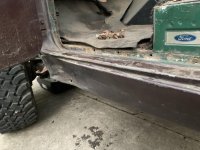
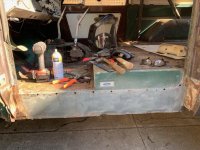
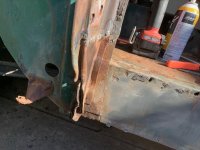
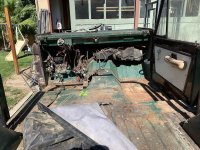
  • It's a 1969 model, with a 302. Originally painted Norway Green, it's now a faded root beer brown.
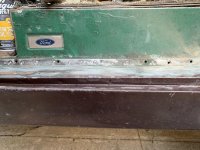
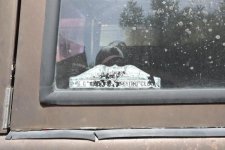
  • It's assembly plant was right here in San Jose, CA. I imagine it has spent its entire life here, but there is a window sticker for "Gottschalk Flight Center", which seems to be a small airport that existed in the Central Valley of California in the 60s and 70s. So, it did make it at least 90 miles east.
  • It retains the license plate frame that it had when I bought it. It's scratched up, but I can see that it was mostly line art, the only word being "Chuck's" at the bottom. So, I've always imagined the original owner was a pilot named Chuck.
  • The only other sticker is a Son Volt sticker I stuck on it after a concert sometime in the mid-90s.
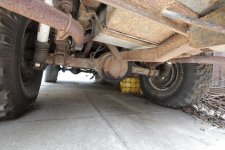
  • It's basically stock, except that it's been cut for fender flares (unfortunately), and has a 3" or 3.5" lift with some suspension modifications by Wild Horses that I had done back in the late 90s.

Anyway, that's a long enough introduction. I'll admit to having a tendency to get overly ambitious with projects like this, but it's been sitting for 16 years, so it's not like I have to get it finished tomorrow. I think I only had my first car (a 1969 Mustang Mach 1) for about 9 months before I pulled the engine and rebuilt it with a friend, who luckily had a little more experience with it than I did at the time. It ended up working out fine, so no worries on this one :).

I'm not completely sure which way I want to go with this right now, so I imagine I'll have a few questions to get that straight in my head here at the beginning.
 
OP
OP
R

rheiser

Newbie
Joined
Jun 7, 2009
Messages
22
I'll save this second message in case I want to edit it later and put in something like a project checklist, or something.
 
OP
OP
R

rheiser

Newbie
Joined
Jun 7, 2009
Messages
22
A few “before” pics to get things started.
 

Attachments

  • 59DC1655-BDC8-4E0B-AAF7-7E3574A9A324.jpg
    59DC1655-BDC8-4E0B-AAF7-7E3574A9A324.jpg
    94.6 KB · Views: 117
  • DAEF6B17-6A98-48A9-9242-2CF524BC6642.jpg
    DAEF6B17-6A98-48A9-9242-2CF524BC6642.jpg
    98.8 KB · Views: 93
  • 08E2E7CF-1FB2-4675-9DB8-6F72F04D517B.jpg
    08E2E7CF-1FB2-4675-9DB8-6F72F04D517B.jpg
    97 KB · Views: 97
  • 8812A227-0DD7-448E-A01A-2D6259EBD531.jpg
    8812A227-0DD7-448E-A01A-2D6259EBD531.jpg
    90.4 KB · Views: 92
  • 6B059B81-906F-430C-8700-908A2623D013.jpg
    6B059B81-906F-430C-8700-908A2623D013.jpg
    111.7 KB · Views: 98

LSUpete

Contributor
Bronco Guru
Joined
Jul 11, 2001
Messages
2,063
I'll be following the build. Do you have a budget or a point you want to get to?
 
OP
OP
R

rheiser

Newbie
Joined
Jun 7, 2009
Messages
22
Do you have a budget or a point you want to get to?

Right now, the point I want to get to is a little more clear. I'd like a reliable, nice-looking truck that I can haul the family around in, with the ability to explore some trails when desired.

I have a spreadsheet going for the project, but there are a bunch of things that are undecided. Some examples:

  • Engine - Wow, a Coyote swap is tempting, but right now I'm leaning toward rebuilding the current engine as a stroker, with an aftermarket fuel injection unit stuck on top (probably Edelbrock Pro Flo). I'm a little concerned about reliability, and whether that will be a factor, though.
  • Transmission - I'd like to swap out the 3-speed for a 5-speed. The idea of a granny low is appealing. I'm not sure what the current choices are though.I currently have NP435, NV4500 and AX15 jotted down in the spreadsheet.
  • Differentials - I'd like some kind of selectable lockers. The mechanical OX lockers seem like a solid choice, but I couldn't find them for a Ford 9". ARB lockers are a possibility, but I'm worried about the potential for more things to go wrong with the added compressor and wires and tubing. I sound like my grandpa complaining about power door locks.

In the end, I think I spitballed $20-30k depending upon how much I ended up having to get someone else to do, and how much I could reign myself in.
 

langester

Contributor
MASTER OF MADNESS
Joined
Mar 2, 2013
Messages
2,672
Welcome back! I look forward to watching the build progress.
Have a good one!
 

Justafordguy

Bronco Guru
Joined
Sep 26, 2009
Messages
6,253
Welcome back, sounds like you have a solid plan, can't wait to see your progress along the way.
 
OP
OP
R

rheiser

Newbie
Joined
Jun 7, 2009
Messages
22
The original Tanner
 

Attachments

  • 40B9606D-655A-4A32-A493-1CE7A4D47D42.jpeg
    40B9606D-655A-4A32-A493-1CE7A4D47D42.jpeg
    70.2 KB · Views: 58
  • 7AAE7A1A-9096-4309-8051-1E3D5344E116.jpeg
    7AAE7A1A-9096-4309-8051-1E3D5344E116.jpeg
    57.8 KB · Views: 56

sprdv1

Contributor
REBEL
Joined
Mar 8, 2007
Messages
81,964
Looks like a decent start.. Get to going and take it one step at a time...

Good luck
 
OP
OP
R

rheiser

Newbie
Joined
Jun 7, 2009
Messages
22
This weekend’s project is going to be repairing the crunched rocker panel. I’ve never replaced a body panel before, so it’ll be a learning experience.

I bought a set of spot weld cutters, which I’ll use once I take a flapper disc to the paint. The videos I’ve watched of people replacing panels usually centers around a bunch of rust. They usually cut up their new panel to fit a spot where a hunk of rusted metal used to be. I usually wonder why they don’t drill out the spot welds for the entire panel, then replace it with an entirely new panel. Any insights?
 

Attachments

  • 53DB2E28-DFCF-42F8-8A37-80A50121198C.jpg
    53DB2E28-DFCF-42F8-8A37-80A50121198C.jpg
    111.1 KB · Views: 46

mattyq17

Bronco Guru
Joined
Jul 11, 2007
Messages
1,600
The repo panels don't fit as well as the original that's why some people only cut out what is needed and patch it in(especially door posts). I had to replace the rocker panel on my 66 as it was rusted out. I bought the deluxe one from WH and still had to do some work on it to get it to fit right. It comes as one piece(top door sill and outer rocker) and I had to drill out the spot welds on it and reposition is as it wasn't welded together correctly to begin with.
 

Attachments

  • 4.16.19_Driver Rocker.jpg
    4.16.19_Driver Rocker.jpg
    133.8 KB · Views: 53
OP
OP
R

rheiser

Newbie
Joined
Jun 7, 2009
Messages
22
Day one working on the rocker panel, and I came away with a few lessons:

  • There are a lot of spot welds holding a rocker panel onto the body.
  • Cutting them out isn't as easy as you imagine in your head.
  • Make sure the spot weld cutter you buy is long enough for the spot welds you want to cut
  • Buy a panel seam splitter at the same time as you buy the spot weld cutter.
  • You need to take off the door to get to the last few spot welds
So, as it stands, I have about half of the spot welds cut. At least, I think most of them are cut. The spot weld cutter I bought is a little bit too short, so the drill arbor rides on the edge of the door sill. That means that the bottom of some of the welds that are low on the panel may not be cut all the way through.

I need to find someone to help get the door off so that I can get the last 4 closest to the front door pillar, and the 2 that attach it to the door pillar. Then I need to get to cutting all 20 of the welds on the bottom of the panel. I have a seam splitter on its way to me so I don't mess up the panels I want to keep.

Every once in awhile I took a break from drilling and did an easier item off the To Do list. The seats are out. The front rubber mat that I put in years ago is out. I wanted to get the seatbelts out so that I could remove the rest of the carpet, but that leads to a bonus lesson:

  • The Torx driver for the seatbelt bolts is not a T-55, even though the Internet might try to convince you it is. I need to go buy the right size tomorrow.
Unfortunately, after I took out the rubber mat in the front, I discovered some cancer in the driver side foot well behind the pedals at the panel seam. It looks like it was there before I bought the Bronco because someone sealed it up with a bunch of silicone. So there's another item on the list.

Tomorrow I'll get the rest of the welds cut, then wait for the seam splitter to get to me, unless I figure out something before then.

Also, I screwed up my password and can’t login with my main computer. Luckily my mobile devices are still logged in. If they get logged out, I’m screwed though :) I’ve got an email in to Jon, so hopefully he can help me out.
 

Attachments

  • 664B71EF-A7B0-4B1C-A1D4-DF7D38544645.jpg
    664B71EF-A7B0-4B1C-A1D4-DF7D38544645.jpg
    121.3 KB · Views: 41
  • C4226283-B707-41CE-8E17-BE08F9D6AD1E.jpg
    C4226283-B707-41CE-8E17-BE08F9D6AD1E.jpg
    129.1 KB · Views: 42
  • 547F1E59-4962-4731-A4D3-00EF97AF601D.jpg
    547F1E59-4962-4731-A4D3-00EF97AF601D.jpg
    191.5 KB · Views: 41

mattyq17

Bronco Guru
Joined
Jul 11, 2007
Messages
1,600
It looks like it worked out well for you. Had you done any body panels before?

I have done front floor pans before but no outside body panels. Searching on this site helped me a bunch. Just go slow, take lots of pictures and you will be fine. Finding all the spot welds can be time consuming for sure!!

Oh and great name for the build, that is my sons name :cool:
 

sprdv1

Contributor
REBEL
Joined
Mar 8, 2007
Messages
81,964
One lesson, one step at a time right :)

Day one working on the rocker panel, and I came away with a few lessons:

  • There are a lot of spot welds holding a rocker panel onto the body.
  • Cutting them out isn't as easy as you imagine in your head.
  • Make sure the spot weld cutter you buy is long enough for the spot welds you want to cut
  • Buy a panel seam splitter at the same time as you buy the spot weld cutter.
  • You need to take off the door to get to the last few spot welds
So, as it stands, I have about half of the spot welds cut. At least, I think most of them are cut. The spot weld cutter I bought is a little bit too short, so the drill arbor rides on the edge of the door sill. That means that the bottom of some of the welds that are low on the panel may not be cut all the way through.

Also, I screwed up my password and can’t login with my main computer. Luckily my mobile devices are still logged in. If they get logged out, I’m screwed though :) I’ve got an email in to Jon, so hopefully he can help me out.
 
OP
OP
R

rheiser

Newbie
Joined
Jun 7, 2009
Messages
22
One lesson, one step at a time right :)

You got it! I’m not in a huge hurry, and learning is half the fun on a project like this.

Got the panel seam splitter yesterday and tried it out. It works great I still need to get the door off for the last few welds, so that’s holding me back right now. Also, with the noise of air tools and pounding on metal, I think I may want to move the project inside the garage soon. Keep in the neighbors’ good graces and all that.

I did pull the inside of the door off to see if there were any looming rust issues. Thankfully there aren’t there. I also pulled out all of the interior. The seatbelt bolts are T-50, BTW.

I’ll post some more pics once I have the rocker panel off. I guess I should probably buy a welder and learn how to weld too. Might come in handy.
 
OP
OP
R

rheiser

Newbie
Joined
Jun 7, 2009
Messages
22
I finally got the needed tools, and talked someone into helping me take the driver's side door off to get to the last few welds. Once that all happened, things went relatively quickly.

Lessons from today:
  • Don't head butt jagged metal. Even lightly.
  • Spot welds can hide themselves pretty thoroughly.
  • There are a lot of things on this project that aren't going to be a one-man job.

There were a couple of things that I wasn't expecting. I guess I hadn't looked closely enough, or the door was blocking my sight, but the panel overlap between the front door post and the outer rocker panel is different than I had worked it out to be. It looks like there is a tab of metal on the rocker panel that is sandwiched between the front and back panels of the door post. If you look at the picture I've attached of the door post, there's a chance I may need to change that out too. I'm not confident that I can straighten it all out to work like new. I also wasn't expecting the rear part of the rocker panel to be in such good shape. I ran a flapper disc over it quickly, and it is virtually rust free. So, I traded the replacement of a floor pan for the (potential) replacement of the rear part of the rocker panel. I'm not sure if it was a good trade yet or not.

I guess I'll keep with a theme and figure out the floor pan and the door post as my next tasks. It's nice to get that one checked off. A major part of that first task was getting tools and my garage set up for future tasks.

Finally, a quick piece of further trivia around the truck. I did some searching for more info about Gottchalk Flight Center, and it looks like there's a possibility that it might have been at a small airport here in San Jose called "Reid-Hillview", which I grew up near for the first few years of my life. Here's the text of an ad I found:


Stretch your wings! Flight school
and rentals. Many SJSU
members. ALL wet fact times.
Seven branches. C 15, C 150
$13.00/hr Entry fee $15.00
Gottschalk Flight Center 923
4171. Reid Hillview Airport.
 

Attachments

  • Rocker panel removed.jpg
    Rocker panel removed.jpg
    131.1 KB · Views: 25
  • Sketchy door post.jpg
    Sketchy door post.jpg
    102.5 KB · Views: 22
  • Rusty floor pan.jpg
    Rusty floor pan.jpg
    120.7 KB · Views: 26
  • Gottchalk Flying Club.jpg
    Gottchalk Flying Club.jpg
    96.7 KB · Views: 22
Last edited:
OP
OP
R

rheiser

Newbie
Joined
Jun 7, 2009
Messages
22
The teardown continues.

Got some of the guys in the neighborhood to help me lift the top off, so I could get to removing the dash. That came out relatively easily. I'm trying to take my time and label all of the wires and connections, but I still feel like I missed a few things. The stereo was some cheap old Sanyo unit. Of course whoever put it in had to enlarge the opening, so there's some gnarly metal work that's part of that decision. A list of things I found in the heater ducting: a fuse puller, a pack of matches, a nasty piece of Wrigley's gum, lots of leaves, and a screw or two.

The forums here really came to the rescue this weekend. Every time I looked for a clue about how to remove one of the dashboard switches, there was a detailed post here. Plus, I wrote a post asking for media blasting in the area, and found someone within the day. I was just trying to get a jump on things, and didn't expect results so quickly. I've also been asking for info about some random parts I've been curious about; a roof rack, the fender flares. The next one will be the heavy duty hitch receiver, once I manage to get it out of the truck.

Lessons learned this week:
  • Take more pictures. Make more notes. You can't have too many of either.
  • Kids will make a "hideout" or "fort" out of anything, especially a Bronco roof laying on the ground.
  • There are more layers to a Bronco than you realize at first. Even these simple trucks have tons of things attached to them, which can get intimidating sometimes.

Next up: Heater core, wiring harness, getting the interior bare.
 

Attachments

  • IMG_0007.jpg
    IMG_0007.jpg
    189.3 KB · Views: 21
Top