• Welcome to ClassicBroncos! - You are currently viewing the forums as a GUEST. To take advantage of all the site features, please take a moment to register. It's fast, simple and absolutely free. So please join our community today!
    If you have problems registering or can't log into your account, please contact Admin.

Radius Arm Threads Bottomed Out

Okie69

Contributor
Sr. Member
Joined
Nov 28, 2011
Messages
791
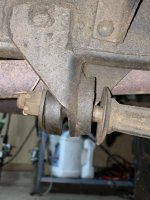
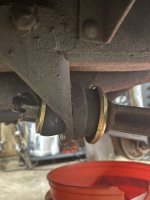
Is it semi normal to run out of threads on the radius arms? I was trying to get it to 90-120ft lbs and just ran out of thread on both of them.

5D44E4B6-61E7-49EA-A27F-645720AB8F8C.jpeg 5C000EFC-1A8C-4358-86CD-76327859A8A6.jpeg
 

stretch

Sr. Member
Joined
Jun 15, 2005
Messages
453
Loc.
Montgomery, TX
Someone else will chime in, but I believe you need to flip the dished washer around to face the front of the vehicle.
 
OP
OP
Okie69

Okie69

Contributor
Sr. Member
Joined
Nov 28, 2011
Messages
791
Someone else will chime in, but I believe you need to flip the dished washer around to face the front of the vehicle.
Well that would be a bummer. I just went off of how they were previously installed.
 

thegreatjustino

Contributor
Red Head Grease Monkey
Joined
Jan 23, 2002
Messages
15,772
Loc.
Stockton, CA
Someone else will chime in, but I believe you need to flip the dished washer around to face the front of the vehicle.

My first thought as well. I've always seen the flat part of the washer toward the bushing. Not only on Broncos, but on the strut arms on classic Mustangs as well.
 
OP
OP
Okie69

Okie69

Contributor
Sr. Member
Joined
Nov 28, 2011
Messages
791
Every picture I can find of them on here has them put in how I did it.

Just from looking at them it seems like it would make sense to have both sides cupped to kind of hold it all together. But obviously that’s not how it was done at the factory.
 

Apogee

Contributor
Bronco Guru
Joined
Nov 26, 2005
Messages
6,055
I just torque the radius arm nuts to sufficiently compress/preload the urethane bushings and then install the cotter pin through the castellated nut. I wouldn't aim for 90 ft-lb myself since that's not really the purpose of that nut anyway. It isn't about stretching the "bolt" a certain amount, it's about compressing the bushings and securely locating the front axle. Considering the factory bushings were rubber with a significantly lower durometer than the urethane replacements, I really do question the merit of the 90 ft-lb torque spec.
 

savage

Contributor
Bronco Nut
Joined
Apr 18, 2007
Messages
2,482
Loc.
Renton
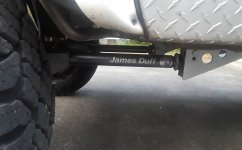
The radius arm washer on mine were installed just like the picture above. When I put my T-rex arms on ,I installed it the same way.
 

Attachments

  • IMG_20210727_203139_033.jpg
    IMG_20210727_203139_033.jpg
    46 KB · Views: 49

Rustytruck

Bronco Guru
Joined
Feb 24, 2002
Messages
10,875
It looks to me you are missing half the bushings there is a bushing on each side of the mount cups clamping the bushing on each side. and no they don't bottom on the threads
 
OP
OP
Okie69

Okie69

Contributor
Sr. Member
Joined
Nov 28, 2011
Messages
791
It looks to me you are missing half the bushings there is a bushing on each side of the mount cups clamping the bushing on each side. and no they don't bottom on the threads
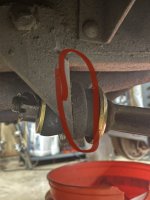
There’s a rubber bushing on each side of the frame mount and then the washer and cup. Is this not right? It seems right.

The part circled in red is metal and welded to the frame mount. 5EDCB403-3800-484F-82D7-243BCB8F6AB5.jpeg
 

carter2772

Bronco Guru
Joined
Oct 21, 2008
Messages
1,570
Loc.
Camano Island, Wa
There’s a rubber bushing on each side of the frame mount and then the washer and cup. Is this not right? It seems right.

The part circled in red is metal and welded to the frame mount. View attachment 878083

this is correct how you have it. I cant speak to the washer orientation but i dont see that the other flopped direction would help. I think the other comment (rustyrtruck) was referring to the first picture. and that first picture, i assume was the previous pic before you put new bushings.
 

MarsChariot

Contributor
Planetary Offroader
Joined
Oct 12, 2004
Messages
2,480
Loc.
Albuquerque, New Mexico
That is all correctly assembled, but something doesn't seem right. Usually the forward bushing "fills" the cup washer to its edges after compression. Are those confirmed to be the correct bushings? It looks a bit thin.
 
OP
OP
Okie69

Okie69

Contributor
Sr. Member
Joined
Nov 28, 2011
Messages
791
Interesting. I bought these from WH years ago. Who knows. I took it out and drove it everything feels fine, but that’s not a real test I guess.
 

Rustytruck

Bronco Guru
Joined
Feb 24, 2002
Messages
10,875
there should be another rubber bushing on the other side of the metal ring. metal ring is part of the mount.
 

66BlueGoose

Contributor
Sr. Member
Joined
Feb 6, 2014
Messages
408
Check to see if the washer immediately under the nut bottoms on the shoulder on radius arm just past the threads. I have noticed that many of the replacement washers have to big a hole preventing them from bottoming on the shoulder which it what will allow you to get to the tourque spec needed an not over crush the bushing. If you have the old washers and they are in good shape, you can use those.
 

m_m70

Contributor
Sr. Member
Joined
Jun 14, 2001
Messages
1,582
Loc.
Pacifica, CA
Not sure if this helps but this is how mine are setup. Been almost 20 years since I installed soo my memory isn't that great but maybe the pic will help. On mine, looks like I have a different washer/cup on the nut side that's thicker??
IMG_1930.jpg
 
Top