Well, Got my soft top installed last weekend, and yes, the forward bow when squeezed in works fine. Thanks for the clarification with that. I know 67RT and other people out there are planning to install one, so have a few tips to make it easier and reduce frustration.
1. first, remove the styrofoam type weather strip they provide. Most of mine was pealing off right out the box. For the door frames, Lowe's actually sells an auto door weather strip that works really well. Just wipe the area with lacquer thinner to remove any oils and apply (self stick.) For the bed rails and header (bolts to the windshield) I used a 1/4"X 1"X 10', also Lowe's. On the header, place right over the holes, leaving the paper backing on, and then just drill the hole through the rubber from the paper side (this prevents tearing the rubber), then remove the paper.
2. Toss the cheap #14, grade 5 sheet-metal screws provided, and get some #14 SS self drilling instead. (need 8) you will be much happier, trust me.
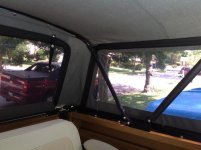
3. Be prepared to bend/adjust the horizontal door frame rod to get the proper fit around the door. You will need to do this before you determine location of the vertical rod. Again, do this with the door closed.
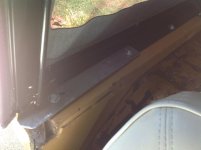
4. Like many have said, do not drill the rear door pillar. A 1 1/2" X 3" flat steel stock (Lowe's) works great. Use the most forward hole on the bed to mount, drill the hole necessary for the door frame vertical rod, and your done. I did find use for the styrofoam weather strip here; I used a small piece to go onto the pillar to rest the vertical rod on-haha!. Best way to determine hole location is to assemble the frame, close the door, and place vertical rod where you have a good door seal. Then mark the holes. I didn't even use their measurements because each side was different. I got lucky i guess, because I didn't have to remove the lower door rubber; just compressed a little with the vertical rod. Vertical rod will need to be cut slightly. Measure each side individually. On mine one side needed 5/8" removed, the other, 1/2".
5. Tailgate rail- Their measurements didn't match the width of my tailgate. Use the 1/2", but then just center it-done.
6. I read a lot of threads where people said the horizontal door frame rod can slip out the forward bow. All kinds of remedies were out there with strap designs from the front bow to a mounting on the windshield frame. I just drilled a very small hole and placed a spring clip. A cotter pin would work just as well- problem solved without a strap flapping over my head.
Anyway, hope this helps. I wasn't able to modify my wiper motor cover, but I bought the low profile one from Tom's and was able to modify it to install my dome light.
New to this, so hope this wasn't in the wrong thread. when I figure out how, I'll post pics if anyone wants them.
LA75
1. first, remove the styrofoam type weather strip they provide. Most of mine was pealing off right out the box. For the door frames, Lowe's actually sells an auto door weather strip that works really well. Just wipe the area with lacquer thinner to remove any oils and apply (self stick.) For the bed rails and header (bolts to the windshield) I used a 1/4"X 1"X 10', also Lowe's. On the header, place right over the holes, leaving the paper backing on, and then just drill the hole through the rubber from the paper side (this prevents tearing the rubber), then remove the paper.
2. Toss the cheap #14, grade 5 sheet-metal screws provided, and get some #14 SS self drilling instead. (need 8) you will be much happier, trust me.
3. Be prepared to bend/adjust the horizontal door frame rod to get the proper fit around the door. You will need to do this before you determine location of the vertical rod. Again, do this with the door closed.
4. Like many have said, do not drill the rear door pillar. A 1 1/2" X 3" flat steel stock (Lowe's) works great. Use the most forward hole on the bed to mount, drill the hole necessary for the door frame vertical rod, and your done. I did find use for the styrofoam weather strip here; I used a small piece to go onto the pillar to rest the vertical rod on-haha!. Best way to determine hole location is to assemble the frame, close the door, and place vertical rod where you have a good door seal. Then mark the holes. I didn't even use their measurements because each side was different. I got lucky i guess, because I didn't have to remove the lower door rubber; just compressed a little with the vertical rod. Vertical rod will need to be cut slightly. Measure each side individually. On mine one side needed 5/8" removed, the other, 1/2".
5. Tailgate rail- Their measurements didn't match the width of my tailgate. Use the 1/2", but then just center it-done.
6. I read a lot of threads where people said the horizontal door frame rod can slip out the forward bow. All kinds of remedies were out there with strap designs from the front bow to a mounting on the windshield frame. I just drilled a very small hole and placed a spring clip. A cotter pin would work just as well- problem solved without a strap flapping over my head.
Anyway, hope this helps. I wasn't able to modify my wiper motor cover, but I bought the low profile one from Tom's and was able to modify it to install my dome light.
New to this, so hope this wasn't in the wrong thread. when I figure out how, I'll post pics if anyone wants them.
LA75
Last edited: