SamD
Full Member
- Joined
- Feb 25, 2014
- Messages
- 214
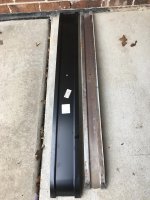
One of my hardtop roof support bows was bent and had a 3/4" gap between the middle of the support bow and the roof, so I removed the original and ordered a new one from Tom's. It arrived yesterday, and i started to install it today, but i soon discovered it isn't going to be the "drop in" replacement job i "assumed".
There is a big difference in size between the stock and replacement hardtop support bows and this changes an easy job into a hard one (for me). Picture below:
I'm assuming they have been made wider to provide more support and longer to allow for trimming to achieve a better fit, which on the surface sounds good. Problem is, they are so wide now that I can't reuse the original flange that is still welded to the top. It was easy to drill out a few spot welds and remove the original support bow, but removing the old flange and welding in the new one isn't something I'm looking forward to doing.
Has anyone ever installed one of these before? any suggestions?
sam