• Welcome to ClassicBroncos! - You are currently viewing the forums as a GUEST. To take advantage of all the site features, please take a moment to register. It's fast, simple and absolutely free. So please join our community today!
    If you have problems registering or can't log into your account, please contact Admin.

Stock Rear Bumper Tire Carrier

sk1nw4lk3r

Sr. Member
Joined
Nov 7, 2015
Messages
548
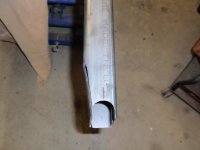
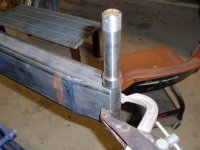
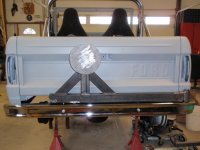
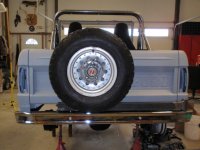
I remember seeing on these forums a couple years ago a guy posted pictures of a bumper he'd manufactured; it was a bumper mount tire carrier, but he had put the chrome bumper on top of the support and cut a hole through the stock bumper for the carrier hinge.

Does anyone remember the post? Have the pics? Or the link to the post?

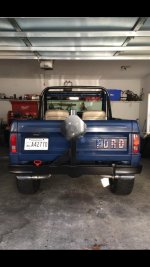
Trying to get some ideas for the 69 I just picked up.

Thanks.
 

BroncoChicken

Sr. Member
Joined
Mar 29, 2015
Messages
356
I’m doing something similar with the stock bumper. I bought the swing arm assembly from Protofab instead of building my own.
 

bronkenn

Contributor
Bronco Guy
Joined
Apr 27, 2017
Messages
2,688
Loc.
Southeast Ohio
Here are a few pics of the one I did.
 

Attachments

  • tire rack1.jpg
    tire rack1.jpg
    53.9 KB · Views: 103
  • tire rack2.jpg
    tire rack2.jpg
    84.9 KB · Views: 104
  • tire rack6.jpg
    tire rack6.jpg
    78.6 KB · Views: 107
  • tire rack8.jpg
    tire rack8.jpg
    82.2 KB · Views: 128
  • tire rack13.jpg
    tire rack13.jpg
    90.2 KB · Views: 138

barronj

Bronco Guru
Joined
Jun 6, 2009
Messages
1,859
BroncoChicken, this is where you teach yourself (assuming you have the time). My first welding job was spot welding floor pans in to my bronco, 8-9 years ago. My second welding job was the bumper in my thread, in 2013; in my thread I even admit that this is the first bead I'd ever laid down. By the time I'd gotten around to installing my ZF in 2016, my welding skills had progressed to the point that I could design and build the crossmember that holds up the ZF
 

Joe473

Sr. Member
Joined
Jul 16, 2012
Messages
954
That looks great! My welding skills are nil, so I’m taking a shortcut.
The swing arm is the easy part of this. Keep in mind you need to create support for the spindle behind the stock bumper too. To me this was the tougher part of the build. 76 Yetis was the one that inspired me a couple of years ago also.

f8ff0f5a772a27a69a39341e09d51817.jpg
d94cd0a1d0dca446fb8328b2798082da.jpg
ea619161a4d9d65d839a17bd2874b152.jpg
a2eea77be98e75a4888faa6cc8321b72.jpg
2cccbb6d60073153226d861d3c74e451.jpg
ddf7fb40f0b8d179eaaaff1fe995b7e4.jpg


Sent from my SM-G960U using Tapatalk
 

BroncoChicken

Sr. Member
Joined
Mar 29, 2015
Messages
356
Protofab kit

As sure as we were discussing this, look what showed up today. Can’t wait to dive into this.
 

Attachments

  • E3E05589-C83B-4801-99E5-826841A3C73E.jpg
    E3E05589-C83B-4801-99E5-826841A3C73E.jpg
    68.5 KB · Views: 84

No Hay

Bronco Guru
Joined
Jun 4, 2014
Messages
1,657
Love these bumpers, they all look great! Sure wish I could order one from somebody!

BroncoChicken, it's always fun to see bikes stored inside. I joked with my wife a couple weeks ago. No pics of my bicycles inside.
 

Attachments

  • IMG_0952.JPG
    IMG_0952.JPG
    121.2 KB · Views: 61
OP
OP
S

sk1nw4lk3r

Sr. Member
Joined
Nov 7, 2015
Messages
548
Thanks for all the help guys!! Love these bumpers, blows my mind no one is manufacturing them for sale yet.

Thanks for the links and photos. I think I'll tackle this this summer.
 

BroncoChicken

Sr. Member
Joined
Mar 29, 2015
Messages
356
Protofab offered to build my kit reversed for just that reason. I like that you can see the letters behind yours.
 

asappin

Full Member
Joined
Oct 14, 2014
Messages
205
Built a swingarm that is welded to the stock bumper. Not quite as sleek as everyone else’s design but works for my needs.
 

Attachments

  • 8AC6C4A1-F83F-4792-AC0F-7EBFE14FFCAE.jpg
    8AC6C4A1-F83F-4792-AC0F-7EBFE14FFCAE.jpg
    72.5 KB · Views: 68
  • 88ED98A9-6F7B-4B64-819C-EE34A7E9F272.jpg
    88ED98A9-6F7B-4B64-819C-EE34A7E9F272.jpg
    64.7 KB · Views: 69
  • BF3E835B-CFB3-4044-A012-10B1A1216A07.jpg
    BF3E835B-CFB3-4044-A012-10B1A1216A07.jpg
    59.5 KB · Views: 66
Last edited:
Top