


Broncobowsher
Total hack
- Joined
- Jun 4, 2002
- Messages
- 35,064
OK, revised it slightly again. This arm has been an evolution for the past 7 years or so. There have been ups and downs. Few damaged parts. But the arm I have been running for the past few years has working real good. Just the frame side pivot was a bit cobbled. So I recently went and redid it into what I believe will now be the final revision.
Some history;
Did a lift with some soft used National springs about 7 years ago. Took a couple of blocks to get the springs back up to where they should have been at. So soft springs, 4.88 gears and blocks. Yes, horrible combonation. I parked it on a hill just to see how the thing flexed. Well the parking on a hill was enough to twist the rear end and nearly bind the U-joint. So off to build a torque arm.
First version (lost the photos) was a single bracket that I installed on the housing, some clevis turnbuckles I had from a boat and a few other parts. Well the 3/8" clevis snapped every time I touched the gas. After enough metal was thrown on it I had a working torque arm. Well sort of. After a good trip I was spewing gear oil as that bracket ripped the housing open like a .22 going through a hot soda can. Just happen to be 400 miles away and I took the arm off and siliconed the housing shut in the parking lot of Carrol Shelby enterprises. Drove home without it.
So the orgins of this current arm;
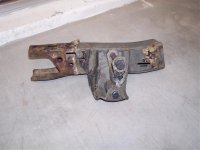
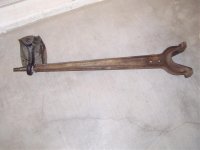
After some repairs to the housing and ditching the single plate that had failed me I rethough the design. After a little thinking about the stresses that were much higher then originally thought. Radius arm like the front should do. I had a busted Dana 30 housing that I spent way too much time carving the axle wedges off of. (You can just buy new wedges) After a lot of work I had the wedges mocked up to the 9". Note that I squared the wedges so they would place the radius arm perpendicular to the housing and not angled like the front is. I also aquired a spare arm and a used set of bushings. Installing the wedges I did a few tricks. One was I bolted everything together without welding the wedges in. This allowed me to rotate the arm to get the angle right. Do a couple of tack welds, pull the bushings out so they don't melt and weld away. Another trick was to install one bushing upside down. Thick part of both bushings on top. This cancels out the corrective caster adjsutment and makes the bushings 0°. this way you can go back later and adjust the pinion angle with degreed bushings if needed. 7° swing either way depending on what bushing you use and how you install it.
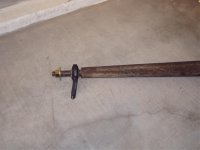
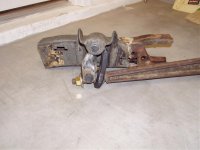
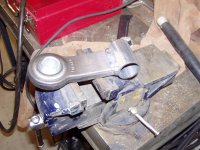
So I have an arm coming off the housing that is finally strong enough. The trick is the frame side. The simple and wrong way is to copy the front and place an eye on the frame for the arm. But this would restrict for/aft movment and bind the spring. Originally I made a pivot with sway bar endlinks at 45° angles. Worked good as the forces would put half the load into compressing one link and the other half of the forces into pulling a link. Well it was a bit rigged with scraps of angle iron welded here and there. But I ran it for years that way and the links held. Then I decided that it would be best if I actually fixed it right. I found a 3-point hitch at Tractor Supply Company that was the right size and even had a little angle built right into it that looked to be just right. Part # 02-67791 is what I got. I was getting the parts together. Now I have had this part for 2½ years and finally got around to using it. I kept pushing this project to the back burner. Well I finally got the rest of the parts. This time a chunk of frame and a shackle. Originally planned to use the shackle but later decided to use a poly bushing. I had to trim the 3" poly bushing down to 2¾" to fit the frame hanger. Weld the forged tractor heim to the bushing sleeve. 1¾" of 1" ID tubing (out of 7/8" ID tubing) to take up the slack.
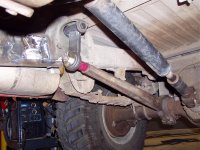
Line things up. Weld away. Presto, finished torque arm without the rigged brackets out of too thin angle iron. The shackle and heim combo allow all the proper movments of the rear axle and hold back the evil ones. that ball of the heim allows more articulation twist then running a pure leaf spring style shackle. Using a stock type hanger and stock arm gives it a very stock looking appearance.
With a little more work the arm could probably be installed on the drivers side instaed of the passenger. That would give you room to mount stock type exhaust. Since my muffler is under the drivers seat I had all the room I wanted inside the frame rail. Only 1 arm is needed. Trying to use 2 will cause them to fight each other and limit rear axle articulation. Putting the torque arm on only one side of the frame works amazinly well. Never any wierdness from it. Since the arm has been installed I have only experienced the slightest amount of hop once. that was while on the throttle, making a tight U-turn is deep, soft, course sand. It may actually have been more of a function of the locker then anyting else. The C-bushings allow a little give but hold the axle firm enough to prevent any wild movements.
Some history;
Did a lift with some soft used National springs about 7 years ago. Took a couple of blocks to get the springs back up to where they should have been at. So soft springs, 4.88 gears and blocks. Yes, horrible combonation. I parked it on a hill just to see how the thing flexed. Well the parking on a hill was enough to twist the rear end and nearly bind the U-joint. So off to build a torque arm.
First version (lost the photos) was a single bracket that I installed on the housing, some clevis turnbuckles I had from a boat and a few other parts. Well the 3/8" clevis snapped every time I touched the gas. After enough metal was thrown on it I had a working torque arm. Well sort of. After a good trip I was spewing gear oil as that bracket ripped the housing open like a .22 going through a hot soda can. Just happen to be 400 miles away and I took the arm off and siliconed the housing shut in the parking lot of Carrol Shelby enterprises. Drove home without it.
So the orgins of this current arm;
After some repairs to the housing and ditching the single plate that had failed me I rethough the design. After a little thinking about the stresses that were much higher then originally thought. Radius arm like the front should do. I had a busted Dana 30 housing that I spent way too much time carving the axle wedges off of. (You can just buy new wedges) After a lot of work I had the wedges mocked up to the 9". Note that I squared the wedges so they would place the radius arm perpendicular to the housing and not angled like the front is. I also aquired a spare arm and a used set of bushings. Installing the wedges I did a few tricks. One was I bolted everything together without welding the wedges in. This allowed me to rotate the arm to get the angle right. Do a couple of tack welds, pull the bushings out so they don't melt and weld away. Another trick was to install one bushing upside down. Thick part of both bushings on top. This cancels out the corrective caster adjsutment and makes the bushings 0°. this way you can go back later and adjust the pinion angle with degreed bushings if needed. 7° swing either way depending on what bushing you use and how you install it.
So I have an arm coming off the housing that is finally strong enough. The trick is the frame side. The simple and wrong way is to copy the front and place an eye on the frame for the arm. But this would restrict for/aft movment and bind the spring. Originally I made a pivot with sway bar endlinks at 45° angles. Worked good as the forces would put half the load into compressing one link and the other half of the forces into pulling a link. Well it was a bit rigged with scraps of angle iron welded here and there. But I ran it for years that way and the links held. Then I decided that it would be best if I actually fixed it right. I found a 3-point hitch at Tractor Supply Company that was the right size and even had a little angle built right into it that looked to be just right. Part # 02-67791 is what I got. I was getting the parts together. Now I have had this part for 2½ years and finally got around to using it. I kept pushing this project to the back burner. Well I finally got the rest of the parts. This time a chunk of frame and a shackle. Originally planned to use the shackle but later decided to use a poly bushing. I had to trim the 3" poly bushing down to 2¾" to fit the frame hanger. Weld the forged tractor heim to the bushing sleeve. 1¾" of 1" ID tubing (out of 7/8" ID tubing) to take up the slack.
Line things up. Weld away. Presto, finished torque arm without the rigged brackets out of too thin angle iron. The shackle and heim combo allow all the proper movments of the rear axle and hold back the evil ones. that ball of the heim allows more articulation twist then running a pure leaf spring style shackle. Using a stock type hanger and stock arm gives it a very stock looking appearance.
With a little more work the arm could probably be installed on the drivers side instaed of the passenger. That would give you room to mount stock type exhaust. Since my muffler is under the drivers seat I had all the room I wanted inside the frame rail. Only 1 arm is needed. Trying to use 2 will cause them to fight each other and limit rear axle articulation. Putting the torque arm on only one side of the frame works amazinly well. Never any wierdness from it. Since the arm has been installed I have only experienced the slightest amount of hop once. that was while on the throttle, making a tight U-turn is deep, soft, course sand. It may actually have been more of a function of the locker then anyting else. The C-bushings allow a little give but hold the axle firm enough to prevent any wild movements.
")