• Welcome to ClassicBroncos! - You are currently viewing the forums as a GUEST. To take advantage of all the site features, please take a moment to register. It's fast, simple and absolutely free. So please join our community today!
    If you have problems registering or can't log into your account, please contact Admin.

Triangulated rear link suspension

ksagis

Contributor
Aspiring Bronco Guru
Joined
Jun 15, 2020
Messages
818
Loc.
Austin
Was getting smarter on upper triangulated link rear suspensions, particularly on EBs given the geometry constraints. Several tech sources mentioned needing 40 degrees of triangulation. In a EB thats a bit hard to do given frame, etc.

Also, one source mentioned you could take credit for both the triangulation in the upper link and whatever triangulation one has in the lower links. While I agree in theory, it seems for small angles, that might overly take credit for added stability.

Any thoughts on the minimum of 40 degrees and if folks think its valid to take credit for any small amount of lower link triangulation? (I have about 6 degrees on each of the lower links)
 

Yeller

Contributor
Bronco Guru
Joined
Mar 27, 2012
Messages
7,688
Loc.
Rogers County Oklahoma
40 degrees isn’t necessary. Yes the angle gets combined with the lowers. There is plenty of room for the links in and EB. Exhaust gets interesting. My generic rule of thumb is, get as much as you can get without getting crazy lol.

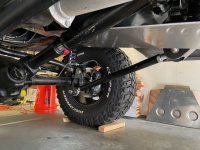
Vertical and longitudinal placement is more important. The uppers need to be as close to parallel to the ground as possible +\- 10 degrees maximum, preferably not more than 5 degrees. Then keeping the lowers no higher than the centerline of the axle (trail only vehicles can by above centerline) measure the distance between the upper and lower mounting points on the axle in a vertical orientation. At the frame they need to be 50-70% of that distance. The rules aren’t as tight as the books lead you to believe and still work very well, it doesn’t matter how perfect the geometry may be if it doesn’t fit within the packaging restraints.
 

Attachments

  • IMG_2768.jpeg
    IMG_2768.jpeg
    158.7 KB · Views: 261
  • IMG_2767.jpeg
    IMG_2767.jpeg
    205.3 KB · Views: 234
OP
OP
K

ksagis

Contributor
Aspiring Bronco Guru
Joined
Jun 15, 2020
Messages
818
Loc.
Austin
...measure the distance between the upper and lower mounting points on the axle in a vertical orientation. At the frame they need to be 50-70% of that distance.

Not sure I understand this one, I think you're saying to measure the vertical distance between the upper and lower mounts on the axle side, and measure the same on the frame side. And on the frame side, it should be 50 to 75% of what you measured on axle side. Given your upper triangulation is inside frame, and outer is under frame, I'm guessing maybe 4 inches of distance between the pivot at frame, which would say axle side is maybe 6 to 8 inches of separation vertically?

I gotta comment on the rock sliders, they look great and nicely tied in! :) Thanks for sharing pics. Are those placed under the rockers?
I had a buddy many years ago that had a Defender D90 and they would remove the rockers and submerge the rock sliders up where the rocker was. Looked really nice.

Edit: P.S. I see on your front axle that you put the wristed side on drivers, was that due to HP being on that side and running out of room for stuff? Is there an advantage of having wristed on drivers or passenger side?
 
Last edited:

Yeller

Contributor
Bronco Guru
Joined
Mar 27, 2012
Messages
7,688
Loc.
Rogers County Oklahoma
Part of the confusion maybe I took it way further than just the triangulation, I took it to the point of completion. While the triangulation is important, there is a total package that has to be taken into account that all plays together.

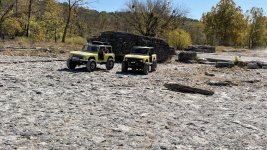
This is @stout22 ’s bronco, I’ll let him discuss the rockers. If I remember correctly they are 2x6 tube welded in place of the rockers with supports going to the cab mounts.

Yes that upper link on the front is where it fit and gave us the performance characteristics that we wanted. Keep in mind it is not wristed like an old school bronco that has a radius arm on one side and flexible joint on the other it is a 3 link that does an excellent job of controlling the axle and helping the tires provide traction, it uses a track bar ti locate the axle side to side.

Me and stout22 about 2 hours after putting his back together 7 days from a robust normalish trail bronco to a 1ton 40” tired monster.
 

Attachments

  • IMG_2776.jpeg
    IMG_2776.jpeg
    361.2 KB · Views: 156
  • IMG_2766.jpeg
    IMG_2766.jpeg
    288.6 KB · Views: 175
OP
OP
K

ksagis

Contributor
Aspiring Bronco Guru
Joined
Jun 15, 2020
Messages
818
Loc.
Austin
Great looking rigs!

I imagine I’m using the wristed terminology a bit fast and loose and when I am using it, I’m simply meaning that the torsion degree of freedom has been released so that when one side of axle is drooped, and other side of axle isn’t drooped, it’s not twisting the crap out of the suspension.

I’ve seen this approach that allows a twisting movement in the axle to release the torsion and help articulation (which doesn’t seem as common anymore) and is maybe what is classicly called a wristed axle:

https://classicbroncos.com/wristedaxle.shtml

And then I’ve seen done like the pics you posted that have the pax side with two attachments and the drivers side with a single attachment at axle. And since one side has a single attach point at axle, it has better articulation (some rigs have both attachment on both sides but have a removable linkage for trail use)

The way I was thinking was both of these were wristed since both approaches “released” a torsion constraint in a somewhat similar fashion allowing better articulation.

Thanks for the info!
 

Yeller

Contributor
Bronco Guru
Joined
Mar 27, 2012
Messages
7,688
Loc.
Rogers County Oklahoma
It is way more than articulation; axle control and torque management are key. I’m going to get an argument here from someone, radius arms suck for torque managing a front axle, point the nose up and make a step climb. Torque is applied to the front tires, that torque removes load from the front axle, reducing traction and inducing wheel hop. Now turn that vehicle around and drive down that same slope, step on the brakes and the front suspension extends, steep enough with enough traction it will extend to the point that will literally run over the font axle. Keep in mind these physics apply to the rear as well but in reverse. Now make all of the joints flexible and add a separate link to control the torque. point the nose up a slope, the front suspension compresses, additional traction is applied the front axle and the slope is surmounted with not wheel hop. Turn around and drive down, it now has some nosedive when the brake is applied but it will now slide instead of trying to run over the front axle.

People like the feeling of radius arms on the street, they are super stable, usually don't need a sway bar (although I don't feel my linked front ends need one...), they don't have nosedive when the brakes are applied, and the ride isn't terrible. Linked front tends to be more compliant, has more nosedive and tends to have more body role. It is all give and take depending on your situation, use and comfort level.

BTW I've studied suspension systems for over 35 years, not as an engineer, but as a fabricator and a desire to understand, to build, drive, race, and wheel, the best functioning, well rounded vehicles I could develop.
 

moab_walker

New Member
Joined
Sep 24, 2017
Messages
6
40 degrees isn’t necessary. Yes the angle gets combined with the lowers. There is plenty of room for the links in and EB. Exhaust gets interesting. My generic rule of thumb is, get as much as you can get without getting crazy lol.

Vertical and longitudinal placement is more important. The uppers need to be as close to parallel to the ground as possible +\- 10 degrees maximum, preferably not more than 5 degrees. Then keeping the lowers no higher than the centerline of the axle (trail only vehicles can by above centerline) measure the distance between the upper and lower mounting points on the axle in a vertical orientation. At the frame they need to be 50-70% of that distance. The rules aren’t as tight as the books lead you to believe and still work very well, it doesn’t matter how perfect the geometry may be if it doesn’t fit within the packaging restraints.
thanks for the rule of thumb this really helped me visualize how these should shape up.
 
OP
OP
K

ksagis

Contributor
Aspiring Bronco Guru
Joined
Jun 15, 2020
Messages
818
Loc.
Austin
That's a great looking suspension model your using! :cool:
I'm very happy with the setup.
Nice suspension and articulation!

What part of Alabama are you in? I spend a fair bit of time in Huntsville at times.
 

rocknhorse76

Contributor
Bronco owner since 1993 💪🏻
Joined
Jun 7, 2014
Messages
463
Loc.
Central WA
40 degrees isn’t necessary. Yes the angle gets combined with the lowers. There is plenty of room for the links in and EB. Exhaust gets interesting. My generic rule of thumb is, get as much as you can get without getting crazy lol.

Vertical and longitudinal placement is more important. The uppers need to be as close to parallel to the ground as possible +\- 10 degrees maximum, preferably not more than 5 degrees. Then keeping the lowers no higher than the centerline of the axle (trail only vehicles can by above centerline) measure the distance between the upper and lower mounting points on the axle in a vertical orientation. At the frame they need to be 50-70% of that distance. The rules aren’t as tight as the books lead you to believe and still work very well, it doesn’t matter how perfect the geometry may be if it doesn’t fit within the packaging restraints.
Hey Yeller, what size tubing do you recommend for links?
 

Yeller

Contributor
Bronco Guru
Joined
Mar 27, 2012
Messages
7,688
Loc.
Rogers County Oklahoma
Hey Yeller, what size tubing do you recommend for links?
I use 2”x.250” DOM for lowers as the standard go to and 1-3/4”x.120” for uppers. I’ve had good success with that, and not had any failures. I have had a few bent lowers, but not so much to be broken on the trail. I’ve used 2-1/2x1/2 DOM in some extreme abusive applications but don’t feel it necessary for 99% of builds. The whole idea is to get the ID of the tubing to 1-1/2”. That way off the shelf weld in bungs fit and the same 1-1/4” shank joint can be used for the uppers and lowers. For a little more bling and just a tiny bit more money 2” 7075 aluminum is lighter and stronger.
 

rocknhorse76

Contributor
Bronco owner since 1993 💪🏻
Joined
Jun 7, 2014
Messages
463
Loc.
Central WA
I use 2”x.250” DOM for lowers as the standard go to and 1-3/4”x.120” for uppers. I’ve had good success with that, and not had any failures. I have had a few bent lowers, but not so much to be broken on the trail. I’ve used 2-1/2x1/2 DOM in some extreme abusive applications but don’t feel it necessary for 99% of builds. The whole idea is to get the ID of the tubing to 1-1/2”. That way off the shelf weld in bungs fit and the same 1-1/4” shank joint can be used for the uppers and lowers. For a little more bling and just a tiny bit more money 2” 7075 aluminum is lighter and stronger.
Much appreciated, sir.
 

rocknhorse76

Contributor
Bronco owner since 1993 💪🏻
Joined
Jun 7, 2014
Messages
463
Loc.
Central WA
I use 2”x.250” DOM for lowers as the standard go to and 1-3/4”x.120” for uppers. I’ve had good success with that, and not had any failures. I have had a few bent lowers, but not so much to be broken on the trail. I’ve used 2-1/2x1/2 DOM in some extreme abusive applications but don’t feel it necessary for 99% of builds. The whole idea is to get the ID of the tubing to 1-1/2”. That way off the shelf weld in bungs fit and the same 1-1/4” shank joint can be used for the uppers and lowers. For a little more bling and just a tiny bit more money 2” 7075 aluminum is lighter and stronger.
Hey Steve, do you happen to remember what length the links are? I’m setting mine up very similar to Stout’s and will be doing the uppers for an antiwrap prior to doing the full swap. Parts should be here this week if Ruff Stuff gets around to shipping them.
 

Yeller

Contributor
Bronco Guru
Joined
Mar 27, 2012
Messages
7,688
Loc.
Rogers County Oklahoma
Hey Steve, do you happen to remember what length the links are? I’m setting mine up very similar to Stout’s and will be doing the uppers for an antiwrap prior to doing the full swap. Parts should be here this week if Ruff Stuff gets around to shipping them.
Should be 36” c/c. That’s my default length unless packaging dictates something different. That’s long enough for a 14” shock. Although I try to talk everyone down to 12”, sooooo much easier to package and very little gain. On Stouts we reused the shocks from his 3-1/2” lift, they are 10” if I remember correctly. More flex is not always better.
 

rocknhorse76

Contributor
Bronco owner since 1993 💪🏻
Joined
Jun 7, 2014
Messages
463
Loc.
Central WA
Should be 36” c/c. That’s my default length unless packaging dictates something different. That’s long enough for a 14” shock. Although I try to talk everyone down to 12”, sooooo much easier to package and very little gain. On Stouts we reused the shocks from his 3-1/2” lift, they are 10” if I remember correctly. More flex is not always better.
I’m shooting for 36” but will probably have to settle for about 34” on the uppers for now. 4R70W/Blackbox Titan/NP205 and an additional crossmember complicates packaging. Once I do the full 4 link I’ll probably move the axle back a few more inches. I already have another set of 14” Radflo coilovers to match what I have in the front.
 

Yeller

Contributor
Bronco Guru
Joined
Mar 27, 2012
Messages
7,688
Loc.
Rogers County Oklahoma
I’m shooting for 36” but will probably have to settle for about 34” on the uppers for now. 4R70W/Blackbox Titan/NP205 and an additional crossmember complicates packaging. Once I do the full 4 link I’ll probably move the axle back a few more inches. I already have another set of 14” Radflo coilovers to match what I have in the front.
That works just fine. Uppers can be much shorter, especially if the lower links have much up angle. The shorter uppers can be used to control the pinion angle for packaging along with anti squat at droop and compression. If the lowers have too much up angle, and the uppers are similar length the anti squat goes through the roof on droop, which is bad. I don’t have an angle when that happens, I’d have to play with the numbers to see, for some reason I can see it when building without knowing what the number is.
 
OP
OP
K

ksagis

Contributor
Aspiring Bronco Guru
Joined
Jun 15, 2020
Messages
818
Loc.
Austin
Minor diversion but thinking to keep in this thread since we're talking links.

@Yeller, I noticed that the front end three link / track bar setup that you built for stout22 has two totally separate bars going from axle to frame (passenger side) and a single bar between axle to frame (drivers side). Instead of two totally separate bars on drivers side, my rig has two attachments at the axle, the two bar merge to a single bar, and then that bar then connects to frame. What are pros and cons of the two approaches?

(older pics from before I modified the pitman arm)
 

Attachments

  • driver side.jpg
    driver side.jpg
    148.6 KB · Views: 172
  • passender side.jpg
    passender side.jpg
    195.3 KB · Views: 140
Top