• Welcome to ClassicBroncos! - You are currently viewing the forums as a GUEST. To take advantage of all the site features, please take a moment to register. It's fast, simple and absolutely free. So please join our community today!
    If you have problems registering or can't log into your account, please contact Admin.

VIDEO - floor pan replacement - UPDATE - MORE ADDED

Mark

Contributor
Bronco Klutz
Joined
Aug 29, 2003
Messages
5,414
Loc.
NW Indiana
Saw a thread the other day asking how to remove the floor pan from the support channel. I had my 7 y.o. video tape a little action since I'm currently at this stage on my '77.

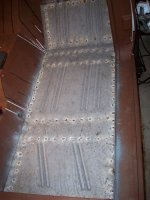
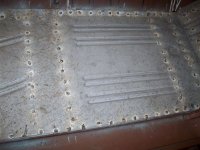
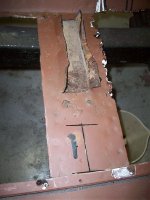
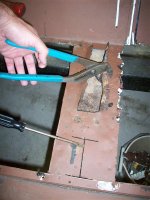
First get cut out the large squares of floor between the channels and make lengthwise cuts down the middle of the channel, pry-up a flap like in the photos.
 

Attachments

  • floorpan2a.jpg
    floorpan2a.jpg
    101 KB · Views: 1,376
  • floorpan3a.jpg
    floorpan3a.jpg
    110.8 KB · Views: 1,284
Last edited:
OP
OP
Mark

Mark

Contributor
Bronco Klutz
Joined
Aug 29, 2003
Messages
5,414
Loc.
NW Indiana
My boy got such a kick out of the fact that we can post videos on youtube that he wanted me to video him doing his monster truck race. Check it out if you want to. He's 7 and he likes seeing how many views it's getting. :)

Air chisel majesty Part 2

https://www.youtube.com/watch?v=WCY4iSv1GEc

[youtube]WCY4iSv1GEc[/youtube]
 
Last edited:

Orange Crush

Bronco Guru
Joined
Nov 7, 2004
Messages
1,237
Loc.
Maryland
Good to see this. I will be doing pans in the next week or two. Thanks for posting those. Do you have a link to your son's video?
 

7bronco6

Full Member
Joined
Jun 4, 2008
Messages
229
Loc.
PA
Nice post...That air chisel is nice, I need to get me one of those...Your son's video is pretty cool, if only our Bronco's could drive like that in real life..haha..Happy Fathers Day..
 

Socal Tom

Bronco Guru
Joined
Feb 12, 2004
Messages
2,442
Loc.
San Diego, CA
Ok, that is just wrong... First, if it was me, the second time the air chisel slipped, I would have speared my hand on the rusty metal and had to spend the next 6 hours in the emergency room. Then, when I screamed from being speared by the metal, I would have dropped the chisel on my sandal covered foot and sliced off my little toe.

:) nice work.
Tom
 
OP
OP
Mark

Mark

Contributor
Bronco Klutz
Joined
Aug 29, 2003
Messages
5,414
Loc.
NW Indiana
Ok, that is just wrong... First, if it was me, the second time the air chisel slipped, I would have speared my hand on the rusty metal and had to spend the next 6 hours in the emergency room. Then, when I screamed from being speared by the metal, I would have dropped the chisel on my sandal covered foot and sliced off my little toe.
We edited that part out. ;)
 
OP
OP
Mark

Mark

Contributor
Bronco Klutz
Joined
Aug 29, 2003
Messages
5,414
Loc.
NW Indiana
wire wheel and paint the channels.
Treat the inner part with POR15 (or Rustbullet which I had on hand), spray all seam areas to be welded with weld through primer. Napa has it.

Edit. I'll have to upload my pics of this step a little later.
 
OP
OP
Mark

Mark

Contributor
Bronco Klutz
Joined
Aug 29, 2003
Messages
5,414
Loc.
NW Indiana
I'm digging this You Tube thing. Anyone can open and then upload to Youtube - it's free.
A picture is worth a thousand words, then how many is video worth?
Here's the next in progression..

Fit the pan into place. Trim where necessary.
Use self tapping screws to secure the pan to the overlap areas making installing the floor pan quick and easy.

[youtube]0bQ3F-Ny3G4[/youtube]
 
OP
OP
Mark

Mark

Contributor
Bronco Klutz
Joined
Aug 29, 2003
Messages
5,414
Loc.
NW Indiana
Use a ball peen hammer and drift after screwing the pan in place to flatten the seams as much as possible to the body. Repeat this after welding. Before final painting apply seam sealer to make the seams nearly invisible - and most importantly, seal out moisture.

[youtube]Bn4sNMg-OTg[/youtube]
 
OP
OP
Mark

Mark

Contributor
Bronco Klutz
Joined
Aug 29, 2003
Messages
5,414
Loc.
NW Indiana
Plug weld the panel into place. Remove a screw, weld the hole, remove a screw weld the hole, und so weiter... make sure you get good penetration for a permanent bond. We'll grind the welds down smooth before painting.

[youtube]Y4Z6IwlcPxI[/youtube]
 

73stallion

Bronco Guru
Joined
Mar 5, 2004
Messages
16,786
Loc.
Eugene, OR
boy your video camera really doesn't like that weld arc! i like the way you use self tappers and fill the holes though, think i'll do it that way when i replace my floor.
 

needabronco

Bronco Guru
Joined
Jul 2, 2004
Messages
6,411
Loc.
Prescott/Farmington
Thanks Mark your video has inspired me to finally do my floors. Now I'm seriously contemplating pulling the body off the frame:-X...

Your videos could be marketed you know....
 
OP
OP
Mark

Mark

Contributor
Bronco Klutz
Joined
Aug 29, 2003
Messages
5,414
Loc.
NW Indiana
I'm having fun! This is my 4th floor pan and it gets easier and easier.
Here it is all plug welded. Took an hour or two - with farting around time.
 

Attachments

  • plugwelded2.jpg
    plugwelded2.jpg
    132 KB · Views: 1,032
  • plugwelded1.jpg
    plugwelded1.jpg
    131.3 KB · Views: 934

mbroadbridge

Newbie
Joined
Sep 2, 2009
Messages
41
screw sizes?

I am doing my floor replacements and wanted to know what size screws to use. I am worried about going too big and making it tought to fill the hole with weld.
 
Top