


Tito
CB Fire Starter
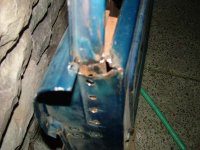
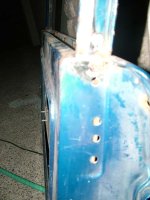
Alright I was doing some body work with Scott - nothin gay - and had some spare time so I wanted to try the window frame removal on one of my spare doors so...went and grabbed one, if you look you can see the spot welds very easily on each side.
Steps:
1. pilot drill in the center of each spotweld, eh, 3/16 or something like that
2. drill out the 4 spotwelds on each side with a 3/8 bit. The striker side pattern for the welds is kinda funky.
3. Take your cutoff wheel or grinder and start removing the weld that is holding the frame to the tops of the doors (the horizontal weld there...you'll see it). Take your time and go slow, do a little wiggle here and there. You can also take a chisel or screwdriver and wedge it where the frame slips into the door and clearance it out there.
4. Do this to the other side too.
5. Do some wiggling, check to see what weld material might be hanging you up, we had a little on one side as well as a spotweld that wasnt completely freed.
6. Do a little cleanup on the frame and door
7. I plan to either weld up the holes in the frame and then thread them so I can just send a really short bolt through the door into the frame or leave it as is and use a button head bolt sent through the inside to the outside with a nut. You could also weld some of those square nuts that are REALLY shallow onto the inside of the frame. The front side where the vent window is doesnt really need short bolts and nuts, just the backside because the window and the weatherstripping will go through there. I plan to use the spotwelds that were cut for the bolting so that it stays true to form and isnt tweeked side to side.
8. Enjoy the simplest vent window and weatherstripping install you could ever imagine as well as a sweet clean look in the summers when the top is off. I might make something stainless or body color to fit in the channel to clean it up if I get the itch.
Sorry for the crappy pics, it got dark on us. Thanks to Scott swa0330 for the assistance and brainpower.


")
