• Welcome to ClassicBroncos! - You are currently viewing the forums as a GUEST. To take advantage of all the site features, please take a moment to register. It's fast, simple and absolutely free. So please join our community today!
    If you have problems registering or can't log into your account, please contact Admin.

73 Explorer Rebuild: year 8/9/10/11

broncobsession

Bronco Guru
Joined
Aug 12, 2001
Messages
4,049
Are you buying a new explorer compressor? Someone (broncobowsher maybe) said the old units can cause Black Death and ruin the new system if you resuse the old unit. And BCB as I'm sure you know has a way to run the sanden stuff with the explorer serp.
 
OP
OP
73azbronco

73azbronco

Contributor
Bronco Guru
Joined
Nov 11, 2007
Messages
8,040
Sorry, life or more accurately my job changed which meant zero time over last few years. Starting to re energize by reading and posting.


So about the AC, I am not seeing the sanden option on BCB for explorer serp, anyone? Im only seeing their front runner serp setup which Im to far into this to change over. I'm using a brand new, not rebuilt, stock Ford FS10 compressor made by Denso. From what I've been told by a local AC guy, they both are similar in output capability. Anyone know differently? Email sent to BCB.

Also, since im using the explorer serp, im using the explorer PS pump, anyone know if anyone made a bracket for the left side of the motor to use with this setup and use the Sanden and ham in a can PS pump?


Yep, just need some wiring, some brakes, some steering column, AC, and a million other little doodads and it s done.
 
Last edited:
OP
OP
73azbronco

73azbronco

Contributor
Bronco Guru
Joined
Nov 11, 2007
Messages
8,040
And it really begins. Garage cleaned out, Im loading my hardtop ona homemade dolley for long term storage, and this is going to get finished over the next three weeks or Randy gets it to finish.

Change of plans:

Going softop. With tubular doors, I mean it's AZ for crimeny sakes, not North Dakota. The 8 days a year it rains won't be an issue. Hence, need to store very nice refinished hardtop.

Not going to use AC, see above for that reason. Simplifies build immensely. Two guys in my hood have the vintage air, they describe it like as long as you only want your kneecap cold, it works great. I'd rather not go through the effort to have a cold knee, and sweltering under a metal roof, it's gone!

No AC, so no need for that side explorer serp bracket. So I'm going back to stock Saginaw steering pump removing many issues with the explorer version. I had external reservoir, lines etc all figured out, Now all I need is lines and plumbing to cooler to make the Hrdroboost steering combo bulletproof. Do need the serp swap kit to make the saginaw fit.

Going EFI, Fitech or Holley Sniper, still debating. Having trouble decoding some ignition issues on the fitech site whereas on the holley site they are pretty clear. I decided the huge altitude changes I would be making to run the thing, made it a no brainer now vice later, I dont want to mess with wires again...

Tonight the top off, then dash setup starts for wiring.
 
OP
OP
73azbronco

73azbronco

Contributor
Bronco Guru
Joined
Nov 11, 2007
Messages
8,040
Holley Terminator sitting on floor as well as all the parts needed to complete this thing. I hope.

Heater box rebuilt with new core and seals.

EFI fuel tank is being purged and cleaned from some bad stuff, will seal it when I get it back.

waiting for bushing from machinist to install WH Sag PS bracket for use on explorer serp. I am also buying a sag pump for a 96 F250 which has no reservoir to see if I can use one of the 4 dual return reservoirs in my junkyard collection.

Explorer fuse panel box was a bust. No, really, the box was so old and fragile from the heat it snapped so the idea to use that as a spare relay box is out, still thinking on that. Ideas?

Going to use original stock side mounted air cleaner for now although I did buy a pretty cool billet side draft intake, just no way to get a filter on it.

Installed ground cables on forward engine block one for battery and one from engine to frame.

Discovered in all the frame/body movement I'm missing the driver side airvent assembly. If thats all I've lost I'm golden.

Cleaned up the tailgate, sprayed internal frame rust preventative inside the cavities as flakes of rust where coming out, that Eastwood frame paint stuff works great.

And then sheared of a nut inside the tailgate, see other thread topic same subject.
 

tommyg

Contributor
Full Member
Joined
Jul 30, 2014
Messages
308
Would you mind posting some close up pictures of your nerf bars? I've been looking for a long time for a good set that isn't the huge tube version and yours look as though they may fit the bill. Greatly appreciate it.
 

txtruk15

Contributor
Sr. Member
Joined
Apr 1, 2017
Messages
753
Loc.
Highland Village, TX
just read through your whole build thread, your perseverance over the years gives me encouragement. Also, living in TX and having no AC, Ive been contemplating the whole AC thing too but now not sure it's really worth it either as I don't need cooler kneecaps either! It would be mainly for my wife when she rides along since I'm running a soft top, no doors or soft half doors anyhoo...

thanks for sharing your progress.
 

DirtDonk

Contributor
Bronco Guru
Joined
Nov 3, 2003
Messages
48,439
If not A/C in an EB, I say insulate the crap out of it! It can actually stay quite manageable, but without extensive insulation scenarios just the heat of the engine and exhaust can make the cabin very uncomfortable for passengers. Let alone a hot day.
Of course, it makes having a convertible that much more fun!

Age has something to do with it too of course. Not the trucks, but ours. I used to think there was no such thing as too hot or too uncomfortable. And even though my other cars had A/C, the lack of it in the Bronco was not a deal-breaker. But I have A/C now (I didn't have to hassle with the install though) and would definitely appreciate it in any EB.

But insulating very well does still make a big difference. Even for old farts with weak constitutions like me!;)

Paul
 

txtruk15

Contributor
Sr. Member
Joined
Apr 1, 2017
Messages
753
Loc.
Highland Village, TX
If not A/C in an EB, I say insulate the crap out of it! It can actually stay quite manageable, but without extensive insulation scenarios just the heat of the engine and exhaust can make the cabin very uncomfortable for passengers. Let alone a hot day.
Of course, it makes having a convertible that much more fun!

Age has something to do with it too of course. Not the trucks, but ours. I used to think there was no such thing as too hot or too uncomfortable. And even though my other cars had A/C, the lack of it in the Bronco was not a deal-breaker. But I have A/C now (I didn't have to hassle with the install though) and would definitely appreciate it in any EB.

But insulating very well does still make a big difference. Even for old farts with weak constitutions like me!;)

Paul

I most likely qualify for the old farts club lol. Love the insulation idea - did you use something like dynamat or boommat under carpet in the cab or heat shield underneath along the transmission tunnel or both? (sorry 73azbronco, didn't mean to hijack your thread)
 

DirtDonk

Contributor
Bronco Guru
Joined
Nov 3, 2003
Messages
48,439
Not just "both" in the EB world. More like "all of the above" instead!
With the new stuff out there more easy to obtain, I may try even different things. I'm leaning this time towards the spray-on Lizard Skin products (noise abatement first, then ceramic thermal barrier on top of that) from underneath. Then add the heat-shield products from DEI over some key areas.

All of the above can be applied to the inside of the tub, but the PO of my new-to-me '68 (904Bronco here) did such a cool job of applying the color-coordinated Raptor Liner, that I'm not really keen on covering it up. I will if I have to, to achieve my goal of quieter and cooler, but only if I must.
I'm going to try external stuff first.

Whenever you add exhaust headers, it's critical to at least pay the additional for the thermal barrier coatings. Or even more effective (but more hassle too) are the header wrap products such as those from DEI and others.

A shield type, mounted with an air gap between the big-heat items such as related to the exhaust (especially with catalytic converters) are a nice addition.
The junkyard is a great resource for ideas, but not all the modern car heat shield components are easily converted to use with Broncos. However if you find one, it's usually going to get the job done.

Another critical area that is not always thought of, is the cowl area under the hood at the base of the windshield. Ford did put insulation (on the inside) there and on the firewall even on the most basic of Broncos. So they knew there was a heat issue for sure. But they just used a glorified jute layer and though very helpful, there should be many more modern products that do the job better.

Liner products and even the Dynamat Extreme (with the foil backing) are not really great at keeping the heat out. Yes, they work to an extent, but their main claim to fame is as sound deadening of the metal panels. My firewall is already Dynamatted, but any Bronco either needs the stuff I mentioned, or at least a good carpet and under-carpet insulation layer.
Those last two really do make a HUGE difference in overall comfort. Both in noise and temperature. But if your Bronco has long-tube headers, even those are likely not enough to keep your wife's favorite shoes from melting!

There have been several recent discussions about noise and especially heat, so search them out to make sure I'm not leaving out any gory details.

Paul
 

txtruk15

Contributor
Sr. Member
Joined
Apr 1, 2017
Messages
753
Loc.
Highland Village, TX
thanks, this is very helpful - I'll do some reading on the forum on this as I like that approach of the dual benefit around thermal and acoustic solutions. DEI has some good stuff on their site for sure....
 
OP
OP
73azbronco

73azbronco

Contributor
Bronco Guru
Joined
Nov 11, 2007
Messages
8,040
Summer is butt pain at work, plus it's only 185 degrees here so no work on EB.

Current status Nov 1, 2017:

I have dropped anything which does not make the truck move in as short a time as possible. No radio, carpet, KC lights, winch, etc. Basic truck, rollbar which was removed, again, to install dash, plan to start and move this under it's own power by mid Nov.

Fuel tank fix was a total fail. The cleaning job which took 2 months at an industrial radiator repair shop was poor at best but he didn't charge me, the second powder coating failed as it left as much junk inside as I started with, he didn't charge me. Boat anchor in really nice dark grey PC.

I'm going to use the first version 25 gallon tank I bought 8 years ago, screw it, worry about it later.

I currently have a QJet installed purpose built by a guy in West PHX who lives carbs.

I have the PS pump done, lines, done, cooler done using an F250 PS cooler mounted right below radiator under winch.

I need to finish rear brake lines to front and front frame rail brake line bracket for soft lines to MC. I need to mount brake booster after frame lines done.

I need to finish heat shield around exhaust which was placed to close to fuel tank, D20, and one section of frame. Last time I let them build an exhaust with body off, to easy to make it way to tight to stuff. I do like the routing though, just not how close it is to stuff.

New 35's and rims are on.

Dash is on table 10% wired up. Had issue with headlight switch which would not release switch, had to order a second and it works fine. Hate to drop dime but TBP had the defective switch and WH had the good switch. Installing some Ron Francis parts along with using EB painless harness. One a courtesy light mod, and second a theft deterrent mod. Couple more to add but not right now.

Drilled hole in stock dash location for cigar lighter. Had to do it, funny it did not come that way.

Finished install of radiator hoses. Used custom Silicone pieces to make bends for lower rad hose. I could not get the bent up "mod" pipe for lower 5.0 explorer with stock rad to fit right. Also used internal rad hose springs to keep it from collapsing. Upper hose is stock rubber cut and rotated about 90 degrees to fit vertical thermostat housing outlet.

Installed very nice windshield, had local shop do it for $140 installed. Pre installation I "repaired" some small rusty edges with grind and primer and paint. Looks great

Installed wipers, but then realized I need to remove motor to install lowering bracket and cowl.

I have a back hallway filled floor to ceiling with "not going to use these yet" parts.

More later with photos in a day or week.
 

boonz28

Sr. Member
Joined
Aug 28, 2011
Messages
477
Awesome build!
I think you're on the right track prioritizing what needs to be done to get it on the road asap.
I eventually had to do the same with mine or else i'm pretty sure it would be a 30 year project that was never quite drivable. lol
 
OP
OP
73azbronco

73azbronco

Contributor
Bronco Guru
Joined
Nov 11, 2007
Messages
8,040
14 Nov 2017 status.

Finished wiper bracket mod and cover mod for soft top.

Deeper into dash rewire, all dash components mounted, wire loom tentatively routed, need to just start biting the bullet and making the connections.

Ordered retro sound and dash speaker with DIN repair kit. Could not see fit to use the DIN dash repair cuby hole storage bin, even though I powdercoated same coler as dash. I'm going fastest route to drive and dash radio is it.

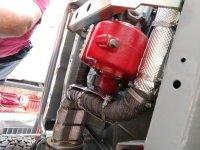
Working mostly on underside right now. Finished front 2/3rds of the exhaust wrap. yep, my guy did such a great job, I am pretty sure I needed to wrap the exhaust so i don't fry paint, and boil D20 fluid. That, and I needed a shield over the exhaust crossover pipe so any grease of the front ujoint wont end up on the pipe and smoke. At first i thought I'd hate myself wrapping exhaust, Now i think it looks pretty good.

Next up wrapping pipe behind muffler, then emergency brakes, back to front brake line, and fuel line. Then reinstall fuel tank, note oil pan on bottom.. With the space available, i sort of think fenderwell headers exiting above the frame and back would have worked, plenty of space between rails and floorboard.


Photo, looking at D20 up is to the right, forward is toward the top. Next photo is driver side by clutch linkage.

Holy cow, if anyone does the wrap, watch it, this stuff is pure fiberglass and I came out looking like a galaxy sparkling with all the glass flakes. Yes, I used a breather and goggles and gloves. Still got some pricklys on me though...
 

Attachments

  • IMG_20171114_154758861.jpg
    IMG_20171114_154758861.jpg
    107.8 KB · Views: 141
  • IMG_20171114_154851800.jpg
    IMG_20171114_154851800.jpg
    94.6 KB · Views: 141
OP
OP
73azbronco

73azbronco

Contributor
Bronco Guru
Joined
Nov 11, 2007
Messages
8,040
23 Nov 2017. Tday, but ours is really tomorrow with family so I'm allowed to post and work today:)

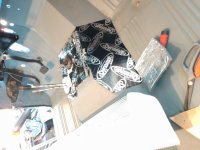
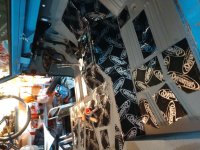
Finished install of rear carpet pad and rear carpet.

Finished install of dynamat on front of cab, will finish rest Sat.

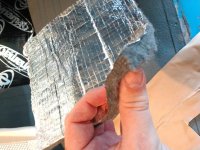
Here are pics of dynamat, the insulating material with reflective backing obtained at local upholstery supply shop for about $50 a roll with enough to do 2 broncos. And high heat reflective material I'm using throughout.

Next up is dynapad on floorboards up to firewall, dynapad under firewall insulator and install firewall insulator. Then front carpet section and trim to finish.

THen dash install.
 

Attachments

  • IMG_20171123_160246596.jpg
    IMG_20171123_160246596.jpg
    121 KB · Views: 111
  • IMG_20171123_160228188_LL.jpg
    IMG_20171123_160228188_LL.jpg
    86 KB · Views: 109
  • IMG_20171123_164545259.jpg
    IMG_20171123_164545259.jpg
    128.4 KB · Views: 133
OP
OP
73azbronco

73azbronco

Contributor
Bronco Guru
Joined
Nov 11, 2007
Messages
8,040
Life got in the way, but I'm back/

Since Dec 2017 I have been finishing the thousand items.

Dec was finishing, finally, brake lines all around. And fuel lines top of frame rail front to back, with a return line for future EFI.

Eastwood brake flaring tool is the bomb. Used it on brake lines and fuel lines.

Last week was WH wilwood brake booster and MC.

Also LOkar throttle cable to carb with brackets.

Today installed dash with wire harness, still need to run wires.

Installed Dakota digital sensor stuff, I had to grind the speedo sensor fitting to make it fit all the way onto speedo gear, it was to long to allow speedo gear circlip to work. I then needed to use an allen screw to mount the adapter because they didn't think about how bid the adapter is, and a regular bolt is to large around.


Photos to follow.
 
OP
OP
73azbronco

73azbronco

Contributor
Bronco Guru
Joined
Nov 11, 2007
Messages
8,040
Dakota digital sensors installed.

Fuel pump installed. I now have fuel lines filters pump from carb to tank that needs to be installed, waiting for test of fuel sender with dakota digital dash.

For now intake and filter installed. Need to work a better airbox/cool air option. This gets me out the door though.

Wiring. I'm good at this part, as good as building motors, just takes time melding a painless harness into a 4g alternator with MSD ignition and a Painless trail rocker box giving me 6 switches. One will be master off for fuel pump (ignition only hot), three for ARB, two for lights front and back. Secret MSD kill switch under dash. Can mount to roll cage but thinking under dash is best.

Obviously the pics, wires are not where they will end up, everything's just the spaghetti pile right now.

Pics
 

Attachments

  • dash wire.jpg
    dash wire.jpg
    106.9 KB · Views: 189
  • arb.jpg
    arb.jpg
    130.1 KB · Views: 167
  • carter pump.jpg
    carter pump.jpg
    102 KB · Views: 163
  • wilwood MC.jpg
    wilwood MC.jpg
    127.7 KB · Views: 157

DirtDonk

Contributor
Bronco Guru
Joined
Nov 3, 2003
Messages
48,439
Obviously the pics, wires are not where they will end up, everything's just the spaghetti pile right now.

I dunno... Seems pretty normal to me. Seen a lot of Broncos run just like that for years without anyone noticing apparently!

Carry on. Looks great!

Paul
 
OP
OP
73azbronco

73azbronco

Contributor
Bronco Guru
Joined
Nov 11, 2007
Messages
8,040
More wiring today, verified MSD 4g painless and trailrocker from painless wiring using carter fuel pump ARB locker pump front rear lights, extra ground wire run fropm dash to front clip to rear end for lights and whatever with fuseable link.etc.


This is completely out of order but could not find it and thought I lost it, my Camshaft info, found it searching for another issue so here is my camshaft, and is a conversation on another thread with someone talking cams and 347:
Welcome to the club. Just finished my 347, delivery from machinsist this AM.

Edelbrock performer heads, 60cc volume, KB 366 stepped hyperT flatop pistons, SCAT stroker forged crank/ rods. To use the pistons I wanted, I had to pick different scat components so a little more cost than a kit.

My camshaft from fordstroker.com who I highly recommend:

J. DIAM: STD INT EXH
VALVE ADJUSTMENT HYD HYD
GROSS VALVE LIFT .561 .556
DURATION @ .006
TAPPET LIFT 260 270
VALVE TIMING OPEN CLOSE
@ .050 INT 3- 33
EXH 45 7-
SPECS FOR CAM INST. @ 108.0 CENTERLINE
INT EXH
DURATION @ .050 210.00 218.00
LOBE LIFT .351 .348
LOBE SEPARATION 112.0 FIRING ORDER STD
ROCKER ARM RATIO 1.60 1.60

Cam is a fordstroker design, compcams grind.

Cam installed advanced two degrees to drop RPM range, have not test driven it but by all accounts the way it starts right up and throttle response is fabulous.

I'm using a custom ignition system designed for this cam/motor, by Ignition Engineering. They used the shell of a Duraspark, set the curve to my cam/motor use, and limited advance to prevent detonation and piston issue (max 38 degree's), using a mopar ignition module which is cheaper than a Ford duraspark and reliable as the day is long in Phoenix summer heat.

Carb is a new out of the box Holley TA 650, no adjustment needed. I'm going to get a AFR reading once its insalled in vehicle.

My stroker lessons learned:

Don't be to afraid about pushing 9.8:1 CR, with the right cam and aluminum heads, dynamically the motor will be seeing about a CR of 8.5:1You'll only get into trouble if you fall for a cam thats too big.

You already found one, ensure all the oil galley plugs are tapped, forgot one and on first start lost oil pressure. The plugs don't like to be cleaned in a abrader, loosens them up.

Second lesson, every cam maker except fordstroker wanted to give me too big a camshaft, all worked from 1500 rpm on up. Compcams technicians one on one wanted to tighten up the LSA which would work counter to my goal (heavy truck, relatively hi CR, lower power band, excellent idle and vacuum).

Stay with a stock oil pump, last thing you need is hi pressure oil flying around inside finding an excuse to burn, stock pump gives me 60 psi at idle.

Classic rear end oil leak, two to be exact. First was standard rear intake leak, easily fixed, second hard to find, rear main seal, needed to buy the upgraded seal to get it to stop leaking. Not sure of that part number, sorry.

My recommendations: Make sure the cam works with your stuff, I spent four weeks going back and fourth with three cam designers before locking down this one. I was also going to try and fake it with an EFI camshaft (i thought I might be goint that way), but now satisfied I made the right choice sticking with a carb cam.

It sounds like you have EFI? If so, I highly recommend getting it to a tuner and solve your higher RPM issues once it gets running, at least verify AFR so you don't smoke the pistons. If your using hypers, stay below 32 degrees advance.
 
Last edited:
Top