• Just a reminder that you won't be able to start new posts or reply to existings posts in the Archive forum.

    This is where all the old posts go so they can still be used for reference and searched.
  • Welcome to ClassicBroncos! - You are currently viewing the forums as a GUEST. To take advantage of all the site features, please take a moment to register. It's fast, simple and absolutely free. So please join our community today!
    If you have problems registering or can't log into your account, please contact Admin.

1970 Build - For the Next Gen

Past_Miner

Contributor
Bronco Guru
Joined
Oct 22, 2003
Messages
1,020
I'm getting started in earnest on a project that's been sitting in my garage for years. It's a 1970 wagon that will be for my son to drive while he finishes out high school.

A little background:
I have owned at least one running bronco (and usually several carcasses) continuously for the last 20 years. All of my kids have grown up around EB's and they all naturally want to own one. Of course, I'm not giving any of them mine so I bought this rolling chassis several years ago with the intention of building it with my oldest son so he could learn a little about cars and have something different to drive when he was in high school. Well, life has its little challenges and in the time since we started this I've gotten divorced, changed jobs and moved to another state for work. Through all of that, I had lots of other problems and bills to deal with so this project went on the back burner. Time flies. My son was 11 when we started all of this, now he's turning 15 and I basically haven't done squat on his rig. He can already visualize his drivers license so he boosted me to get started a few weeks ago. Now our goal is to have this from a rolling chasis to a drivable bronco in one year. He works on it every other weekend when he visits and I work on it whenever I can. I have collected a pile of parts for this build over the years when I was able to swing it. It also gets the benefit of hand-me-down parts when I upgrade my own bronco.

The Build Goal:
The goal is to build a moderate off-roader on a budget with as much reliability as possible. Parts we have so far:

- 3.5" rear springs - donated (thanks Dave)
- 3.5" WH coils
- '76 D44 front end - from my bronco, blown posi, 4.56:1, alloy axles on one side (an unfortunate Moab casualty)
- '71 BB rear end, detriot locker, 4.56:1, alloy axles, Caddy disks - also from my bronco (following a FW swap related to the unfortunate Moab casualty incident, maybe it wasn't that unfortunate afterall ;) )
- Entire drivetrain from a running 1991 big bronco, 5.8L, E4OD, EFI and main harness - This was a long time vehicle of a good friend of mine that met it's doom during a freeway rollover accident. It was donated for the cost of the towing bill and a six pack
- New front door posts, outer rockers, kick panels and miscellaneous cowl pieces from JBG
- New inner fenders and wheel wells from the local classifieds
- Used core support from '66 from the local classifieds
- A couple of sheets of bare 18 ga

Hopefully, as we go forward this will all come together like we want it to. I am fairly good at the mechanical stuff and a little less rounded with the body work. I'm sure I will ask for lots of advice along the way. From the years on this board I know I can count on the rest of the members for good advice.

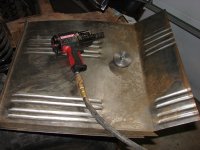
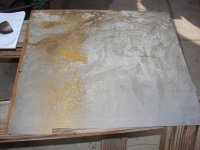
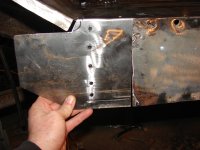
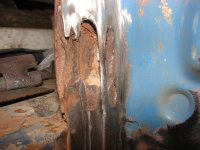
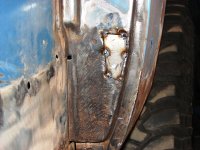
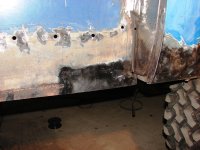
I know these threads aren't worth much without some pics, so here are the starting shots:
 

Attachments

  • DSC00008.JPG
    DSC00008.JPG
    282.5 KB · Views: 276
  • DSC00032.JPG
    DSC00032.JPG
    267 KB · Views: 301
Last edited:
OP
OP
Past_Miner

Past_Miner

Contributor
Bronco Guru
Joined
Oct 22, 2003
Messages
1,020
Axles

The first thing we did was put the new axles under the frame. We did this mostly because they were in the way on the floor all of the time. Had to cut a piece of one spring mount to get it apart but otherwise both ends went easy. We also bolted on a set of used 35's and wheels that I found in the classifieds for $250. They aren't perfect but they are a good start.
 

Attachments

  • DSC01093.JPG
    DSC01093.JPG
    237.8 KB · Views: 376
  • DSC01092.JPG
    DSC01092.JPG
    242 KB · Views: 308
  • DSC00677.JPG
    DSC00677.JPG
    239.3 KB · Views: 295
  • DSC00674.JPG
    DSC00674.JPG
    214.4 KB · Views: 292
  • DSC00672.JPG
    DSC00672.JPG
    250.8 KB · Views: 327
OP
OP
Past_Miner

Past_Miner

Contributor
Bronco Guru
Joined
Oct 22, 2003
Messages
1,020
Starting Body Work

This bronco has the normal cancer spots in the front of the tub that would be expected. The tub is fairly solid from the seat position back though. Here are some pics of the drivers side as we took it apart.
 

Attachments

  • DSC01170.JPG
    DSC01170.JPG
    235.5 KB · Views: 361
  • DSC01168.JPG
    DSC01168.JPG
    240 KB · Views: 340
  • DSC01166.JPG
    DSC01166.JPG
    220.7 KB · Views: 360
  • DSC01167.JPG
    DSC01167.JPG
    221.8 KB · Views: 325
  • DSC01159.JPG
    DSC01159.JPG
    211.1 KB · Views: 327
  • DSC01154.JPG
    DSC01154.JPG
    267.1 KB · Views: 312

Dan's73

Bronco Guru
Joined
Oct 17, 2006
Messages
1,116
Looks like a great Father & Son project...I'm sure he'll learn a lot as you go through it. Best of luck on the build!
 
OP
OP
Past_Miner

Past_Miner

Contributor
Bronco Guru
Joined
Oct 22, 2003
Messages
1,020
Last weekend we tested our skill with the cheap sheet metal brake and bead roller I picked up at Harbor Freight. I would like to blame it on cheap tools but I think the result has more to do with rusty skills. There was some buckling from the roller that took some time to pull out and there were some obvios mistakes in the order the bends were made on the brake. Still, it turned out ok and saved us some cash. I also made a press die to make the dimple for the body bolt on an old lathe I have. It seemed to work out ok too.
 

Attachments

  • DSC01281.JPG
    DSC01281.JPG
    265 KB · Views: 531
  • DSC01279.JPG
    DSC01279.JPG
    253.9 KB · Views: 346
  • DSC01277.JPG
    DSC01277.JPG
    246.3 KB · Views: 365
  • DSC01249.JPG
    DSC01249.JPG
    275.8 KB · Views: 363
  • DSC01275.JPG
    DSC01275.JPG
    222.4 KB · Views: 388
  • DSC01265.JPG
    DSC01265.JPG
    234.3 KB · Views: 350
  • DSC01263.JPG
    DSC01263.JPG
    226.3 KB · Views: 318

zeeman1

Bronco Guru
Joined
Apr 27, 2008
Messages
1,268
Loc.
Seattle
Thats a really good looking floorpan for a DIY'er. If the rest of your work ends up that nice this should be a great rig for your kid. I graduated back in 95, where's mine?
 
OP
OP
Past_Miner

Past_Miner

Contributor
Bronco Guru
Joined
Oct 22, 2003
Messages
1,020
Thats a really good looking floorpan for a DIY'er. If the rest of your work ends up that nice this should be a great rig for your kid. I graduated back in 95, where's mine?

Your floorpan, or your Bronco? lol. I could be persuaded to send you a pan, for a small fee. Sorry, you're on your own for the whole rig.

Thanks for the encouragement. I learned a few things on this piece and I think the other side will turn out a little better.
 
OP
OP
Past_Miner

Past_Miner

Contributor
Bronco Guru
Joined
Oct 22, 2003
Messages
1,020
Welded out the floorpan last night and moved on to the inner rocker. Planning to finish the inner rocker, striker post and seat platform repairs over the weekend then move on to the left side of the cowl and to the kick panel.
 

Attachments

  • DSC01294.JPG
    DSC01294.JPG
    218.6 KB · Views: 401
  • DSC01290.JPG
    DSC01290.JPG
    233.7 KB · Views: 393
  • DSC01288.JPG
    DSC01288.JPG
    236.4 KB · Views: 417
OP
OP
Past_Miner

Past_Miner

Contributor
Bronco Guru
Joined
Oct 22, 2003
Messages
1,020
Striker Post Repairs

Spent most of the weekend spot repairing the drivers side striker post, inner rocker and cowl extension panels. We also finished up repairs on the drivers side floor. The striker post looked pretty bad but it turned out to be very solid except in two isolated spots. The door jamb rib looked especially bad but the lower section was protected by a huge glob of seam sealer that was down inside the rib. This damage was caused by failed seam sealer at the seam where the bed meets the post on the inside of the cab. Water was getting thrown between the striker brace and the striker and rotted away the piece. I also had to cut away the lower section of the brace and fab up a patch. I will be sure to seal this area carefully before lining the bed.
 

Attachments

  • DSC01312.JPG
    DSC01312.JPG
    239.1 KB · Views: 330
  • DSC01307.JPG
    DSC01307.JPG
    245.7 KB · Views: 319
  • DSC01306.JPG
    DSC01306.JPG
    222.5 KB · Views: 299
  • DSC01304.JPG
    DSC01304.JPG
    232.6 KB · Views: 322
  • DSC01301.JPG
    DSC01301.JPG
    248.7 KB · Views: 315
  • DSC01299.JPG
    DSC01299.JPG
    229.1 KB · Views: 334
  • DSC01296.JPG
    DSC01296.JPG
    246 KB · Views: 357
  • DSC01284.JPG
    DSC01284.JPG
    239 KB · Views: 352
OP
OP
Past_Miner

Past_Miner

Contributor
Bronco Guru
Joined
Oct 22, 2003
Messages
1,020
Patched a spot on the lower rear sction of the inner rocker. I had some buckling problems after welding but managed to bump it back to relatively flat with a dolly and hammer. Fabbed a couple of patches to finish up the floor and tunnel repairs on the drivers side.
 

Attachments

  • DSC01331.JPG
    DSC01331.JPG
    220.3 KB · Views: 327
  • DSC01329.JPG
    DSC01329.JPG
    216.2 KB · Views: 317
  • DSC01325.JPG
    DSC01325.JPG
    253.3 KB · Views: 270
  • DSC01322.JPG
    DSC01322.JPG
    255.8 KB · Views: 310
  • DSC01315.JPG
    DSC01315.JPG
    224.2 KB · Views: 286
  • DSC01319.JPG
    DSC01319.JPG
    223 KB · Views: 316
OP
OP
Past_Miner

Past_Miner

Contributor
Bronco Guru
Joined
Oct 22, 2003
Messages
1,020
Left Side Cowl

The left side cowl extension was shot and required replacement. I also had to replace the cowl side extension due to the damage I did to it when I removed the door post. I bought these pieces because I wasn't sure I could make them myself. This especially true for the side extension, which I'm not sure I could fab with the tools I have. I was able to patch the rear side extensin with a small tab rather than remove the dash and replace it. I made a small piece to patch the top of the cowl.
 

Attachments

  • DSC01347.JPG
    DSC01347.JPG
    263.5 KB · Views: 317
  • DSC01343.JPG
    DSC01343.JPG
    254.5 KB · Views: 307
  • DSC01341.JPG
    DSC01341.JPG
    252.1 KB · Views: 281
  • DSC01339.JPG
    DSC01339.JPG
    219.9 KB · Views: 270
  • DSC01337.JPG
    DSC01337.JPG
    243.2 KB · Views: 283
  • DSC01336.JPG
    DSC01336.JPG
    251.1 KB · Views: 288
  • DSC01334.JPG
    DSC01334.JPG
    222.5 KB · Views: 297
  • DSC01333.JPG
    DSC01333.JPG
    236.8 KB · Views: 320
  • DSC01357.JPG
    DSC01357.JPG
    221.5 KB · Views: 347
  • DSC01362.JPG
    DSC01362.JPG
    266.3 KB · Views: 377

BoltBuster

Bronco Guru
Joined
Jun 5, 2002
Messages
2,051
Nice sheetmetal work, you make it look easy...did you have to weld youe E brake cable bracket back on?
 
OP
OP
Past_Miner

Past_Miner

Contributor
Bronco Guru
Joined
Oct 22, 2003
Messages
1,020
Nice sheetmetal work, you make it look easy...did you have to weld youe E brake cable bracket back on?

Thanks. I'm just trying to go slow and be careful. Too much heat and I find myself with a mess. I have a good supply of cutoff wheels and flapper disks too. I have noticed that shiny tends to hide the mistakes.

I haven't welded the cable bracket back in yet. I accidently cut about 90% of the way through the cable when I cut the rot out of floor so I decided I would fix it after I pull the cable out. I'm planning to pull the tub off the frame and put it on a rotisserie after we get the floors and door posts fixed. I figure stuff like this is easier to fix when the tub is upside down.
 
Last edited:

BoltBuster

Bronco Guru
Joined
Jun 5, 2002
Messages
2,051
The first thing we did was put the new axles under the frame. We did this mostly because they were in the way on the floor all of the time. Had to cut a piece of one spring mount to get it apart but otherwise both ends went easy. We also bolted on a set of used 35's and wheels that I found in the classifieds for $250. They aren't perfect but they are a good start.

Miner, whos rear disc brake kit is that? Is that the chevy calipers and disc? hoping to find a kit that matches my front.
 
OP
OP
Past_Miner

Past_Miner

Contributor
Bronco Guru
Joined
Oct 22, 2003
Messages
1,020
Miner, whos rear disc brake kit is that? Is that the chevy calipers and disc? hoping to find a kit that matches my front.

The rears are caddy calipers with late model metric F-150 rotors. I fabbed the mounting brackets for the calipers from the original brackets. I redrilled the 5 x 5.5 bolt pattern in the rotors and then turned down their diameter by about 1/2" to get them to clear. The only reason I used these rotors instead of the Jeep ones was to get the rotor to fit over the outside of my Yukon axles. Most of the kits will have the rotors mounted to the back side of the axle flange similar to the fronts. I'm not sure if these calipers use the same pads as the Chevy fronts or not. These have the integrated e-brake though, so they are different calipers. BC Broncos has a great rear kit based on these calipers and Chuck is the authority on them. He could steer you in the right direction.
 

Attachments

  • DCP00295.jpg
    DCP00295.jpg
    103.4 KB · Views: 113
  • DCP00290.jpg
    DCP00290.jpg
    88.2 KB · Views: 88
  • DCP00293.JPG
    DCP00293.JPG
    150.7 KB · Views: 94
  • DCP00292.jpg
    DCP00292.jpg
    102.7 KB · Views: 92
OP
OP
Past_Miner

Past_Miner

Contributor
Bronco Guru
Joined
Oct 22, 2003
Messages
1,020
The Dreaded Door Post

Okay, I cleaned the garbage out of the back of this Bronco so all of you didn't have to look at that mess anymore. About all I managed to do yesterday was get the first rough set for the kick panel, rocker and door post on the drivers side. The dash had settled a little so I put a jack under it and clamped everything where I thought it needed to go. I was not able to bolt the lower dash brace to the kick panel though. I tried for an hour to jack things around to get the bolt holes to line up. It just doesn't work. After comparing to the other side I am convinced that the holes are just in the wrong place so I will move them and fill the old holes after I get things set where I want them.

I plan to remeasure tonight and put everything together with screws then hang the door and start making adjustments. I think I have read every post available for this, but I'm not proud. If anyone has any advice I will hapilly take it on this one.
 

Attachments

  • DSC01364.JPG
    DSC01364.JPG
    260.9 KB · Views: 360
  • DSC01366.JPG
    DSC01366.JPG
    232.1 KB · Views: 356
  • DSC01367.JPG
    DSC01367.JPG
    226.7 KB · Views: 378
Top