• Welcome to ClassicBroncos! - You are currently viewing the forums as a GUEST. To take advantage of all the site features, please take a moment to register. It's fast, simple and absolutely free. So please join our community today!
    If you have problems registering or can't log into your account, please contact Admin.

Rear Quarter Panel Removal & Replacement Tech Article

BoureeOne

Contributor
Bronco Guru
Joined
Mar 28, 2011
Messages
3,068
Loc.
Madisonville, La
I thought I would start a thread on showing the steps for removing and replacing the rear quarter panels. This may be a little slow going, since my shop is a little ways from my house, and I may not get the chance to get over there for a couple of weeks at a time. I have decided to go LUBR on my 66 Wagon. I have received my new uncut rear quarters from JBG. Below you will see a pic of the fender with the flares removed, as well as the tire removed. I then took my angle grinder and installed a thin cutting wheel. Picked up the wheel at Lowes. I then cut around the edge of the fender , maybe 1 1/2 inches from the outer edges. When cut is complete, you now have very good access to the spot welds. My next post and next step will be to media blast the areas where the spot welds are. Where the fender is spot welded to the door opening I will probably use a wire wheel to expose the welds, but up under the fender I will use the sand blaster. More pics to come.

Scott
 

Attachments

  • IMG_1398.JPG
    IMG_1398.JPG
    88.5 KB · Views: 909
  • IMG_1399.JPG
    IMG_1399.JPG
    96.8 KB · Views: 939
  • IMG_1400.JPG
    IMG_1400.JPG
    100.5 KB · Views: 919
Last edited:

Chief Master Sergeant

Retired U.S. Air Force
Joined
Nov 6, 2002
Messages
5,172
You may be the one who told me how to do this. Air chisel next? That's what I used and it was completely off in half an hour.
 
OP
OP
BoureeOne

BoureeOne

Contributor
Bronco Guru
Joined
Mar 28, 2011
Messages
3,068
Loc.
Madisonville, La
I will probably get the welds drilled out first. I dont want to damage any of the surrounding parts. But the air-chisle is a comin. Here is my dilema. I have such great access to the inner fenders now. Would love to media blast the body now. But have heard to many stories about removing and adding body parts with the body off, and then you can't get stuff lined back up. So, I am going to finish all my body work first. I have replace the passenger floor panel. Will replace drivers also. Will replace the rear quarters. Then I will take the body off.
 

Casey835

Sr. Member
Joined
Mar 8, 2008
Messages
759
Hurry up and weld the new ones in! I want to see how you do it. Im fixing to weld mine in.
 

Chief Master Sergeant

Retired U.S. Air Force
Joined
Nov 6, 2002
Messages
5,172
The only area I really felt like I had to drill out the spot welds was at the striker post. Other than that, the air chisel took the spot welds off pretty cleanly. I drilled holes from the bottom side into the upper quarter panel. Then mounted the quarter and welded it in from inside the tub, through the holes I drilled. Came out pretty clean. Good luck!
 
OP
OP
BoureeOne

BoureeOne

Contributor
Bronco Guru
Joined
Mar 28, 2011
Messages
3,068
Loc.
Madisonville, La
On your striker post, were the welds on the door side or on the fenderwell side? The welds from the factory.
 
OP
OP
BoureeOne

BoureeOne

Contributor
Bronco Guru
Joined
Mar 28, 2011
Messages
3,068
Loc.
Madisonville, La
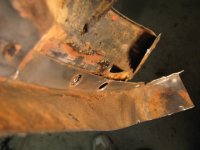
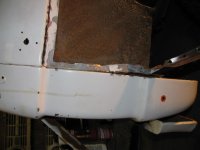
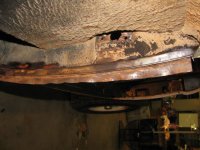
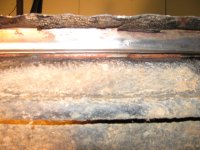
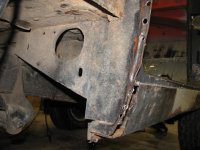
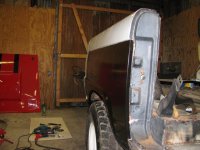
Ok, got back into the shop and finished getting my passenger fender removed. I have taken many photos. I have read other post where guys said they cut a couple of spot welds and the fender fell out. Well that was not the case with mine. I do not know if the fenders were attached differently over the years. Mine is a 66 wagon, and I can only share with you my experience. Also keep in mind that I was very careful and worked slowly to make sure that I did not damage any of the surrounding metal. On my previous post where I said to cut around the edge, try to cut down to maybe an inch of the edge. This will allow you greater access with the angle grinder and wire brush. My orig plan was to use my portable sand blaster to clean metal to locate welds, but it was raining heavily last night and I could not roll Flying Tiger outside. I worked with the rear tire still on, you could of course take the tire off for more room to work. My first job was to thorouly clean the inner edge of the remaining fender. You need to really get in there and get down to the bare metal, this will make the spot welds easier to see. First pic is all the equipment that I used. After I finished removing the fender, I counted 57 spot welds, thats right, 57. Once the metal has been thoroughly cleaned, and the spot welds located, you need to center punch each weld. This step is very important and can save you time later. I used both a deck screw and a ground down phillips screw driver as my punch. On hind sight, I think a better option would be a drill and a small bit. You really want a good pilot hole because the spot weld removing bit is going to want to travel and walk. To save you time of constantly trying to reset the bit on the spot weld, take the time to make a good center punch or drilled pilot hole. Next picture is the bit I used. I bought the 3/8 bit at Harbor Freight. Cost was under $5. The bit has a center point which is spring loaded. There is a screw on the end of the bit that allows you to adjust the tension of the spring. The bit is actually double ended. You can screw the bit off and turn it over for a fresh set of teeth. I cut all 57 welds without turning it over. The first pictures you see of holes being drilled is on the rear bottom portion of the fender edge. I started on the bottom and worked my way up. There are later pics that show how you can clearly see where the spot welds are. The last pic on this page you can see where the fender goes behind a lip. About a foot up from the bottom the fender goes behind a lip. I only found a couple of spot welds on the front of that lip. The rest of the welds in this area of the fender are actually welded from the rear light bucket housing. I could not get to those with the spot weld bit. Those were removed using a combination of the air chisle, hammer and chisle, and the angle grinder with a cutting wheel.
 

Attachments

  • IMG_1493.JPG
    IMG_1493.JPG
    128.5 KB · Views: 719
  • IMG_1421.JPG
    IMG_1421.JPG
    81 KB · Views: 712
  • IMG_1414.JPG
    IMG_1414.JPG
    113.2 KB · Views: 846
  • IMG_1429.JPG
    IMG_1429.JPG
    164.6 KB · Views: 689
  • IMG_1430.JPG
    IMG_1430.JPG
    86.3 KB · Views: 821
  • IMG_1431.JPG
    IMG_1431.JPG
    98.6 KB · Views: 818
  • IMG_1432.JPG
    IMG_1432.JPG
    100.2 KB · Views: 776
  • IMG_1435.JPG
    IMG_1435.JPG
    90.3 KB · Views: 754
  • IMG_1436.JPG
    IMG_1436.JPG
    97.8 KB · Views: 743
  • IMG_1437.JPG
    IMG_1437.JPG
    101.6 KB · Views: 742
Last edited:
OP
OP
BoureeOne

BoureeOne

Contributor
Bronco Guru
Joined
Mar 28, 2011
Messages
3,068
Loc.
Madisonville, La
The first pic here give a good view of how the fender goes behind this lip. The next 2 pics show the view from looking into the rear light bucket space. It was just not feasible to get in there to locate and drill out welds. The next pics (1444 and 1445 ) gives a good view of what the spot welds look like. The next pic ( 1446 ) shows those welds drilled out. The next pic (1448 ) shows the general area where I could not get to the welds from the rear. In this area I would use the air chisel to slightly seperate the fender from the rear quarter. Make sure when you chisel that you keep the flat side of the chisel towards the metal that you do not want to damage. Just chisel in short burst. Once I located the weld I would either insert a small chisel in between the metal and used a hammer. I would also use the angle grinder with a cutting wheel. I found that when you got to the top corners of the fender, both front an back, there were no welds actually in the corner. The first welds along the top and down the front and rear were a few inches from the corner.
 

Attachments

  • IMG_1440.JPG
    IMG_1440.JPG
    103.5 KB · Views: 764
  • IMG_1441.JPG
    IMG_1441.JPG
    85.7 KB · Views: 721
  • IMG_1442.JPG
    IMG_1442.JPG
    85.5 KB · Views: 702
  • IMG_1444.JPG
    IMG_1444.JPG
    89.3 KB · Views: 671
  • IMG_1445.JPG
    IMG_1445.JPG
    111.2 KB · Views: 656
  • IMG_1446.JPG
    IMG_1446.JPG
    125.1 KB · Views: 702
  • IMG_1448.JPG
    IMG_1448.JPG
    77.9 KB · Views: 749
Last edited:
OP
OP
BoureeOne

BoureeOne

Contributor
Bronco Guru
Joined
Mar 28, 2011
Messages
3,068
Loc.
Madisonville, La
The second and third pics show the spot welds on the front part of the fender. The welds are on the fenderwell side. The lip of the fender sits on the door opening side. In pic 1449 you can see the backing plate for the door striker post. The next pic, 1467 shows the spot welds on the front part of the fender cut out. Pic 1475 shows me starting on the top rear portion of the fender. I cut the back portion of the fender off after I had removed the welds to make it easier to manipulate the top. Pic 1476 shows where I would use the air chisel if I had trouble locating a weld. All you need to do is slightly seperate the metal and you can see where the weld is. You can either cut it out with the bit, or cut it with the chisel and hammer, or the angle grinder with the cutting wheel. With out a doubt, at least for me, the easiest thing to do was drill out welds with the bit. Also remember, you do not have to cut deep with the bit. Just an 1/8 of an inch gets the job done. Even if you did not get it completely, a little manipulating of the fender breaks it free. I would typically drill a few welds out, then seperate the fender, then move on to the next few. Pics 1477 and 1478 show the spot welds up on the inner top of the fender. Remember, really cleaning these surfaces makes it much easier to see the welds.
 

Attachments

  • IMG_1448.JPG
    IMG_1448.JPG
    77.9 KB · Views: 595
  • IMG_1449.JPG
    IMG_1449.JPG
    126.9 KB · Views: 579
  • IMG_1467.JPG
    IMG_1467.JPG
    104.8 KB · Views: 606
  • IMG_1475.JPG
    IMG_1475.JPG
    85.2 KB · Views: 585
  • IMG_1476.JPG
    IMG_1476.JPG
    96.5 KB · Views: 622
  • IMG_1477.JPG
    IMG_1477.JPG
    112.2 KB · Views: 597
  • IMG_1478.JPG
    IMG_1478.JPG
    126.6 KB · Views: 553
Last edited:
OP
OP
BoureeOne

BoureeOne

Contributor
Bronco Guru
Joined
Mar 28, 2011
Messages
3,068
Loc.
Madisonville, La
All of thes pics show what everything looks like with the complete fender removed. Pics 1481 and 1482 clearly show the lip that the rear part of the fender slides behind. There is a channel there that the fender fits into.
 

Attachments

  • IMG_1480.JPG
    IMG_1480.JPG
    113 KB · Views: 717
  • IMG_1481.JPG
    IMG_1481.JPG
    94.5 KB · Views: 647
  • IMG_1482.JPG
    IMG_1482.JPG
    110.3 KB · Views: 663
  • IMG_1483.JPG
    IMG_1483.JPG
    145.1 KB · Views: 622
  • IMG_1484.JPG
    IMG_1484.JPG
    124.1 KB · Views: 607
  • IMG_1485.JPG
    IMG_1485.JPG
    142 KB · Views: 622
  • IMG_1486.JPG
    IMG_1486.JPG
    123 KB · Views: 615
  • IMG_1487.JPG
    IMG_1487.JPG
    113.4 KB · Views: 563
  • IMG_1488.JPG
    IMG_1488.JPG
    138.2 KB · Views: 693
OP
OP
BoureeOne

BoureeOne

Contributor
Bronco Guru
Joined
Mar 28, 2011
Messages
3,068
Loc.
Madisonville, La
These last pics show the new fender mocked up. I bought my fenders from JBG. They are the more expensive Dynacon. Just sitting there mocked up, you would think this fender was custom made for my rig. The fit is unreal. Everything lines up perfect and fits like a glove.

If I run into any extra issues when I remove the drivers side, I will post it on this thread. I will also try and do some extensive research on the best way to install the new fenders, and I will document that also.

I think I would like to get into the open fenderwell now, while it is really exposed, and do some media blasting.

I hope this thread helps. I am by no means an expert. I like to take things slow and do them right. If you have any questions I will try to answer them. Hopefully if there are questions, the real experts will chime in with good answers.

Thanks
Scott
 

Attachments

  • IMG_1489.JPG
    IMG_1489.JPG
    100.5 KB · Views: 840
  • IMG_1491.JPG
    IMG_1491.JPG
    64.6 KB · Views: 756
  • IMG_1494.JPG
    IMG_1494.JPG
    111.8 KB · Views: 724
  • IMG_1495.JPG
    IMG_1495.JPG
    115.8 KB · Views: 774
  • IMG_1497.JPG
    IMG_1497.JPG
    74.6 KB · Views: 706

Edger6

Full Member
Joined
Dec 14, 2011
Messages
225
Loc.
Hampton,
Thank you. Do u have to cut out the rear fender to access the spot welds, im guessing everthing is spot welded, I have two tubs that im trying savalage as much as I can from each. Before I start buying body parts. Any one in hampton roads wanna come help.
 
OP
OP
BoureeOne

BoureeOne

Contributor
Bronco Guru
Joined
Mar 28, 2011
Messages
3,068
Loc.
Madisonville, La
I would say no, you dont have to cut it to get to welds. But it sure does make it a whole lot easier. If you dont cut them I would say you would almost have to sand blast to clean off the metal to be able to see the welds.
 
OP
OP
BoureeOne

BoureeOne

Contributor
Bronco Guru
Joined
Mar 28, 2011
Messages
3,068
Loc.
Madisonville, La
Ok, I finally got to get the drivers side panel removed. The only difference I ran in to from the passenger side was that I did find some spot welds close to the top corners in the front and rear. The first pic 1547 shows where the spot welds were drilled out on the upper inner lip and the front door post. The second pic 1544 shows the entire fender removed. The last pic 1545 shows the lip that the rear of the fender slipped into. You can see the spot welds that are done from the rear light bucket area. You can not really get to those front the rear . I used the air chisel to slighly seperate the fender from the rear quarter. Make sure that any chisel you use, whether an air chisel or a chisel with a hammer, that the flat side of the chisel is towards the metal that you do not want to damage or disturb. With the air chisel I would just give it a quick trigger pull to slightly separate the metal so you can see where the spot welds are. I then used a very sharp cold chisel and hammer to cut the spot welds. You can also use an angle grinder with a cutting wheel to cut those welds, but be very careful, it can get away from you and might damage the surrounding metal.

Hope this helps.

Scott
 

Attachments

  • IMG_1547.JPG
    IMG_1547.JPG
    109.1 KB · Views: 450
  • IMG_1544.JPG
    IMG_1544.JPG
    98.1 KB · Views: 479
  • IMG_1545.JPG
    IMG_1545.JPG
    92.5 KB · Views: 433

smankin

Newbie
Joined
Feb 28, 2011
Messages
18
This article came across just in time. I have a new passenger fender and tail light bucket to put on next weekend.
 

Chief Master Sergeant

Retired U.S. Air Force
Joined
Nov 6, 2002
Messages
5,172
Hey brother, the fun part starts when you go to cut the hole for the gas fill pipe. What an ass pain! I used a hydraulic punch to make a perfect hole, but unfortunately the hole was off by the slightest bit and made for a real pain installing the pipe. Then the three screws that mount the pipe to the body gave me fits. You are doing a great job though. I'll be glad when mine is done for awhile.
 
OP
OP
BoureeOne

BoureeOne

Contributor
Bronco Guru
Joined
Mar 28, 2011
Messages
3,068
Loc.
Madisonville, La
I think I am ok there for a couple of reasons. Will be installing a 2" BL, and I will be using a Cobra Roadster Style flip up cap, and I will be installing a 23 gallon aftermarket tank.. I will have to custom make the filler hose anyway, so I can put the cap where-ever I want to a certain degree. There are two local shops that make the tanks, Deep South Fab, and Searchers 4x4. So I can have them tweek it if need be. The driver side fender, 65 spot welds. The guys who say they cut a couple of welds and the fender fell out. Those could not be factory installed fenders.

Scott
 
OP
OP
BoureeOne

BoureeOne

Contributor
Bronco Guru
Joined
Mar 28, 2011
Messages
3,068
Loc.
Madisonville, La
I will tell you this also. I wish I know what the PO coated this rig with. This is a 66, and there is virtually no rust. I know the pics looks like rust in the fender wells, but that is old mud and dirt stuck to the thick black almost tar like coating. Black stuff comes off fairly easy, and underneath is good clean metal. I have very slight rust spots on two floor boards so I just replaced them. But tub, door post, engine compartment, cowl fenders, frame, are all really really clean. I got really lucky, especially since I bought this site unseen. Except for a few pics.
 
Top