- Joined
- Apr 3, 2022
- Messages
- 435
I discussed in a prior thread how backlogged the new 302 Blueprint engines were and how I was getting put off month after month. Well that is behind me now and I can finally report on the motor I received. First, it came in a great container that was extremely well built and the motor was very secure.

It was wrapped in plastic and had all the needed instructions tagged to the motor.

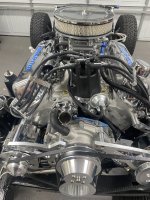
I opted for the full dress motor for a number of reasons, and I am very pleased with the quality of the parts they installed.

So the motor got put on the frame and all the rest of the drive train was installed.

I did not like the huge BLUEPRINT blue letters on the valve covers so replaced those with some billet aluminum ones. I also wanted a better looking/performing air cleaner so changed that out as well.

Put the body back on (pre-paint) and wired up the motor with a simple harness I built that includes mechanical Oil, Volts, and Temp gauges. I ran through the pre lube process by pulling all the plugs, ensuring fuel line not connected so as not to drop fuel into cylinders, and disconnected the hot lead from battery to coil. Cranked it over for about 20 seconds and the oil pressure came up smoothly to around 50 psi. Put the plugs back in, ran a fuel line into a gas can, connected the coil to 12v and cranked it over....nothing! After some investigative work, I determined that the fuel pump was not pumping any fuel. This was a very nice Holley style pump that came on the motor, but it was not pumping. I even tried to prime it (as was done with some older pumps) but no go. I went to AZ and picked up a cheapo $20 pump, intalled it, cranked it over, and she started right up. The high idle was near perfect. Once it settled down I did a quick timing check and it was spot on at 32 all in at around 3500. Went through the cam break in (although since it was dynoed befored being sent this was not really neccesary). But I let it run for 20 minutes between 2000 and 2400 rpm, varing the rpm the whole time. Shut it down and let it cool off. I did go in and call Blueprint and told them about the fuel pump and Brad in the tech shop over nighted me a new one...great customer service.
Next morning went out and she fired right up with a single turn of the key. This time I adjusted the Holley to sit at 800 RPM idle. Motor purred like a kitten. Never got above 180 degrees the entire time. So while I cannot say anything yet about longevity, I can say that the motor so far appears to be a nice build. Starts great, idles nice, and has great acceleration (sound only). More to follow once I get this on the road...after paint, wiring, interior, on and on and on!

It was wrapped in plastic and had all the needed instructions tagged to the motor.

I opted for the full dress motor for a number of reasons, and I am very pleased with the quality of the parts they installed.

So the motor got put on the frame and all the rest of the drive train was installed.

I did not like the huge BLUEPRINT blue letters on the valve covers so replaced those with some billet aluminum ones. I also wanted a better looking/performing air cleaner so changed that out as well.

Put the body back on (pre-paint) and wired up the motor with a simple harness I built that includes mechanical Oil, Volts, and Temp gauges. I ran through the pre lube process by pulling all the plugs, ensuring fuel line not connected so as not to drop fuel into cylinders, and disconnected the hot lead from battery to coil. Cranked it over for about 20 seconds and the oil pressure came up smoothly to around 50 psi. Put the plugs back in, ran a fuel line into a gas can, connected the coil to 12v and cranked it over....nothing! After some investigative work, I determined that the fuel pump was not pumping any fuel. This was a very nice Holley style pump that came on the motor, but it was not pumping. I even tried to prime it (as was done with some older pumps) but no go. I went to AZ and picked up a cheapo $20 pump, intalled it, cranked it over, and she started right up. The high idle was near perfect. Once it settled down I did a quick timing check and it was spot on at 32 all in at around 3500. Went through the cam break in (although since it was dynoed befored being sent this was not really neccesary). But I let it run for 20 minutes between 2000 and 2400 rpm, varing the rpm the whole time. Shut it down and let it cool off. I did go in and call Blueprint and told them about the fuel pump and Brad in the tech shop over nighted me a new one...great customer service.
Next morning went out and she fired right up with a single turn of the key. This time I adjusted the Holley to sit at 800 RPM idle. Motor purred like a kitten. Never got above 180 degrees the entire time. So while I cannot say anything yet about longevity, I can say that the motor so far appears to be a nice build. Starts great, idles nice, and has great acceleration (sound only). More to follow once I get this on the road...after paint, wiring, interior, on and on and on!


