• Welcome to ClassicBroncos! - You are currently viewing the forums as a GUEST. To take advantage of all the site features, please take a moment to register. It's fast, simple and absolutely free. So please join our community today!
    If you have problems registering or can't log into your account, please contact Admin.

Build Thread: 1974 Horse with No Name

skrit

Contributor
A Horse with No Name
Joined
Apr 24, 2006
Messages
186
Loc.
Durham
Prologue:
After 10 years of sitting with parts sitting outside, rusting and generally getting ruined - I'm restarting my '74 build starting from the frame up (with my wife's permission of course!). Everything including the engine is dismantled. Had a '74 351 block with '68 302 heads originally. Was about to sell it all as a lot but had a change of heart. 2024 is the year I finally realize my dream of a running, reliable, restored Bronco! Here is it's current sad state.
20231227_101210.jpg

Just bought a donor '99 Explorer 5.0L EFI with 4x4 4R70W tranny and it's being delivered tonight. It's going to be a slow weekend project but hope do document it well. Stay tuned....
 
Last edited:
OP
OP
skrit

skrit

Contributor
A Horse with No Name
Joined
Apr 24, 2006
Messages
186
Loc.
Durham
Episode 1: Project Name Change, Specs and Wishlist - (Updated 1/8/2024)

Edit: FYI This thread looks much better without Tapatalk. I checked it on my phone via Tapatalk and none of the formatting looks correct.
Neither my kids or wife understood the name "Project 1974 Bronco Exploder" for my original project build thread - so I changed it. I don't have a name for my rig yet but I'm sure it will be found by the end of this build.
I have been educating myself with all of the previous threads from folks on this wonderful forum so I am going to keep my questions limited unless I get absolutely stumped. Questions will be colored Purple. Edits will be in Orange.


Below is what I have and what upgrades I plan. Your thoughts, items I missed, opinions, etc. are welcome!

A Horse with No Name Current Specs:


1974 Bronco Ranger

Build Goal:
  • Reliable Street/Highway Cruiser with mild to moderate off road ability and according to my wife - no so smelly (exhaust) or loud.
  • Possible LUBR with new rear quarters or maybe a new complete steel body – haven’t decided yet. Lots of repairs needed on the existing body but that will be near the end of the build.
Engine:
  • ‘74 Ford Galaxy 351 Windsor Bare Block (D4AE-6015-AA8) original bore, planed, stripped, cleaned and honed. (but now has surface rust from sitting)
  • Unknown Cam
  • Stock Crank Shaft – needs polishing
  • ’68 C80E-D or F Ford 302 Cast Heads with unknown valves and springs – no signs of issues
  • All new rebuild parts for the 351 (pistons, bearings, harmonic balancer, timing chain, timing chain cover, water pump, fuel pump, Pertronix ignitition parts, etc…)
  • All engine parts not used will be sold at end of build
Tranny:
  • Stock C4, column shift, unknown miles, worked previously - to be sold at end of build
Transfer Case
  • Stock Dana 20, unknown miles, worked previously, J Fab twin stick, normal leaks - to be reused
    • Full Reseal, clean and powder coat.
Frame:
  • Stock Frame with Stock Rear Shock Mounts and Stock Front Coil and Shock Towers - to be reused
  • Frame has been blasted, POR15'd and coated with POR15 primer. I don't have a high CFM compressor and it's too late to powder coat so I'm going to use KBS Coatings Satin Blacktop https://www.kbs-coatings.com/blacktop.html rattle can 1 stage. Yes, I would like to do 2 stage, yes I would like to use a paint gun but that's not something I can easily do with my 4 cfm compressor. I also don't have 240V in my shop.
Rear Axle
  • 74-75 Ford 9 Stock Medium Duty (Big Bearing) Banjo Style Housing - to be reused
  • Wagner FF-80174/5 10” Drum Backing Plate # - to be reused
  • Keeping rear drum brakes – not doing a rear disc brake conversion
  • 28 Spline Axles
  • Open Carrier
  • 3.50 Gears
  • Stock Leaf Spring Perches
  • Stock Shock Mounts
Front Axle
  • Dana 44 Stock Housing - to be reused
  • Chevy Disk Brake Conversion - to be reused
  • Stock Axles - to be reused
  • Open
  • 3.50 Gears
  • Warn Premium Hubs - to be reused
Suspension
  • Never installed Rancho 9000XL shocks - to be reused
  • Never installed Tom's 2.5" UltraFlex 11 Pack Rear Leaf Set - to be reused
Tires
  • 33x10.5x15 BFG A/T’s - to be reused
A Horse with No Name Engine and Tranny Donor Specs:

Desired a more modern drivetrain with EFI so I’m going to be doing the Expo swap.

  • 1999 Ford Explorer 5.0L 175,000 miles. Do not intend to do a complete rebuild, head porting, cylinder boring, etc. Just taking top end apart to check everything over and clean up any carbon.
    • Full reseal with new gaskets/seals
    • Remove timing chain and inspect/replace
    • Inspect main and rod bearings for wear
  • 1999 Ford Explorer 4R70W 4 Speed Auto 175,000 miles - operational.
    • Full Rebuild and use Advance Adapters part 50-2704E https://www.advanceadapters.com/4959
    • Found this video series on You Tube which I plan to follow...
      . Anyone else follow this class and did you have success?
A Horse with No Name Upgrade Parts Wishlist:

James Duff Dual Sport Bump Steer Eliminator Heim Tie Rod Over Steering System$1200
James Duff T-Rex Arms for 2.5” Lift$1000
James Duff Dual Sport Hellwig Front Sway Bar with Quick Disconnects and Lower Coil Cups$850
James Duff Front Coils 2.5”$250
James Duff 1” Integrated Body Lift$200
BC Broncos 4R70W Crossmember (ZF/Atlas)?$400
Advance Adapters 4R70W to Dana 20 Adapter (ZF/Dana 20?)$700
Lokar ACA-1808 Column Shift Linkage for 4R70W$100
Ididit 1974-75 Ford Bronco Tilt Column Shift Steering Column - Chrome$1300
Sandersen FF758 1-5/8” Diameter Silver Ceramic Headers GT40P Compatible$800
Tom Woods Custom Front and Rear Drive Shafts$900
Trick Chassis Ford 9” Yukon Nodular Complete Third Member (or similar) with Eaton Tru Trac/4.56 Gears /Forged 1310/Nodular Daytona Pinion Support$1500
WildHorses4x4 31 Spline Extreme Duty Large Bearing Axles with 10” Drum$350
Yukon Dana 44 4.56 Ring and Pinon$200
??? US Shift Quick 4 with Remote Display (Do I need this if reusing all of the stock explorer harness/ECU parts?)$1000
??? EFI Guy 4R70W ECU / Harness Mods???
 
Last edited:

fordguy

Contributor
Bronco Guru
Joined
Jan 23, 2005
Messages
5,520
You will not need external controller for your trans,ecm will handle that
 

1969

Contributor
Sr. Member
Joined
Feb 28, 2022
Messages
534
You have a lot of parts on your wishlist and after 10 years and almost giving up. I would make it a priority to get it running and driving with the parts that you do have even if it maybe stock parts but when it’s running and you’re driving it around with a grin from ear to ear you’ll be more motivated to keep it and continue to fix it up. Just my two cents. My Bronco is
 
OP
OP
skrit

skrit

Contributor
A Horse with No Name
Joined
Apr 24, 2006
Messages
186
Loc.
Durham
You have a lot of parts on your wishlist and after 10 years and almost giving up. I would make it a priority to get it running and driving with the parts that you do have even if it maybe stock parts but when it’s running and you’re driving it around with a grin from ear to ear you’ll be more motivated to keep it and continue to fix it up. Just my two cents. My Bronco is
I had it running years ago. I had partially restored it but decided to take it to the next level. That's where the original project stalled. Now it's time to take it to the next level.
 

Attachments

  • IMGP1495.JPG
    IMGP1495.JPG
    192.2 KB · Views: 61

Wild horse 75

Sr. Member
Joined
May 9, 2023
Messages
358
Loc.
BC
I would add to your engine project would be a full reseal and while you’ve got the pan off check a couple main and rod bearings. Also while the timing cover is off see if a new timing chain might be a good idea. No point in only going part way checking things over since now is the time to rebuild it if need be. You don’t have to go crazy but if you want it reliable taking a look at everything is worth it.
And I would reseal the transfer case as well. You’re going to kick yourself if you spend all this time and money on this and it leaves drips everywhere it’s parked.
Personally I would rebuild the tranny and transfer case and do a refresh on the engine but that’s just me.
Also it’s never too late for powder on the frame. They will blast off any paint you’ve got on it. If you want it powder coated just do it.
You‘re also missing rear springs and shocks from your wishlist.
 
OP
OP
skrit

skrit

Contributor
A Horse with No Name
Joined
Apr 24, 2006
Messages
186
Loc.
Durham
I would add to your engine project would be a full reseal and while you’ve got the pan off check a couple main and rod bearings. Also while the timing cover is off see if a new timing chain might be a good idea. No point in only going part way checking things over since now is the time to rebuild it if need be. You don’t have to go crazy but if you want it reliable taking a look at everything is worth it.
And I would reseal the transfer case as well. You’re going to kick yourself if you spend all this time and money on this and it leaves drips everywhere it’s parked.
Personally I would rebuild the tranny and transfer case and do a refresh on the engine but that’s just me.
Thank you for the advice and I agree with the above. No reason to half-ass it.
Also it’s never too late for powder on the frame. They will blast off any paint you’ve got on it. If you want it powder coated just do it.
I think the paint will be OK. I'll post pics once I get it painted which will be soon. I will document how well it holds up over time.
You‘re also missing rear springs and shocks from your wishlist.
I had previously bought new Rancho 9000XL shocks and a Tom's 2.5" Lift Ultraflex 11 pack Rear Leaf set. I'm planning to use those. I also have a Heavy Duty U Bolt kit. I'll add them to my list as to be reused.
 

Wild horse 75

Sr. Member
Joined
May 9, 2023
Messages
358
Loc.
BC
I think the paint will be just fine too. You just mentioned powder coating and I didn’t want you to think you’re backed into a corner since you’ve already primed it. You mention not having enough power in your shop for a big compressor to use a paint gun. My buddy is in the same boat and he picked up an airless sprayer and has painted his truck a few times with very good success. The reason he’s had to repaint is due to him using it all the time and having rust come back or getting chips and scratches. The airless sprayer gives him extremely good results. You’d never know it was painted that way in a 3 car garage.
 
OP
OP
skrit

skrit

Contributor
A Horse with No Name
Joined
Apr 24, 2006
Messages
186
Loc.
Durham
A Horse with No Name Build Thread
Episode 2: Body Cart


Note for this and future episodes:

For my build thread, I'm not going to be documenting every single step of everything that I do. I'm not even sure if I'm creating this build thread correctly.

I'm a complete amateur with average problem solving skills and mechanical inclination. I'm doing this build completely SOLO in my limited spare time with the help of Youtube, the internet, and the kind folks on this forum with much more experience and ability who have "been there - done that". This means I'm going to mess lots of things up along the way. Gotta learn the hard way sometimes!


Because I have a small garage which was so cluttered I could barely walk around, I decided to build a body cart to free up some much needed work space.

I built a wooden body cart using information from other cart builds on this forum as well as this guy:
https://www.youtube.com/watch?v=PNc5_OEr6es&t=51s&pp=ygUQYnJvbmNvIGJvZHkgY2FydA==

I added some HF trailer jacks for mobility which I think worked out really well. The cart can be leveled, raised up and down, etc.
Here is the end result.

20240130_163033.jpg 20240130_163021.jpg

20240130_163046.jpg
20240130_163110.jpg

The body and cart are now out of the garage, sitting in my driveway under a car cover. Yes, I know - it is in rough shape but I'm going to deal with it last. If you are wondering what the long 2x is at the back bottom, there will be another one added to the front. With those, some doubled up plywood and more support - I plan to do a tip-over cart similar to this:
1710006233905.png


Last edited:
OP
OP
skrit

skrit

Contributor
A Horse with No Name
Joined
Apr 24, 2006
Messages
186
Loc.
Durham
A Horse with No Name Build Thread
Episode 3: Organ Donor and Garage Improvements


So pulling the '99 Explorer 5.0, 4R70W and Wiring Harness was an adventure. It didn't help that it was sitting in my yard. Between the rain, constantly changing NC weather and limited spare time - it took quite a while.

I bought this cheap plasma cutter from Amazon and this welding helmet from HF to cut off the entire front clip because I wanted to remove the engine and trans as a single piece. I had never used a plasma cutter before - it was fun! Once I had it removed I bought this shop crane from HF.

Here is how it looked when I finally got everything loose:
20240217_130136.jpg
What made this process much more difficult was the soft ground. I had to use wood to keep the wheels from sinking into the mud.

After wrestling with the crane wheels, plywood and mud, I finally got it in the driveway:
20240217_132008.jpg

Here everything is in the garage. I had already removed the 4R70W. I lowered the engine and placed the transmission on a convertible 2 wheel dolly/cart I had which worked perfect. I meant to take a pic of this process.
20240302_130101.jpg

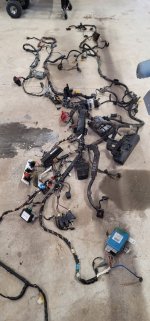
Here is the complete wiring harness from the donor. I got everything including the ignition cylinder and key out of the steering column, anti-theft stuff, all fuse boxes, ecu, instrument cluster, climate controls - just didn't know what I needed so I got almost everything.
20240302_144316.jpg

If you didn't notice, the garage is much less cluttered and I added 6 of these inexpensive 10,000 lumen shop lights from HD which helps tremendously! Here is a before (bottom) and after (top):
20240309_120650 ba.jpg
 
OP
OP
skrit

skrit

Contributor
A Horse with No Name
Joined
Apr 24, 2006
Messages
186
Loc.
Durham
A Horse with No Name Build Thread
Episode 4: 4R70W Teardown

My questions to you are in PURPLE
Updates are in ORANGE

I never would have attempted this if it weren't for this guy:
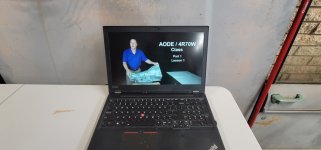
20240303_110337.jpg

I had linked to his Youtube video class in Episode 1. This guy's calm demeanor, detailed steps and speaking voice made the teardown much less intimidating. There are many other great Youtube videos that are also very helpful. A few other ones I liked are here and here.

I will be replacing all steels, frictions, seals, bearings, solenoids, accumulators and associated servo pistons. I ordered this replacement overdrive servo pin because when I placed the original pin in the overdrive bore hole, there is some wiggle which is a common problem from the bore getting wallowed out The new pin has an O-ring to fix this issue.
20240309_143442.jpg

So here is my 4R70W torn down which was quite simple other than 1 mishap (Concern #3 below). I spilled trans fluid all over the garage floor and now have some nice stains in the concrete which doesn't bother me at all. I cleaned all the trans parts with a 5 gal HF bucket and some odorless mineral spirits:
20240309_112501.jpg
20240309_112429.jpg

Upon inspection, the transmission appeared in decent shape. I believe it had been serviced fairly recently as all of the clutch packs were in good shape. I did find some concerns and created one myself (more on that further down :rolleyes:). So as a reminder, my questions to you all will be in Purple.

Concern #1:
Worn sun gear shell
I will be replacing this with a new one because of the wallowed out areas shown with the red arrow. Also the reverse drum it is sitting on seems glazed. It's not gouged so should I reuse this or replace? The reverse clutch frictions and steels looked brand new so maybe there was an issue previously that was corrected? See update below

20240309_112835.jpg

UPDATE: I'm not going to replace the reverse drum. It took all of 5 minutes with scotchbrite to get it looking factory as shown here:
20240309_163436.jpg


Concern #2: OEM stamped steel forward clutch drum
According to the veterans, this is a common failure part and will get destroyed at the snap ring groove over time due to how thin the metal is. The forward drum looked fine (shown with red arrow) but to prevent this common failure, I ordered this forged steel forward clutch drum.

20240309_112501a.jpg

Concern #3: My novice mistake
I did not know that a common thing with older engines and trans were broken bolts. Well step 1 or 2 of the teardown involved removing the tail housing. With my brute strength, I managed to break 2 of the tail housing bolts. I tried a penetrating fluid soak for several days - didn't work, I tried the heat with a torch and grab with pliers trick - didn't work. I have never stick welded and I have this cheap welder and I attempted to weld a nut on them -didn't work as the weld failed and I managed to get slag on the housing face which I can probably file off. These bolts seemed bonded to the housing.

So.... I attempted to drill them out with a drill (I have no drill press). I managed to booger up one of them bad by drilling at an angle by accident (too many beers?). The other one is not great either. I had planned to drill them out and re-tap the holes with a slightly larger size. Then I thought maybe I would just use a SS bolt nut and lock washer since the other 4 threaded holes are fine. I have no idea what I'm doing or should do. Let me know what you would do to fix this. The bolt holes that I messed up are shown with red arrows.

20240309_112432a.jpg
Close up:
20240309_112439.jpg
 
Last edited:
OP
OP
skrit

skrit

Contributor
A Horse with No Name
Joined
Apr 24, 2006
Messages
186
Loc.
Durham
A Horse with No Name Build Thread
Episode 4: 4R70W Teardown Updated 3/15/2024

My questions to you are in PURPLE
Updates are in ORANGE

So today my new replacement parts came in. In summary - I bought this kit which has everything except bearings:
20240315_155902.jpg

I inspected bonded rubber on the old servos and found them hard as a rock. I was able to easily break the rubber.
20240315_155558.jpg

It is my amateur opinion that any wear in the transmission was due to leaks with the servos as well as the overdrive pin bore. Good thing my rebuild kit has all new servos and accumulators. For the overdrive servo, I fitted the replacement OD servo with the Sonnax pin bore fix which has an O-ring. New one is pictured right and old one to the left.
20240315_155516.jpg I received the upgraded Sonnax forged steel forward clutch drum. I then realized that the shaft is pressed in. I thought maybe I buy a cheap shop press for this job but as luck would have it, I discovered a backyard machine shop just down the road. Within 15 minutes and $0.00, the shaft was pressed out of the old drum and into the new with the exact distances as factory. I couldn't have been happier with this guy and I'm glad to know an experienced machinist is so close. He specializes in rebuilding engine heads so there will be some upcoming posts when the 5.0L EFI rebuild episodes are done. Here is a pic of the old stamped steel drum (left) compared to the new forged drum. Much heavier duty.
20240315_155300.jpg
I also got the new sungear shell - note the difference from the old one on top compared to the new one.
20240315_155209.jpg

As far as Concern #3, several of you chimed in after I posted a separate post on what to do. I thought about drilling the holes bigger and using washers bolts and nuts or Helicoils. I just don't want to mess it up anymore. Because I got lucky and found a local machine shop, I'll be taking the 4R70W case and the new Advance Adapters D20 tailpiece (once I order it) over to him to clean out the old bolt pieces while creating 2 perfect matching holes using the new tailpiece as a guide. I'll have him tap the holes in the case and leave the ones in the tailpiece smooth.
 

Viperwolf1

Contributor
electron whisperer
Joined
Aug 23, 2007
Messages
24,326
Get new servo covers, too. They also get hard and leak.

Get a spiral snap ring for the mechanical diode. The original ring is weak and can spread out at high rpm. The aftermath is not pretty.

You can tig weld the reverse drum lugs to replace the steel worn off by the shell.

You can get a 4 clutch pressure plate for the reverse drum. I think in '99 they dropped it from 4 to 3 clutches. Your kit probably has the extra clutch and steel you would need.
 

Speedrdr

Contributor
Learning Member
Joined
Nov 27, 2017
Messages
1,244
Loc.
Paris, MS
Man, I never knew there was so many parts to an auto transmission. Although I wonder if all the parts are easier to replace/work on than a manual transmission. Correct me if I’m wrong, but are most of the parts in an automatic kinda in line and “stack” onto the next part?

Randy
 

Viperwolf1

Contributor
electron whisperer
Joined
Aug 23, 2007
Messages
24,326
Man, I never knew there was so many parts to an auto transmission. Although I wonder if all the parts are easier to replace/work on than a manual transmission. Correct me if I’m wrong, but are most of the parts in an automatic kinda in line and “stack” onto the next part?

Randy
They do stack together very compactly. As I like to say, it'll only go together one way. So if you can't put it together and make it fit in the case, it ain't right.
 
OP
OP
skrit

skrit

Contributor
A Horse with No Name
Joined
Apr 24, 2006
Messages
186
Loc.
Durham
A Horse with No Name Build Thread
Episode 5: 4R70W with AA 50-2704a Kit to Dana 20
Update 1: Found answer to my AA D20 spud shaft assembly posted below...


My questions to you are in PURPLE
Updates are in ORANGE


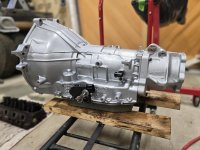
I'm happy to say that the 4R70W rebuild with Advance Adapter Dana 20 Kit is pretty much complete. I followed The instructions from this guy and this guy. Between the both, I could not have asked for a better instructional video playlist. Hope it works!

Here is the finished product:
20240421_133119.jpg

20240421_133134.jpg
You'll notice above that I still haven't addressed the 2 locations in the 4R70W case where I broke bolts and did a crappy job of drilling them out. I'll probably just through bolt them with a stainless bolt , lock washer and nut.
20240421_133311.jpg

I started tearing down the Dana 20 thinking that I would do a full re-seal and re-bearing. Overall, disassembly was pretty straight forward thanks to help from this guy and this guy.

Unfortunately I can't get the shift fork set screws out even with heat and one started to slightly strip. I think I might just skip replacing the shift rod seals - is this dumb?

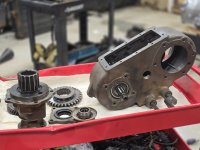
Here is the Dana 20 torn down:
20240421_132954.jpg

20240421_133012.jpg

Now here is my dilemma...The Advance Adapter kit 50-2704a has by far the WORST instructions - or lack thereof. Additionally, I can't find any Youtube videos showing exactly how to put the parts of the kit in the Dana 20. Has anyone seen an instructional video of adapting the Dana 20 using the 50-2704a kit?

Below is a pic of the parts that the 50-2704a kit came with (pictured at top) and I think I have it in the correct order based on how the original Dana 20 parts were put together. I'm not sure what direction the end seal needs to be. Any help is much appreciated. Also, has anyone successfully driven the new bearing on the spud shaft using a pipe or socket without using a hydraulic press?
20240421_132345.jpg

Here is the answer to my question on AA 502704A Dana 20 Spud Shaft, bearing and seal orientation. Yes, the way I have it pictured above is correct.

1713726449232.png


Verification of orientation found here from a post 9 years ago: https://classicbroncos.com/forums/threads/new-4r70w-d20-adapter-from-wild-horses.255139/post-2710234
 
Last edited:

chrlsful

Bronco Guru
Joined
Oct 21, 2009
Messages
1,357
the brn oil seal in post #19 looks correct w/o knowing anything abt this app. These seals all ways go that way
no matter where they go (motor, axel, etc). This style are built ‘directional’. U seem to have the correct direction.
 
Top