• Welcome to ClassicBroncos! - You are currently viewing the forums as a GUEST. To take advantage of all the site features, please take a moment to register. It's fast, simple and absolutely free. So please join our community today!
    If you have problems registering or can't log into your account, please contact Admin.

Door post patch

jcb9089

Sr. Member
Joined
Feb 22, 2007
Messages
510
I searched the threads, but have not found exactly what I'm looking for.

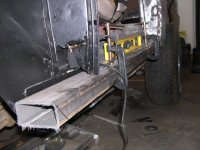
A couple weeks ago, I noticed some rust on my driver side kick panel. Yesterday, I cut away the rot, but found the reason for the rust was the hole was filled with dirt. After further searching, I found the bottom of the door post was rotted, but the rest of it seems pretty solid. I didn't suspect this because the door does not sag and I don't have rust in other places.

My plan is to clean up the rust with a wire brush and then paint it with por-15 or rust bullet. Then I will patch over the rust spots. Patching the kick panel is easy enough, but I'm not sure how to patch the lower door post. Any ideas or suggestions on the bet way to patch the lower door post? Also, what's better for this type of work, por-15 or rust bullet?
 

Attachments

  • Bronco.jpg
    Bronco.jpg
    76.3 KB · Views: 57
  • rust spot1.jpg
    rust spot1.jpg
    144.6 KB · Views: 143
  • rust spot2.jpg
    rust spot2.jpg
    98.3 KB · Views: 128

trailpsycho

Bronco Guru
Joined
Dec 11, 2003
Messages
4,856
I dont have any pics I can post from work, but I did the repair this way...Just cutting out the rusty section liek you did doesnt take care of the area. You need to drill our the spot welds...as you can probably see from where you are now, the design of the section is like a clam-shell. I would drill out the spot welds enough so that you can remove all the way up to the bottom (or even higher) of the first door hinge bakcing plate support bracket. A dremel helps to make the fine small, not too deep cuts on the edges where the clamshell meets. It looks like the other half of the clam shell may also need some attention...at the very least a spot blasting would be a good idea...I would not trust POR or RB as much as a good spot blast (or replacement of that lower section as well). Ideally, it would have been best to have not cut out the center section but rather to have removed the half of the clamshell as one piece...that way you could reproduce it better. Once you get it removed and the area inside blasted, use some 3M weld-through primer get several good coats on and let them dry. You will need to reproduce the half of the clamshell that you removed. You spot weld it in the same way you removed it and carefully weld the horizontal junction where you patch meets the original doorpost. Be careful when you weld it as the stock doorpost will not be of the same quality of steel as your repacement piece.

The way I formed my piece of the clam shell was to start on the straight edge and make a 90 and then get an idea of how the slightly radius edge would need to be and bent accordingly. I did it all with c-clamps, hammers and some plate. I wished I had had my vice at the time, but the pieces actually turned out pretty good. I can try to post pics if you think it will help, but it will be a while. Realized this w/e that my home computer has a virus, so no internet from home for a week or so when I can reload it. I may be able to bring the camera to work later in the week.

As is evident from your pics, you have alot more rust going on inside your door post than I think you want to admit...you may want to consider expanding the scope of this repair as it will not last very long...and it will only get worse. I was lucky enough to be able to move beyond the 2ndary surface rust and blast inside on my repair. Good luck.
 
OP
OP
jcb9089

jcb9089

Sr. Member
Joined
Feb 22, 2007
Messages
510
Thanks for the detailed write up; your explanation helped me out a lot. I am still trying to convince myself that a patch would be just fine, but I am starting to think I just need to replace the post all together. If you get a chance to post the picture of your patch, please do because it may be awhile before I can replace the post. Thanks
 

Chief Master Sergeant

Retired U.S. Air Force
Joined
Nov 6, 2002
Messages
5,172
Here's what we did. The bottoms were completely gone, so I had to splash/drip POR 15 into the post. I'm sure it will need replacing some day, but I think it turned out okay. Before and after!
 

Attachments

  • Done3.JPG
    Done3.JPG
    101.8 KB · Views: 143
  • Done2.JPG
    Done2.JPG
    100.1 KB · Views: 155
  • Drivers2.JPG
    Drivers2.JPG
    100.1 KB · Views: 138
  • DSCN2162.JPG
    DSCN2162.JPG
    241.7 KB · Views: 139

Tito

CB Fire Starter
Joined
Jan 29, 2006
Messages
10,781
Loc.
Bakersfield, CA
Not sure if it was mentioned above but be sure to replace the plates that the doors bolt into while you are in there as I am sure the bolts are rusted up and it would do you a world of good to have nice new clean threads in there. Tom's sells them but you could make your own by using the old ones as templates.
 

Chief Master Sergeant

Retired U.S. Air Force
Joined
Nov 6, 2002
Messages
5,172
Not sure if it was mentioned above but be sure to replace the plates that the doors bolt into while you are in there as I am sure the bolts are rusted up and it would do you a world of good to have nice new clean threads in there. Tom's sells them but you could make your own by using the old ones as templates.

I think I have a couple of them lying around I'll never use if you need them.
 

canary28

Jr. Member
Joined
Oct 19, 2007
Messages
51
JCB9809-
I'm in the throes of replacing door posts (mine were rotted up to the upper hinge). Given how straight the body looks and how nice the fit of the door is from the photo, I'd definitely opt for a patch rather than major surgery. Unless you do this all the time (I don't), it's a lot of trial and error work getting things to fit correctly, and the patch panel that I used are okay, but don't fit perfectly (like they always say, some fitting required).
 

jjwtwice

Full Member
Joined
Jun 12, 2007
Messages
182
Loc.
IGH, MN
1st Sarg, thats a sweet looking repair. Now you've got a much tougher rocker pannel. So what if the profile is not quite the same. Good work.
 

Chief Master Sergeant

Retired U.S. Air Force
Joined
Nov 6, 2002
Messages
5,172
1st Sarg, thats a sweet looking repair. Now you've got a much tougher rocker pannel. So what if the profile is not quite the same. Good work.

Thanks! Here's what it looks like after all the work was done.
 

Attachments

  • DSCN2571.JPG
    DSCN2571.JPG
    123.7 KB · Views: 118

jjwtwice

Full Member
Joined
Jun 12, 2007
Messages
182
Loc.
IGH, MN
Your going to need to raise that seat soon. I'm sure your son can't wait to start driving that thing.
 

mnido

Sr. Member
Joined
Jul 20, 2007
Messages
978
I also had the rust at the bottom, however I opened the post all the way up. Glad I did, sandblasted, fabricated some new brackets to hold the hinges, chased the threads on the hinge plate, Por 15 inside, shot some 2 part Epoxy over all of it. Fab some new covers, have yet to weld it up. Did drivers side too.And no, the middle picture with the bubble gum welds is not my handy work. Third picture reveals how I corrected what some hack did..
 

Attachments

  • IMG_0515Start.jpg
    IMG_0515Start.jpg
    56 KB · Views: 87
  • IMG_0654Second.jpg
    IMG_0654Second.jpg
    36.3 KB · Views: 107
  • IMG_0678third.jpg
    IMG_0678third.jpg
    47.7 KB · Views: 114

bosshoff

Contributor
Sr. Member
Joined
Mar 30, 2004
Messages
713
I did something very similar to mnido. I think I used 12 gauge steel, and had it put in a brake to 90°. I then trimmed it to the outline of the door post. I used rivets in attaching a lot of the old/weaker meatal to the new stuff, as most of you know;)
 

Attachments

  • DSCF0209.JPG
    DSCF0209.JPG
    66.6 KB · Views: 77

mnido

Sr. Member
Joined
Jul 20, 2007
Messages
978
Thanks ! I am repairing the cowl rust this weekend and plan to cover and level the entire cowl with a piece of sheet metal. I am removing all the heater stuff. Can't wait !
 
Top