• Welcome to ClassicBroncos! - You are currently viewing the forums as a GUEST. To take advantage of all the site features, please take a moment to register. It's fast, simple and absolutely free. So please join our community today!
    If you have problems registering or can't log into your account, please contact Admin.

Duffy's 77 Build Thread- Restomod, daily, re-uncut

OP
OP
D

duffymahoney

Contributor
Bronco Guru
Joined
Apr 26, 2015
Messages
2,571
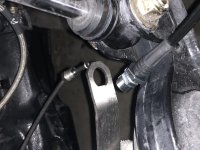
I kept getting air from the right front caliper. The brake shop though it was coming from the caliper itself. It was rebuilt locally, and I just decided to swap them out for better. I decided to switch to posi loaded centrics (I have used them in the past with great results). Basically all new internals and parts and the cast is zinc coated (not perfectly but better then raw or painted). I also made the switch to T- bird front calipers and brake lines from dufftuff.

Centric part numbers:
1976 ford T-Bird calipers front #142.61013 142.61014
1979 Cad Eldo rear with parking brake set up # 142.62512 142.62511

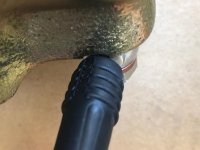
The T-bird calipers come with thicker copper washers, but you still need to notch them slightly to clear the banjo fitting. I then used some touch up clear coat on them. Hopefully my brakes feel better now.

Here is some info from centric
Posi Quiet Loaded Calipers:
Posi Quiet loaded calipers are a full line of original equipment replacement brake calipers providing unmatched quality and value.
When installing Posi Quiet loaded calipers, technicians can be assured that they are getting top quality products that have been engineered to meet or exceed the function of the original part. Each component is specifically designed for each application and the attention to detail throughout the manufacturing and testing process ensures each caliper will perform to the exacting standards of today’s vehicles.

Each Posi Quiet caliper is finished in the same way as the original from the factory; Posi Quiet calipers feature a Zinc Dichromate finish, or O.E. colored powder coating depending on the application. This feature ensures that the caliper will look as good as it works throughout its lifetime.


Submit Posi Quiet Friction
Every Posi Quiet loaded caliper comes complete with application specific Posi Quiet brake friction. For more information on Posi Quiet brake pads go here.
Submit All new pistons
Every Posi Quiet caliper piston phenolic or steel is replaced to guarantee proper performance throughout the lifetime of the caliper.

Submit New Hardware
Posi Quiet calipers have all new hardware installed. All guide bolts, pins, through bolts and seals are replaced guaranteeing the caliper will function correctly.

Submit New Boots and Seals
Posi Quiet calipers come complete with all new dust seals, O-rings and boots.

Submit Less Noise
Posi Quiet calipers utilize the new Quiet Clips™ style abutment clips. These quiet clips ensure proper pad fitment and reduced vibration related noise under braking.
 

Attachments

  • IMG_2452.jpg
    IMG_2452.jpg
    94 KB · Views: 158
  • IMG_2453.jpg
    IMG_2453.jpg
    95.3 KB · Views: 139
  • IMG_2454.jpg
    IMG_2454.jpg
    112.3 KB · Views: 116
  • IMG_2456.jpg
    IMG_2456.jpg
    64.9 KB · Views: 120
OP
OP
D

duffymahoney

Contributor
Bronco Guru
Joined
Apr 26, 2015
Messages
2,571
I ended up having 77 fittings on my brake lines, so I had to change them out to the 75 style. Which is just a smaller, to work with the duff lines. Also had to machine the ends of the duff cables to fit my brackets.

Found out I didn't bench bleed correct (re-did it and got so much air out), also the booster push rod thing isn't set correct. I had about 1/3 of an inch gap, only issue is the rod is out of adjustment, so I will have to use the adapter willwood sends with this kit.

I love learning from mistakes, and I hate brake fluid.
 

Attachments

  • 20180504_044555172_iOS.jpg
    20180504_044555172_iOS.jpg
    52.5 KB · Views: 134
  • 20180504_042929047_iOS.jpg
    20180504_042929047_iOS.jpg
    89.9 KB · Views: 105
  • 20180503_231154877_iOS.jpg
    20180503_231154877_iOS.jpg
    118.5 KB · Views: 109
  • 20180503_132959092_iOS.jpg
    20180503_132959092_iOS.jpg
    44.2 KB · Views: 105
  • 20180503_132715443_iOS.jpg
    20180503_132715443_iOS.jpg
    112.8 KB · Views: 111
  • 20180503_132950275_iOS.jpg
    20180503_132950275_iOS.jpg
    52.7 KB · Views: 98
OP
OP
D

duffymahoney

Contributor
Bronco Guru
Joined
Apr 26, 2015
Messages
2,571
Billet rear view mirror is in. Might not be big enough. Also my lady drove my bronco to the gym. She looks great driving it.
 

Attachments

  • 10638A7B-EE30-4E3A-B61B-5B6E20F1D70B.jpg
    10638A7B-EE30-4E3A-B61B-5B6E20F1D70B.jpg
    69.2 KB · Views: 200
  • 194B0814-38A9-40F3-808F-CD5AFC6CDEAA.jpg
    194B0814-38A9-40F3-808F-CD5AFC6CDEAA.jpg
    115.7 KB · Views: 250
OP
OP
D

duffymahoney

Contributor
Bronco Guru
Joined
Apr 26, 2015
Messages
2,571
She looks happy too. You might not get it back. Ken

Luckily she likes the 240z more;)

Got my engine bay LED installed. Kind of regret this one. But glad it’s wired and works well.
 

Attachments

  • 8D2287A8-865B-4C09-B600-7BC8D529C575.jpg
    8D2287A8-865B-4C09-B600-7BC8D529C575.jpg
    58.6 KB · Views: 165
  • B1154A6F-D02A-48EE-83B7-B4B47B433698.jpg
    B1154A6F-D02A-48EE-83B7-B4B47B433698.jpg
    62 KB · Views: 154
OP
OP
D

duffymahoney

Contributor
Bronco Guru
Joined
Apr 26, 2015
Messages
2,571
Still waiting on paint for my doors and hardtop, I hate paint!

I am working on attaching my cage to my windshield so it doesn't bounce. I don't want a full cage, but I wanted it to look correct. These will bolt on and off if needed. Follows the lines, still needs some tweaking, but overall I am happy.

Disclaimer : I know this isn't going to help in a roll over, accident etc...
 

Attachments

  • 20180511_235121716_iOS.jpg
    20180511_235121716_iOS.jpg
    79.2 KB · Views: 249
OP
OP
D

duffymahoney

Contributor
Bronco Guru
Joined
Apr 26, 2015
Messages
2,571
Braces are done and off to powder.
 

Attachments

  • 79640983-DCD2-43B7-8897-7ECBB756BDB9.jpg
    79640983-DCD2-43B7-8897-7ECBB756BDB9.jpg
    74.1 KB · Views: 184
  • 6D115210-2DA6-4137-8EB0-D2AA3B35A167.jpg
    6D115210-2DA6-4137-8EB0-D2AA3B35A167.jpg
    71.5 KB · Views: 165
  • F7E85495-A3C5-48F9-AE57-963B7938036F.jpg
    F7E85495-A3C5-48F9-AE57-963B7938036F.jpg
    99.8 KB · Views: 153
OP
OP
D

duffymahoney

Contributor
Bronco Guru
Joined
Apr 26, 2015
Messages
2,571
How did you attach it to the windshield? That looks great

I don’t know about the weight. Seems sturdy.

Attach to the bottom of the windshield where the hard top mounts. My idea is it stays on year round. Even with hard top installed. I also got a rubber washer to help with the movement. So bolt through the windshield then rubber washer then brace. Then a nut. Pretty awesome!

Got them back from powder and installed. Tested. No movement!

I also road tested the bronco. Drove 20 miles at 60-70 mph. My 4.11 and 285/70 isn’t enough gear. It’s like 1700-1900 rpms. So at some point I will need to swap them out.
 

Attachments

  • F7828500-F11B-46DD-BDE6-D098FCA4670E.jpg
    F7828500-F11B-46DD-BDE6-D098FCA4670E.jpg
    70 KB · Views: 342
  • 2FB4C6BE-AA4F-4663-9071-4C2969AC89DD.jpg
    2FB4C6BE-AA4F-4663-9071-4C2969AC89DD.jpg
    103.3 KB · Views: 329
  • 30EB1195-B380-4DD6-B638-928C8AA065FC.jpg
    30EB1195-B380-4DD6-B638-928C8AA065FC.jpg
    89.8 KB · Views: 298
  • 8EF3C9BC-3CC8-4B12-BB34-7323A1B6F52C.jpg
    8EF3C9BC-3CC8-4B12-BB34-7323A1B6F52C.jpg
    81 KB · Views: 292
OP
OP
D

duffymahoney

Contributor
Bronco Guru
Joined
Apr 26, 2015
Messages
2,571
Doors got fully stripped and re painted. I had some adhesion issues.

They now are fully put together and hung again. I also raised the driver side core up slightly. It wasn’t even.

I need to adjust my cage- windshield attachment to get the doors and windshield in line. But door panels and speakers should be in tomorrow!
 

Attachments

  • 1617848F-261E-48A2-96F1-F1DFA6F05AC3.jpeg
    1617848F-261E-48A2-96F1-F1DFA6F05AC3.jpeg
    30.9 KB · Views: 181
  • 46179542-8BEF-484C-90EC-AE2160F194E7.jpg
    46179542-8BEF-484C-90EC-AE2160F194E7.jpg
    76.1 KB · Views: 186
  • BBB32009-8234-4075-8905-C9C9005783B6.jpg
    BBB32009-8234-4075-8905-C9C9005783B6.jpg
    65.4 KB · Views: 174
  • 752254B5-10CC-4FBA-AEED-5D69027C1E79.jpg
    752254B5-10CC-4FBA-AEED-5D69027C1E79.jpg
    77 KB · Views: 176
  • 5439C299-1404-48A4-921B-F1188DB866B1.jpg
    5439C299-1404-48A4-921B-F1188DB866B1.jpg
    68.7 KB · Views: 189
OP
OP
D

duffymahoney

Contributor
Bronco Guru
Joined
Apr 26, 2015
Messages
2,571
Another shot
 

Attachments

  • AC1AA8B1-C624-4CE1-8AC9-FFF1D9525C46.jpg
    AC1AA8B1-C624-4CE1-8AC9-FFF1D9525C46.jpg
    75.9 KB · Views: 135
OP
OP
D

duffymahoney

Contributor
Bronco Guru
Joined
Apr 26, 2015
Messages
2,571
Touch up is done!

Now to drive it 70 miles per hour again! I am excited to have doors on for that part.
 

Attachments

  • 32783353_10155706762873985_5322625216130580480_n.jpg
    32783353_10155706762873985_5322625216130580480_n.jpg
    71.8 KB · Views: 149

Spartan76

Jr. Member
Joined
Jun 21, 2015
Messages
128
where did you source the lexan sun visors? I need something clean like that so I can put a soft top wiper motor cover on AND have sun visors.
 
Top