• Welcome to ClassicBroncos! - You are currently viewing the forums as a GUEST. To take advantage of all the site features, please take a moment to register. It's fast, simple and absolutely free. So please join our community today!
    If you have problems registering or can't log into your account, please contact Admin.

Firewall reinforcing plate

lc66roadster

Newbie
Joined
Aug 12, 2006
Messages
41
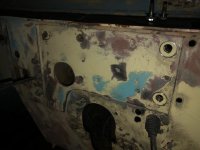
I have seen several pictures of firewalls, some with and some without a reinforcing plate behind the brake pedal (on the engine side). I would like to remove or modify mine to install a new brake system, but it seems that my 66 is welded on. Maybe just grind the little bent edge pieces flush, or try to remove the plate? (may need a plug cutter)
Tracy
 

Attachments

  • IMG_9583.jpg
    IMG_9583.jpg
    81.2 KB · Views: 63

Madgyver

Bronco Madman
Joined
Jul 30, 2001
Messages
14,700
cut edge and weld another plate over it.
 

Attachments

  • 226998308_5884451148294516_257360595219999751_n.jpg
    226998308_5884451148294516_257360595219999751_n.jpg
    41.8 KB · Views: 88
  • 216196390_10220379589625924_172599053769226206_n.jpg
    216196390_10220379589625924_172599053769226206_n.jpg
    130.1 KB · Views: 87

Spaggyroe

Full Member
Joined
Dec 9, 2019
Messages
284
I CNC plasma cut a plate to relocate my booster towards the drivers side. It bolts to the existing holes, but I did have to drill a large hole in the firewall to accommodate my hydroboost unit (superduty). The factory firewall plate is still there. I did not trim the edges.

If this is the route you want to go, PM me. I have a few more of these mounting plates and corresponding pedal parts available. (mine only works with an automatic trans though).
 

Attachments

  • IMG_0801.jpg
    IMG_0801.jpg
    63.9 KB · Views: 67
  • IMG_0818.jpg
    IMG_0818.jpg
    72.1 KB · Views: 68
  • IMG_0819.jpg
    IMG_0819.jpg
    66.1 KB · Views: 71

DirtDonk

Contributor
Bronco Guru
Joined
Nov 3, 2003
Messages
47,638
Is it the clocking of the booster that limits the transmission type? Assuming that the shift linkage on the column is the issue? Or is it something else?
Seems like a floor shift would eliminate that issue, if that's what it is.

Did you have a discussion thread on this? I should re-read it!

Paul
 

Spaggyroe

Full Member
Joined
Dec 9, 2019
Messages
284
Is it the clocking of the booster that limits the transmission type? Assuming that the shift linkage on the column is the issue? Or is it something else?
Seems like a floor shift would eliminate that issue, if that's what it is.

Did you have a discussion thread on this? I should re-read it!

Paul

Hi Paul.

This is the first time I've posted pics of it. My brake peddle solution involves making a bellcrank type dealio that fits in the stock peddle box, but occupies the portion that would allow the clutch peddle to ride in it. There's probably a work around for that though. Let me see if I have some pics.
 

Spaggyroe

Full Member
Joined
Dec 9, 2019
Messages
284
Here are some pics of the peddle in process. I ended up bending a jog in the peddle to space it farther away from my gas peddle.
 

Attachments

  • IMG_0802.jpg
    IMG_0802.jpg
    84.9 KB · Views: 43
  • IMG_0803.jpg
    IMG_0803.jpg
    93 KB · Views: 42
OP
OP
L

lc66roadster

Newbie
Joined
Aug 12, 2006
Messages
41
I CNC plasma cut a plate to relocate my booster towards the drivers side. It bolts to the existing holes, but I did have to drill a large hole in the firewall to accommodate my hydroboost unit (superduty). The factory firewall plate is still there. I did not trim the edges.

If this is the route you want to go, PM me. I have a few more of these mounting plates and corresponding pedal parts available. (mine only works with an automatic trans though).
That plate looks great. And it simplifies the mounting of the hydroboost. So it moves it more inline with the clutch pedal?

On mine, I made a plate that connects the clutch pedal to the brake pedal, basically making one large pedal. I really like it. So it would probably be pretty easy for me to attach the hydroboost rod to the clutch pedal.

I added a picture of my pedal modification, it covers both the clutch and the brake.
 

Attachments

  • IMG_9585.jpg
    IMG_9585.jpg
    95.8 KB · Views: 38
Last edited:

Spaggyroe

Full Member
Joined
Dec 9, 2019
Messages
284
lc66roadster, yeah that's a good description. It does move the booster over more inline with the clutch pedal. You probably could make your oe clutch pedal activate the relocated booster.
 

Spaggyroe

Full Member
Joined
Dec 9, 2019
Messages
284
I've received a number of PM's asking for more pics and details of my setup. Here are some pics showing the parts that were plasma cut, and some pics showing the installation.

The firewall plate is 3/16", and the peddle parts are 3/8" thick material.

The hydrobooster is from a 2005-2010 F250/F350 Powerstroke

The push rod of the hydrobooster is modified (although, with a little product revision I think the factory superduty push rod could be used).

There is a custom spacer / bullet in the Wilwood master cylinder.

The proportioning valve bracket is custom made. It is not a wilwood piece.

The new hole in the firewall is 6" closer to the drivers fender.

I use the factory brake light switch, but the wilwood prop valve also comes with a brake light switch that could be used as well.
 

Attachments

  • 1.jpg
    1.jpg
    93.6 KB · Views: 40
  • 2.jpg
    2.jpg
    84.9 KB · Views: 33
  • 3.jpg
    3.jpg
    93.2 KB · Views: 29
  • 4.jpg
    4.jpg
    100.5 KB · Views: 36
  • 5.jpg
    5.jpg
    82.7 KB · Views: 40
  • 6.jpg
    6.jpg
    80 KB · Views: 42
Last edited:

catfan

Contributor
Full Member
Joined
Jul 1, 2016
Messages
259
lc66roadster, yeah that's a good description. It does move the booster over more inline with the clutch pedal. You probably could make your oe clutch pedal activate the relocated booster.

That's better than the one I did, I moved the hole 1" and mounted the push rod
on the other side of the pedal.
 

Attachments

  • IMG_0221.jpg
    IMG_0221.jpg
    137.5 KB · Views: 32
  • IMG_0219.jpg
    IMG_0219.jpg
    107.8 KB · Views: 31
Top