• Welcome to ClassicBroncos! - You are currently viewing the forums as a GUEST. To take advantage of all the site features, please take a moment to register. It's fast, simple and absolutely free. So please join our community today!
    If you have problems registering or can't log into your account, please contact Admin.

floor pan, inner rocker, kick panel replacement order

sneditch

Jr. Member
Joined
Jan 23, 2017
Messages
54
Looking for a sanity check on panel replacement order. Any insights or wtf are you doing is welcome…learning mode for sure.

I have body and frame on a rotisserie and leveled, body mounts replaced, doors and bed braced, everything close to square.

Kick panel not too bad but is rusted where it meets floor pan - A pillar - inner rocker and filled with foam insulation. Inner Rocker and A Plllar are shot so figured why not go further down the rabbit hole since I am there...

Originally thought was to replace floor pans and tunnel first, then inner rocker, kick panel, A pillar.

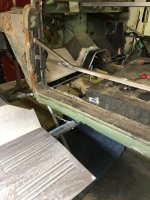
After seeing this body rotate on the rotisserie I am thinking I should keep cowl braced to frame as it is in pic 8168 below, and instead start by replacing inner rocker, then proceed to kick panel then A pillar etc. Once that slow and tedious process is done then put floor pans, lower f/w, etc.


Any reason not to go this route? Info is appreciated as well as indication of anything I am ovelooking.


Cheers

Sned
 

Attachments

  • IMG_8701.jpg
    IMG_8701.jpg
    118.1 KB · Views: 168
  • IMG_8168.jpg
    IMG_8168.jpg
    113.8 KB · Views: 136
  • IMG_8170.jpg
    IMG_8170.jpg
    123.1 KB · Views: 125
  • IMG_8171.jpg
    IMG_8171.jpg
    81.5 KB · Views: 122
  • IMG_8173.jpg
    IMG_8173.jpg
    109 KB · Views: 129
  • IMG_8187.jpg
    IMG_8187.jpg
    88.2 KB · Views: 142
  • IMG_8188.jpg
    IMG_8188.jpg
    105.5 KB · Views: 135
  • IMG_8189.jpg
    IMG_8189.jpg
    90 KB · Views: 142
  • IMG_8161.jpg
    IMG_8161.jpg
    84.5 KB · Views: 109
  • IMG_8159.jpg
    IMG_8159.jpg
    98.1 KB · Views: 118

Attac

Contributor
Sr. Member
Joined
Jun 29, 2015
Messages
865
Sned
go look here. it shows how i di it. In the pics what you dont see is the brace rod that i ran from the front of the cowl to the frame. That brace along with the one from the floor body mount support will keep the cowl in the right up down and front to back configuration.
Chuck
http://classicbroncos.com/forums/showthread.php?t=258810
 
OP
OP
sneditch

sneditch

Jr. Member
Joined
Jan 23, 2017
Messages
54
Thanks @Attac Subscribed and reading...much appreciated!


Sned
go look here. it shows how i di it. In the pics what you dont see is the brace rod that i ran from the front of the cowl to the frame. That brace along with the one from the floor body mount support will keep the cowl in the right up down and front to back configuration.
Chuck
http://classicbroncos.com/forums/showthread.php?t=258810
 

Attac

Contributor
Sr. Member
Joined
Jun 29, 2015
Messages
865
also look at Jefe and rydogs if you need more pics.
Chuck
 

Crush

Contributor
Bronco Guru
Joined
May 30, 2007
Messages
3,463
Loc.
Greenbottom, WV
i went from inside to outside but before hand. I removed all the body mounts and left it on the frame. then i leveled out the body with jacks so that the doors were square in the openings. then i took as many measurements as i could from many places around the door jambs and across the cowl to the floor and braced it all up. then i removed the rusted metal. then i installed the new metal from inside to outside and cut to fit the way i wanted it to. then i screwed the panels in with self drilling screws. once i had it all screwed in, i checked all the measurements again. then i removed one screw at a time and plug welded each screw hole. then i removed all the braces and started stitch welding the panels in. made for a very nice/square/sound repair. took a long time but was worth it

I realize that you are already on a rotisserie so check level and square as best you can and fit doors to it and check how they fit BEFORE you weld ANYTHING

hope this helps

Chuck
 

rydog1130

Sponsor/Vendor
Bronco Guru
Joined
Jun 19, 2014
Messages
4,026
Heres a critical measurent that will help with your cowel. Your kick panel will hold it in place once you get it there if it has moved.

IMG_0190.jpg
 
OP
OP
sneditch

sneditch

Jr. Member
Joined
Jan 23, 2017
Messages
54
I am 21.5" on both sides from top lip of cross rail to bottom of cowl. Measuring tape a couple inches in from kick panel. I am 21.25" on both sides from top lip to cowl at body mount location on the same cross rail.

The KPs aren't too bad and the cowl is fairly straight. I can see the cross rail is bent down slightly on both ends though, which I believe is creating the quarter inch difference on both sides.

I don't think this is an issue but I'll need to see what the floor pan looks like when it's screwed down to the crossrail. I think I will follow attacs example and Weld a support from the body mount bolts to the cowl once I have the floor Pan in.

Thanks for this rydog... Will advise on what it look like when I get the rest of the floor out.

Shon

Heres a critical measurent that will help with your cowel. Your kick panel will hold it in place once you get it there if it has moved.

View attachment 460713
 
Top