• Welcome to ClassicBroncos! - You are currently viewing the forums as a GUEST. To take advantage of all the site features, please take a moment to register. It's fast, simple and absolutely free. So please join our community today!
    If you have problems registering or can't log into your account, please contact Admin.

Looking for advice replacing my floor pans.

Basketcase

Newbie
Joined
Dec 26, 2014
Messages
32
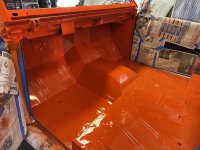
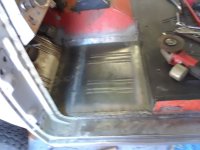
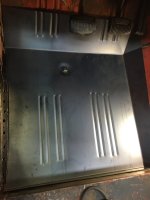
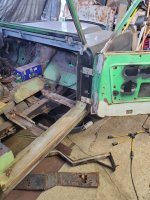
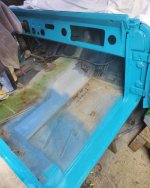
I'm in the process of replacing both the passenger and driver side floor pans. I have new panels from Wildhorses that extend up to the firewall. My existing toe boards (panel from the floor to the firewall) are in good condition with no rust or corrosion. I am considering cutting off my new floor panels just above the floor itself and welding a seam at the bottom of the toe board. Is this something that seems reasonable or should I cut out the existing toe boards and use the entire new panel? I'm not trying to make a concourse restoration, but I also don't want to end up with something that looks hacked together. I'm open to any input here.
 

Rbuddy98

Contributor
Full Member
Joined
Sep 27, 2018
Messages
192
I did mine like you are saying. Here are some before and after photos.
Hope this helps.
 

Attachments

  • 73030874-F3C9-414A-8C7C-FAAEB6144880.jpeg
    73030874-F3C9-414A-8C7C-FAAEB6144880.jpeg
    205.3 KB · Views: 84
  • 611C5779-A6D6-4D6D-8EF2-62478D176E55.jpeg
    611C5779-A6D6-4D6D-8EF2-62478D176E55.jpeg
    205.8 KB · Views: 86
  • 244ED7FB-2713-4B92-A663-1A5AED071A3F.jpeg
    244ED7FB-2713-4B92-A663-1A5AED071A3F.jpeg
    215.3 KB · Views: 83
  • 56AD45AB-24B3-46D5-8C3C-0661EC1060FA.jpeg
    56AD45AB-24B3-46D5-8C3C-0661EC1060FA.jpeg
    220.1 KB · Views: 84
  • C10C0100-DE9B-4529-BED6-2CD264446640.jpeg
    C10C0100-DE9B-4529-BED6-2CD264446640.jpeg
    84.8 KB · Views: 76
  • E7912758-5F4A-4104-9115-F7B51F4DFC82.jpeg
    E7912758-5F4A-4104-9115-F7B51F4DFC82.jpeg
    119.4 KB · Views: 71
  • 134B13CF-8D92-454A-AE2F-4A9B140719B7.jpeg
    134B13CF-8D92-454A-AE2F-4A9B140719B7.jpeg
    160.9 KB · Views: 70
  • 7228D659-FAC3-4E67-B786-4502668146DB.jpeg
    7228D659-FAC3-4E67-B786-4502668146DB.jpeg
    176.6 KB · Views: 83

RH

Full Member
Joined
Jan 15, 2008
Messages
196
Ive done it both ways, in my opinion it is easier to replace the entire panel.
 

jeffncs

Contributor
Sr. Member
Joined
May 4, 2004
Messages
1,131
Loc.
Raleigh, NC
I did the front section of the pass floor yesterday. I should have replaced the whole thing as I found a thin spot in the rear section. Now I have to take the time to do that when I could have knocked it our at once - shame on me.

The silver clips you see below are a huge help making butt welds.

IMG_0989.jpeg IMG_0990.jpeg
 

Wild horse 75

Sr. Member
Joined
May 9, 2023
Messages
358
Loc.
BC
Replacing at a factory seam would be easiest since you can cut out the spot welds and use the existing flange to plug weld the new panel to. But if you don’t want to go that far for whatever reason make sure you find where the thin rusty metal stops and go a couple inches past that. You’ll be thankful when you’re welding similar thicknesses of sheet metal over new thick metal to old sketchy thin metal.
 

Madgyver

Bronco Madman
Joined
Jul 30, 2001
Messages
14,700
Use new panels as you need them. you may cut off 25%-50% off of the new panels the replace the rusty portion of your floors. There is no commitment to use the whole replacement piece. Do what's easier for you.
 

Attachments

  • 334229398_223959253336791_4414645563248998840_n.jpg
    334229398_223959253336791_4414645563248998840_n.jpg
    220.6 KB · Views: 42
  • 121802187_10218518886189501_247248674685743780_n.jpg
    121802187_10218518886189501_247248674685743780_n.jpg
    279.5 KB · Views: 43
  • 275173245_10221432432346334_7134066419321281451_n.jpg
    275173245_10221432432346334_7134066419321281451_n.jpg
    180.4 KB · Views: 43
OP
OP
B

Basketcase

Newbie
Joined
Dec 26, 2014
Messages
32
Thanks for the input all! My toe boards are really solid, so I'm going to try to install the new panel with a good overlap and secure with plug welds. Weld through primer on all mating surfaces and follow up with seam sealer on both sides. You can probably tell that this is the first time doing metal work like this, but I have a pretty solid tub. If I screw it up and have to do it again to get it right it will still be less expensive than paying a shop to do this work.
 
OP
OP
B

Basketcase

Newbie
Joined
Dec 26, 2014
Messages
32
I did mine like you are saying. Here are some before and after photos.
Hope this helps.
In your finished photos I can't see any line where the patch panel sits on top of the original toe board panel. How did you do that? In your fabrication/fitting photos it appears that the patch panels go up the toe boards about 2-3 inches, but in your finished photo there is no visible line where they mate. It looks great by the way!
 

Rbuddy98

Contributor
Full Member
Joined
Sep 27, 2018
Messages
192
That photo you are referring to was a test fit. I trimmed the replacement panel down ( about a 1/2 wide) to make it look like a factory seam even though there wasn’t a seam there. The replacement over laps the original floor board and I plug welded them together.
 

jeffncs

Contributor
Sr. Member
Joined
May 4, 2004
Messages
1,131
Loc.
Raleigh, NC
I know this question was asked of someone else but I’m jumping in anyway….

If you overlap, plug weld them so the panels super tight. I also solid weld the overlap seam. After cleaning up the welds, shoot some epoxy primer and over all of it and seam seal smoothing with a clean rag saturated with paint thinner. Your seams will disappear.

Personally, I’m a fan of butt welding to eliminate the overlap pocket which can harbor water and rust. Look at my pics above and you’ll see the tools, gap and spacing.

IMG_0992.jpeg
 

Wild horse 75

Sr. Member
Joined
May 9, 2023
Messages
358
Loc.
BC
If you’re going to lap weld get yourself some quality weld through primer. Spray both pieces and weld them together. Then go back with the epoxy primer. Then hit it with seam sealer. Seam sealer isn’t always 100% it’s pretty easy to leave a tiny gap somewhere and the primer under will help insure you don’t end up with more rust. The more time you spend on your prep and fitment the better the end result will be.
 
Top