Tech article by Bryan Key (Revelation)
ATTENTION: I am in the middle of doing this swap on a stock Bronco. One MAJOR change; the instructions for the bracket will not work. You must fabricate your own bracket. And it can be done with the dash in BUT would be best done with the dash out. Pay attention to the location of the gauge cluster as it poses clearance issues.
For this install I used the tilt column from a 1989 F-250. The Column from a 1984 to 1991 will work; they are round. The newer ones could most likely be adapted, but have larger cover pieces. If you are running an auto with column shift you can use a newer column with the shifter on it, if you are running a manual find a donor with a manual.
If you go with an 84-91 here is how I installed one in my Bronco. I wanted the column to sit back an inch from stock for comfort when I mount my seat. I am 6'5" and like to stretch my legs when driving. You can adjust the location to fit your specific application.
First thing to find is a good used column. You need everything from steering wheel to rag joint at the steering box. Be sure to get as much of the wiring as you can to ease installation.
Check and make sure the ignition, lock and tilt all work. There is a pot metal piece that can break inside the column and would have to be replaced. The ignition switch is operated by a rod that runs down the top of the shaft. It is visible when the column is removed. I used the factory mount from a 1986, as it was much smaller than the one off the 1989. The smaller one should fit through the stock holes in the dash. I was not concerned as my dash was opened up and an overlay is being used, giving me plenty of working room. You could also modify the dash and make a larger cover plate to accommodate access better.
This could be done with the dash in place, but if the dash is removed it will make all the fabrication much easier.
First step is to make a plate for the new column to bolt to. I used 16ga. stainless with a bend in it to add rigidity. You could add another bend to add even more rigidity if you want, but I feel it is not needed.

Next drill it for the factory Bronco holes. Bolt it in place and get your alignment before drilling the holes for the column mount.

Next you will have to have spacers, the size will depend on how deep or shallow you mount the column.

The column must be low enough for ignition switch clearance. I have 1/4" of clearance on mine and seems to be perfect.

Route the wiring for the ignition switch through the existing hole in the clutch/brake pedal bracket at this time and plug it in to the ignition switch as access will be limited once bolted into place.
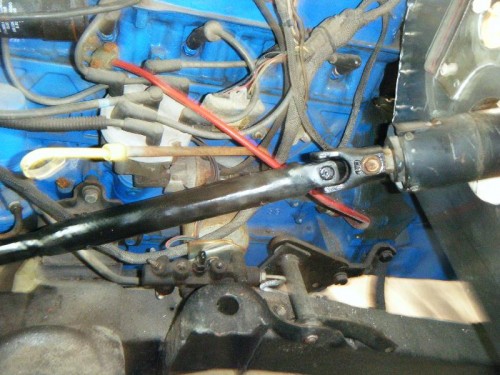
Once bolted into place you can move your attention to the steering shaft. I have the 4x4x2 steering box and the column rag joint was a bolt on. It may also be for other boxes to. Check prior to any modifications of the steering shaft.
The steering shaft must be lengthened. To do this I cut the upper shaft 2 inches from the top U-joint and added a piece of tubing that the shaft would fit snugly in. I made sure I had enough slide left to accommodate installation, welded it into place, added roll pins for added security and it bolted together like it was made for the EB.


Once that is bolted in you have to turn your attention to the firewall brackets. If you wanted to cut the firewall you could use the stock bracket that came on the newer column. I did not want to use that so I fabricated my own from 16ga stainless and installed it.

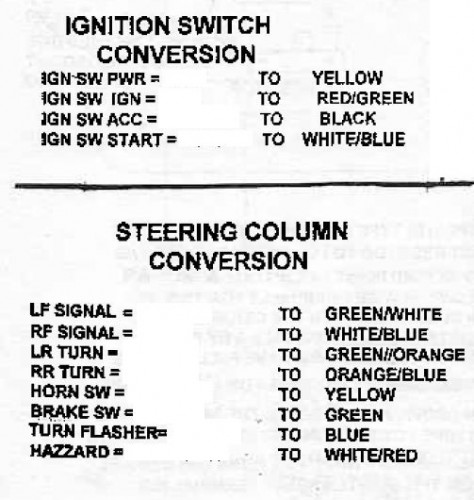
Next was the wiring. It can be wired to use the newer ignition switch, and was fairly straight forward, as were the turn signals. I was installing a new harness so it was a little easier. You will need to get the wiring diagram for your Bronco to match up the turn signal wires and the ignition switch wiring. I am omitting the colors on the Bronco side as over the years many have rewired, and colors are no longer uniform.
The Diagram for the plug you will be wiring to. View is from the face with the wires on the backside.

And the turn signal wiring you must match up.

I soldered all connections and covered with shrink wrap for a clean install.
You will have to fabricate a cover to fill in from the dash to the collar on the column. I have yet to do this as I am still completing my build.
After installation you now have a tilt column with a locking wheel and the ignition on the column.


Any other questions you can PM me or e-mail to BryKey@gmail.com
ATTENTION: I am in the middle of doing this swap on a stock Bronco. One MAJOR change; the instructions for the bracket will not work. You must fabricate your own bracket. And it can be done with the dash in BUT would be best done with the dash out. Pay attention to the location of the gauge cluster as it poses clearance issues.
For this install I used the tilt column from a 1989 F-250. The Column from a 1984 to 1991 will work; they are round. The newer ones could most likely be adapted, but have larger cover pieces. If you are running an auto with column shift you can use a newer column with the shifter on it, if you are running a manual find a donor with a manual.
If you go with an 84-91 here is how I installed one in my Bronco. I wanted the column to sit back an inch from stock for comfort when I mount my seat. I am 6'5" and like to stretch my legs when driving. You can adjust the location to fit your specific application.
First thing to find is a good used column. You need everything from steering wheel to rag joint at the steering box. Be sure to get as much of the wiring as you can to ease installation.
Check and make sure the ignition, lock and tilt all work. There is a pot metal piece that can break inside the column and would have to be replaced. The ignition switch is operated by a rod that runs down the top of the shaft. It is visible when the column is removed. I used the factory mount from a 1986, as it was much smaller than the one off the 1989. The smaller one should fit through the stock holes in the dash. I was not concerned as my dash was opened up and an overlay is being used, giving me plenty of working room. You could also modify the dash and make a larger cover plate to accommodate access better.
This could be done with the dash in place, but if the dash is removed it will make all the fabrication much easier.
First step is to make a plate for the new column to bolt to. I used 16ga. stainless with a bend in it to add rigidity. You could add another bend to add even more rigidity if you want, but I feel it is not needed.

Next drill it for the factory Bronco holes. Bolt it in place and get your alignment before drilling the holes for the column mount.

Next you will have to have spacers, the size will depend on how deep or shallow you mount the column.

The column must be low enough for ignition switch clearance. I have 1/4" of clearance on mine and seems to be perfect.

Route the wiring for the ignition switch through the existing hole in the clutch/brake pedal bracket at this time and plug it in to the ignition switch as access will be limited once bolted into place.
Once bolted into place you can move your attention to the steering shaft. I have the 4x4x2 steering box and the column rag joint was a bolt on. It may also be for other boxes to. Check prior to any modifications of the steering shaft.
The steering shaft must be lengthened. To do this I cut the upper shaft 2 inches from the top U-joint and added a piece of tubing that the shaft would fit snugly in. I made sure I had enough slide left to accommodate installation, welded it into place, added roll pins for added security and it bolted together like it was made for the EB.


Once that is bolted in you have to turn your attention to the firewall brackets. If you wanted to cut the firewall you could use the stock bracket that came on the newer column. I did not want to use that so I fabricated my own from 16ga stainless and installed it.

Next was the wiring. It can be wired to use the newer ignition switch, and was fairly straight forward, as were the turn signals. I was installing a new harness so it was a little easier. You will need to get the wiring diagram for your Bronco to match up the turn signal wires and the ignition switch wiring. I am omitting the colors on the Bronco side as over the years many have rewired, and colors are no longer uniform.
The Diagram for the plug you will be wiring to. View is from the face with the wires on the backside.

And the turn signal wiring you must match up.

I soldered all connections and covered with shrink wrap for a clean install.
You will have to fabricate a cover to fill in from the dash to the collar on the column. I have yet to do this as I am still completing my build.
After installation you now have a tilt column with a locking wheel and the ignition on the column.


Any other questions you can PM me or e-mail to BryKey@gmail.com


