


Tech article by Clay McGuill (eBronc)
NV3550. NV4550. ZF S5-42. No, they’re not map coordinates – just a few of the manual transmissions popular for swapping into Early Broncos. Whether to gain a low "crawler" gear for offroad use, an overdrive for highway travel, or for the strength and easy shifting a modern transmission gives, getting rid of the orignal 3 speed and upgrading to one of these heavy duty 5 speeds is becoming #1 on many Bronco owners’ "to do" lists. There are even aftermarket parts (and some complete kits) that adapt them to Broncos (for a big chunk of change – like around $3,000.00 !!!). If, like me, you live in the REAL world of house payments, kid's braces, electric bills and the like, spending that kind of money on an old truck just isn't going to happen. Where there's a will, there's a way, though - follow along as I show you how to swap in a (2wd) ZF 5 speed into an early Bronco - using FACTORY parts (and a little fabrication) for less than what just the adapter cost for one of those kits.The NV 3550 is a nice fit into a Bronco, and it shifts smoothly, but it’s only rated for a maximum of 300 ft-lbs of torque. Probably OK for a daily driver, but not really what a rockcrawler needs. The NV4550 is much larger and heavier, with a greater torque capacity, but they are very popular upgrades for many other types of 4x4’s, which puts good used units in high demand (read: EXPENSIVE.). Plus, both of these trans require bellhousing AND transfer case adapters, as well as clutch changes to work in a Bronco – lots of hassle and additional expenses.
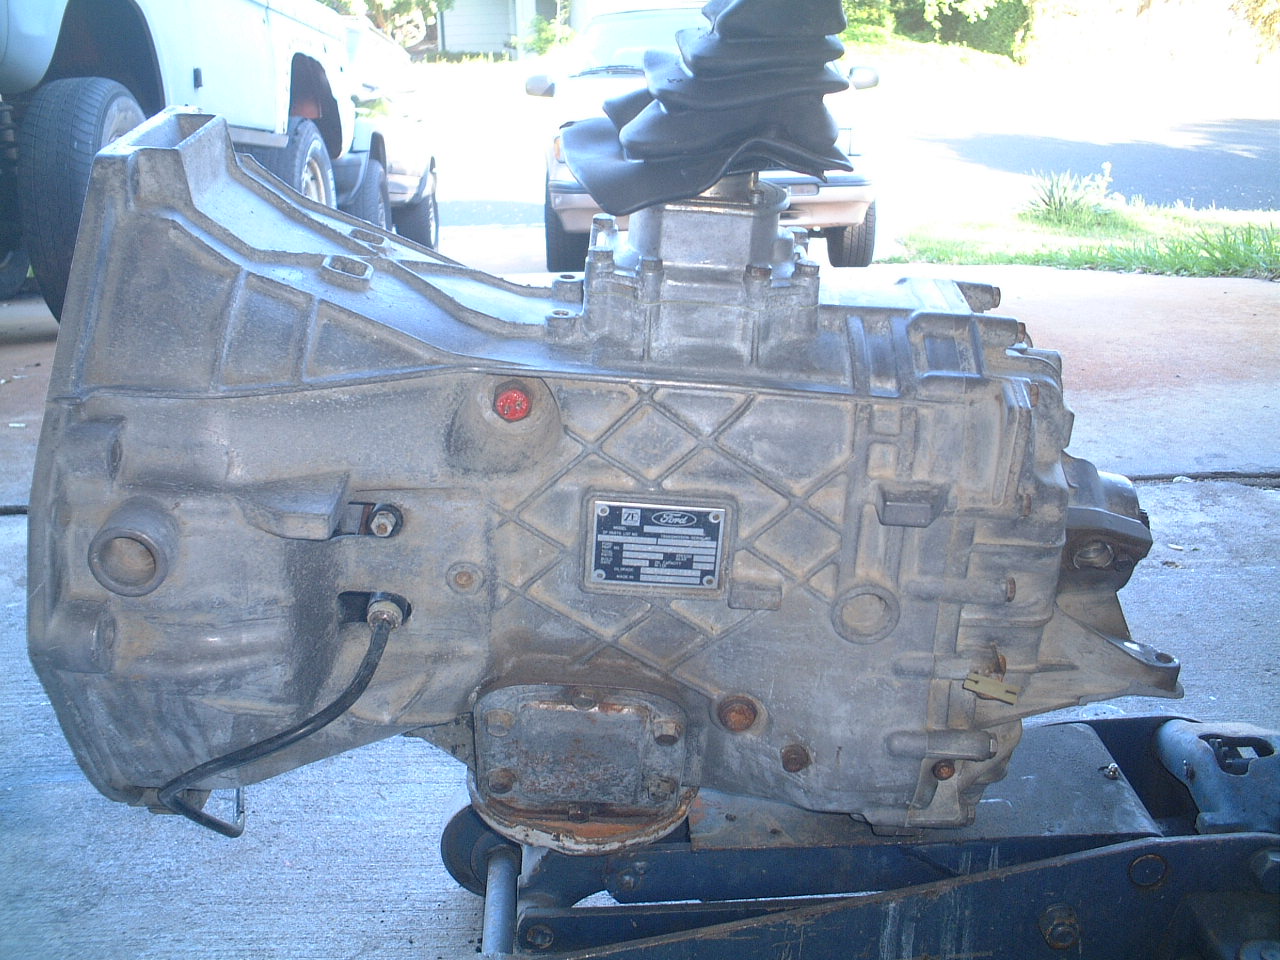
The ZF S5-42 (and -47) were actually factory equipment in a number of Ford heavy-duty trucks for a few years - they were installed in 2wd and 4wd '87-'95 F250 HD’s, 350’s, and 450’s behind Windsor blocks (so it’ll bolt right up to the 289, 302, or 351W in your Bronco), 460’s, and diesels. The units installed behind 351W's even have the same 1 1/16" 10-spline input shaft as an EB's 3 speed, so you can re-use your stock clutch. It's a large unit, but does fit into an Early Bronco with just a little trimming here and there (a body lift helps a lot). It’s pretty similar to a NV4550 in both gear ratios, size, and torque capacity.
What makes the low overall cost of this particular swap possible is the rather large price discrepancy between the 2wd and 4wd versions of the ZF. Although the differences between the two versions are minor - (the rear case section of the 4wd version has a flange with the generic, round 6-bolt pattern, while the 2wd version only has 2 "ears" for a crossmember mount, and the main output shaft diameter and spline counts are slightly different), everything else (bellhousing, gear ratios, etc) are the same. All of the aftermarket kits and parts available are for the 4wd version, which makes it more sought after and expensive than the 2wd version - this is a good thing. 4wd ZF's usually run a little over $1000, while 2wd ZF's can be found in salvage yards and eBay for a few hundred bucks, depending on condition (and how motivated the seller is). I paid $168 for my 2wd ZF on eBay - you may not be quite that lucky.

 When shopping for a 2wd ZF, try to find one that comes with the driveshaft yoke, flywheel, clutch, hydraulic T.O bearing, master cylinder, and whatever other bits and pieces you can get the seller to throw in the deal. Hey, it's just junk to them, right? You CAN re-use your Bronco's flywheel and clutch, but you will need the other pieces. Once you've got the parts, all you have to do is figure out a way to adapt the 2wd transmission to the Bronco's Dana 20 input shaft. Fear not, I've been been there and done that, and it's surprisingly easy. (And cheap). Read on.


 There are a few things you need to keep in mind - the ZF is quite a bit taller (14.5") than the stock Bronco 3 spd transmission (8.5"), so it's a TIGHT fit beneath the floorpan. In fact, if you haven't got a body lift, count on having the bottom of the trans hanging down below the framerails. You'll need to cut a 5 1/2" x 6 1/2" hole in the tunnel up near the firewall for the shifter tower, body lift or not. The transmission output shaft, adapter spud shaft, and transfer case input shaft centerlines all have to align, and the transmission and transfer case need to fit between the frame rails and under the sheetmetal floor (unless you don't mind cutting rather large holes for clearance.) This is where a body lift makes a big difference. My truck already had a 2" body lift, but I complicated things by insisting that everything (trans, transfer case, crossmember) be above or even with the bottom of the frame rails so I could run a flat bellypan/skidplate. If you're willing to sacrifice a little ground clearance, you can run the transmission and transfer case lower in the chassis to clear the floor if you need to. The overall length of the ZF 2wd is 26", from the bellhousing face to the rear output - less than 1" longer than the stock 3 speed/adapter combo.
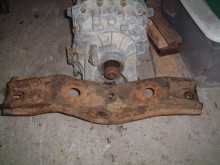
 You won't need to buy an expensive custom crossmember or adapter - your Bronco's original crossmember can be easily modified to support and mount the rear of the ZF and still support the transfer case. By notching the front of the crossmember so the ears of the ZF can pass through it, an angle iron bracket welded underneath the crossmember and drilled with the ZF mounting pattern will allow bolting the ears to the crossmember, and the transfer case will be solidly mounted using the original (but modified) adapter.

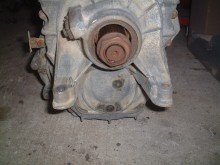
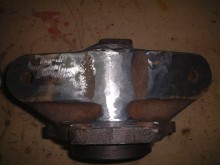 Ok, that's the theory. Now for the greasy part. First, remove the 3-speed transmission, transfer case, and crossmember from your truck, and unbolt the transfer case, the crossmember, and the transmission from the adapter. Since the 2wd ZF has no provisions for bolting an adapter to it, you'll need to modify your Bronco's original transmission-to-transfer case adapter a little. You won't need the front half of the 8" long adapter, but you'll need to keep most of the rear half, since it has the mounting bolt flange for the Transfer case, the mounting ears for the crossmember, the T-case shifter mount, and the internal bore for the lubricant seal and spud shaft bearing. Once you've unbolted the adapter from the transfer case and transmission, remove the spud shaft, bearing, and seal, clean out all traces of gear oil, and cut the adapter in half along a line running from just in front of the shifter mounting hole to just in front of the crossmember mounting ears. An angle grinder works best for this, but it's still going to take a while. Go ahead and grind the "rib" off the bottom of the adapter so it will sit flush on the crossmember while you're at it.

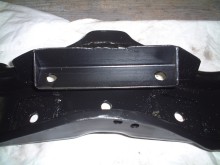 Now, it's time to modify the crossmember. In order to use the two threaded mounting "ears" on the rear of the ZF to support it, you'll need to cut two 1 1/2" x 1 1/2" rectangular holes, centered 5 1/2" apart, in the front face of the crossmember so it can slip over them. To bolt the mounting ears on the rear of the ZF to the crossmember, you'll need to fabricate a bracket out of 1 1/2" x 1 1/2" angle iron, weld it to the bottom of the inside front edge of the crossmember (just below the rectangular holes you just cut), and drill it so bolts can be threaded up into the tapped holes in the ears. You'll notice that the holes in the crossmember for the adapter mounting bolts are much bigger than the 9/16" diameter bolts, because the original setup had the flanged, isolating rubber bushings between them. To locate the adapter properly and reduce the diameter of the mounting holes, use the orginal square flat metal plates from the crossmember mounts. Put the modified cut-down adapter directly on top of the crossmember and verify that the centerline of the bore lines up with the output shaft of the transmission. Use the old bolts to secure the adapter in place, with the square plates up against the bottom of the crossmember. Double check the shaft centerline again, then weld the plates directly to the bottom side of the crossmember.

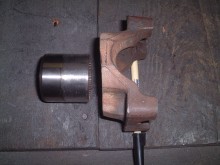
 To transfer power from the transmission output shaft to the transfer case input gear, you'll need to modify the existing spud shaft. The original Bronco spud shaft fits the stock 3 spd's 28-spline output shaft, and is too small and the wrong spline count to fit over the 2wd ZF's 29-spline, 1.495" diameter output shaft. Since the 2wd ZF has a driveshaft yoke on the end of the output shaft (you DID get a driveshaft yoke when you picked out your trans, didn't you?), and the Bronco's spud shaft fits the transfer case, if you cut down the ZF yoke to just a sleeve and weld it to the female end of the Bronco's spud shaft, you'll have just what you need. Cut the ZF yoke where the internal splines end, and carefully grind down what's left of the yoke ears until you've got a tubular internally splined sleeve about 1.8" inches long, and maintain the outer diameter of the existing oil seal. If your particular 2wd ZF didn't come with a driveshaft yoke, you can order one from Drivetrain.com (ZF part #1307304079) or your local Ford dealer (Ford part #E7TZ089A) for about $50.

 To connect the new sleeve to the existing spud shaft, you would be wise to enlist the assistance of a machine shop or driveshaft rebuilder. You want to make sure that the two pieces are concenctric and that the weld bead is STRONG - otherwise, the shaft will wobble while it's turning (destroying the bearings in short order), or the weld will break the first time you really plant your foot in the throttle. (Yeah, maybe you've got access to a big welder, and can stick metal together OK, but every ounce of torque will be going through this weld, and you've got to know your limitations.) If you're worried about the weld not being able to hold up under all that torque, don't be - most driveshaft shops weld thin-wall tubing to yokes for custom driveshafts every day, for everything from daily drivers to dragsters to 70,000 lb 18-wheelers. They can probably handle it.

 Once you've got the spud shaft modified, you can start reassembling things. Press a new oil seal and bearing into the cut-down adapter, then slide the modified spud shaft through them from the transmission side. The bearing is a pretty tight fit over the shaft, so you'll need to either use a press or do some careful work with a brass drift and a hammer. Press (or drive) the shaft all the way through until the raised shoulder on it is up against the inner race of the bearing. Now, slide the transfer case input gear over the big splines on the end of the spud shaft as far as you can by hand, then either press it or drive it on until it bottoms against the other side of the inner bearing race, and just clears the snap ring groove in the spud shaft. Install the snap ring into the groove (this can be a real PITA without the right snap-ring pliers, by the way), and you're nearly done. All that's left is to turn the Tcase up on it's back, insert the 13 roller bearings into the input shaft counterbore (use a little grease to keep them in place), put a new gasket in place on the adapter mounting flange, carefully slide the adapter into place, and tighten the hardware to about 35 ft-lbs.


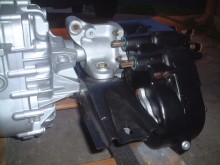
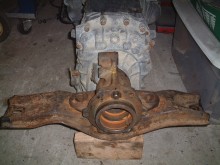
 At this point, you should be nearly done with the necessary modifications. The crossmember will slide over the two mounting ears at the rear of the ZF and they can be bolted together using the bracket underneath the crossmember. The modified spud shaft will slip over the ZF's output shaft splines, and the adapter will bolt directly to the crossmember in the stock location, without using the original bushings. Once you've got everything lined up and bolted together, you'll end up with a drivetrain combination like this:


 You can even use your stock T-case shifter - but you'll probably need to cut the shifter hole in the floor for clearance, since the T-case is now a little further back than stock. The crossmember brackets bolted to the frame will need to be moved back and up a little on the framerails - you'll need to lift everything up into position to determine their exact position on your particular vehicle, since it depends on whether you're running a body lift or not, how much of a lift, etc. Once you determine the correct location, you'll need to mark and drill new holes for the mounting bolts in the frame rails, since the "nut plate" in the factory location can't be moved. After the drivetrain is bolted back into the truck, you can measure for new driveshafts - the transfer case is now a few inches further back in the chassis, so the stock driveshafts won't fit. What I found interesting, though, was the fact that with the stock axles still under my truck, the measurements for both the front and rear driveshafts were EXACTLY the same - 30 1/2 inches from yoke to yoke. I'll be swapping out both axles soon (for a high-pinion Dana 44 front, Dana 60 rear), so I'll wait until those are in to see how much the measurements change before ordering driveshafts.


The new drivetrain actually fits extremely well into the Bronco - the only cutting needed will be for the ZF shifter tower and extending the D20 shifter hole in the floor tunnel rearward a few inches. The top of the ZF sits just barely below the floor with a 2" body lift, and the top of the transfer case just clears the "stiffening rib" running under the floor where the seats are, with the bottom of the transmission and transfer case even with the bottom of the frame rails. Even though the ZF is physically larger than the original 3 speed, you'll actually have more room to run headers and exhaust pipes because the ZF's internal hydraulic throwout bearing allows the removal of the old mechanical clutch linkage.
When I performed this transmission swap on my project truck, I took the opporuntity to rebuild the transfer case and re-install it in a "clocked" position, to raise the front output above the level of the bottom of the frame rails. This is not a REQUIRED modification for the ZF swap, so if the transfer case hanging down like a grappling hook and hitting nearly every good-sized rock you drive over doesn't bother you, you won't have to worry about the next few steps. But hey, you've come this far, why stop now? C'mon, it'll be fun.
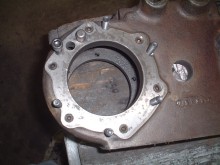
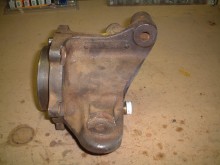
 The stock Bronco Dana 20 transfer case is bolted to the rear of the adapter by 6 bolts in a symmetrical pattern. There is a 1/2" diameter "indexing pin" at the top of the bolt pattern, which is lightly pressed into the flange at the rear of the adapter. Once the pin is removed, the case can be rotated in respect to the adapter, and the bolt holes will line up in any of 6 other postions - however, none of them will be usable with the case actually installed in a Bronco. The next set of bolt holes in the adapter puts the front ouput too high and the case into the floorpan. Since I wanted to rebuild the transfer case anyway, I dissassembled it and used the adapter as a jig so I could drill and tap a new set of mounting holes (3/8"-16, same as stock) and indexing pin hole between the existing sets, which ended up being perfect. The front of the transfer case is a little thin between the original mounting hole bosses, so rather than rely on a few threads in the cast iron, I ran Grade 8 socket-head bolts from the inside of the case out through the tapped holes - much like studs, but even stronger since they are both threaded INTO the case AND clamp it and the adapter together. The adapter's 1" long, inner circular flange slips tightly into the case bore (much like a spindle fits into a steering knuckle on a front axle) to take the vertical and horizontal loads on the junction, and the (relocated) 1/2" diameter indexing pin prevents the adapter and case from rotating in respect to each other, so all the bolts really do is fasten the pieces together. I used allen-head set screws to block off the original tapped mounting holes.
Since the transfer case was now slightly rotated relative to the adapter, the stock shifter linkage would no longer fit. No big deal, since I wanted to convert the T-case over to a twin-stick setup anyway. I used the original shifter lever (after removing the internal spring-loaded mechanisim, bending the tubing a little, and cutting off a few inches off the bottom (where the old linkage attatched) as one stick. I recycled the Bronco's incredibly heavy duty original muffler bracket and some electrical conduit I had left over from a house wiring project to make the other shifter lever - basically, I just copied the shape of the other shifter, and used a longer pivot bolt to attach them both to the original adapter hole. Short sections of 3/8" threaded rod inserted and welded into the tops of the shifter tubes gave me a place to put knobs - which I made out of old billiard balls, drilled and tapped halfway through. To connect the bottom of the levers to the shift rails, I used some old 1/4" rod ends I had lying around, and welded short studs to the original shift rail connecting tabs.
I had to modify the ZF's stock shifter a little to fit under the dash and not interfere with the new twinstick shifters. I cut the shifter right at the base of the rubber insulating tube, drilled and tapped the center steel shaft, then inserted threaded rod (3/8-16) into it, with about 2 inches sticking out. I fabricated a small offset bracket and welded it to the original bottom of the ZF shifter, then bent and welded a short section of thick-wall tubing to it. The 2 inches of threaded rod on the end of the top of the ZF shifter fit into this tubing, which positions the shifter just below the bottom of the dash in 1st, 3rd, and 5th. I made sure to leave enough clearance for my right knee and the twinsticks when the shifter is in 2nd, 4th, and Reverse.
Tech article by Clay McGuill (eBronc)
NV3550. NV4550. ZF S5-42. No, they’re not map coordinates – just a few of the manual transmissions popular for swapping into Early Broncos. Whether to gain a low "crawler" gear for offroad use, an overdrive for highway travel, or for the strength and easy shifting a modern transmission gives, getting rid of the orignal 3 speed and upgrading to one of these heavy duty 5 speeds is becoming #1 on many Bronco owners’ "to do" lists. There are even aftermarket parts (and some complete kits) that adapt them to Broncos (for a big chunk of change – like around $3,000.00 !!!). If, like me, you live in the REAL world of house payments, kid's braces, electric bills and the like, spending that kind of money on an old truck just isn't going to happen. Where there's a will, there's a way, though - follow along as I show you how to swap in a (2wd) ZF 5 speed into an early Bronco - using FACTORY parts (and a little fabrication) for less than what just the adapter cost for one of those kits.The NV 3550 is a nice fit into a Bronco, and it shifts smoothly, but it’s only rated for a maximum of 300 ft-lbs of torque. Probably OK for a daily driver, but not really what a rockcrawler needs. The NV4550 is much larger and heavier, with a greater torque capacity, but they are very popular upgrades for many other types of 4x4’s, which puts good used units in high demand (read: EXPENSIVE.). Plus, both of these trans require bellhousing AND transfer case adapters, as well as clutch changes to work in a Bronco – lots of hassle and additional expenses.
The ZF S5-42 (and -47) were actually factory equipment in a number of Ford heavy-duty trucks for a few years - they were installed in 2wd and 4wd '87-'95 F250 HD’s, 350’s, and 450’s behind Windsor blocks (so it’ll bolt right up to the 289, 302, or 351W in your Bronco), 460’s, and diesels. The units installed behind 351W's even have the same 1 1/16" 10-spline input shaft as an EB's 3 speed, so you can re-use your stock clutch. It's a large unit, but does fit into an Early Bronco with just a little trimming here and there (a body lift helps a lot). It’s pretty similar to a NV4550 in both gear ratios, size, and torque capacity.
What makes the low overall cost of this particular swap possible is the rather large price discrepancy between the 2wd and 4wd versions of the ZF. Although the differences between the two versions are minor - (the rear case section of the 4wd version has a flange with the generic, round 6-bolt pattern, while the 2wd version only has 2 "ears" for a crossmember mount, and the main output shaft diameter and spline counts are slightly different), everything else (bellhousing, gear ratios, etc) are the same. All of the aftermarket kits and parts available are for the 4wd version, which makes it more sought after and expensive than the 2wd version - this is a good thing. 4wd ZF's usually run a little over $1000, while 2wd ZF's can be found in salvage yards and eBay for a few hundred bucks, depending on condition (and how motivated the seller is). I paid $168 for my 2wd ZF on eBay - you may not be quite that lucky.

 When shopping for a 2wd ZF, try to find one that comes with the driveshaft yoke, flywheel, clutch, hydraulic T.O bearing, master cylinder, and whatever other bits and pieces you can get the seller to throw in the deal. Hey, it's just junk to them, right? You CAN re-use your Bronco's flywheel and clutch, but you will need the other pieces. Once you've got the parts, all you have to do is figure out a way to adapt the 2wd transmission to the Bronco's Dana 20 input shaft. Fear not, I've been been there and done that, and it's surprisingly easy. (And cheap). Read on.

 You won't need to buy an expensive custom crossmember or adapter - your Bronco's original crossmember can be easily modified to support and mount the rear of the ZF and still support the transfer case. By notching the front of the crossmember so the ears of the ZF can pass through it, an angle iron bracket welded underneath the crossmember and drilled with the ZF mounting pattern will allow bolting the ears to the crossmember, and the transfer case will be solidly mounted using the original (but modified) adapter.

 Ok, that's the theory. Now for the greasy part. First, remove the 3-speed transmission, transfer case, and crossmember from your truck, and unbolt the transfer case, the crossmember, and the transmission from the adapter. Since the 2wd ZF has no provisions for bolting an adapter to it, you'll need to modify your Bronco's original transmission-to-transfer case adapter a little. You won't need the front half of the 8" long adapter, but you'll need to keep most of the rear half, since it has the mounting bolt flange for the Transfer case, the mounting ears for the crossmember, the T-case shifter mount, and the internal bore for the lubricant seal and spud shaft bearing. Once you've unbolted the adapter from the transfer case and transmission, remove the spud shaft, bearing, and seal, clean out all traces of gear oil, and cut the adapter in half along a line running from just in front of the shifter mounting hole to just in front of the crossmember mounting ears. An angle grinder works best for this, but it's still going to take a while. Go ahead and grind the "rib" off the bottom of the adapter so it will sit flush on the crossmember while you're at it.
 Now, it's time to modify the crossmember. In order to use the two threaded mounting "ears" on the rear of the ZF to support it, you'll need to cut two 1 1/2" x 1 1/2" rectangular holes, centered 5 1/2" apart, in the front face of the crossmember so it can slip over them. To bolt the mounting ears on the rear of the ZF to the crossmember, you'll need to fabricate a bracket out of 1 1/2" x 1 1/2" angle iron, weld it to the bottom of the inside front edge of the crossmember (just below the rectangular holes you just cut), and drill it so bolts can be threaded up into the tapped holes in the ears. You'll notice that the holes in the crossmember for the adapter mounting bolts are much bigger than the 9/16" diameter bolts, because the original setup had the flanged, isolating rubber bushings between them. To locate the adapter properly and reduce the diameter of the mounting holes, use the orginal square flat metal plates from the crossmember mounts. Put the modified cut-down adapter directly on top of the crossmember and verify that the centerline of the bore lines up with the output shaft of the transmission. Use the old bolts to secure the adapter in place, with the square plates up against the bottom of the crossmember. Double check the shaft centerline again, then weld the plates directly to the bottom side of the crossmember.
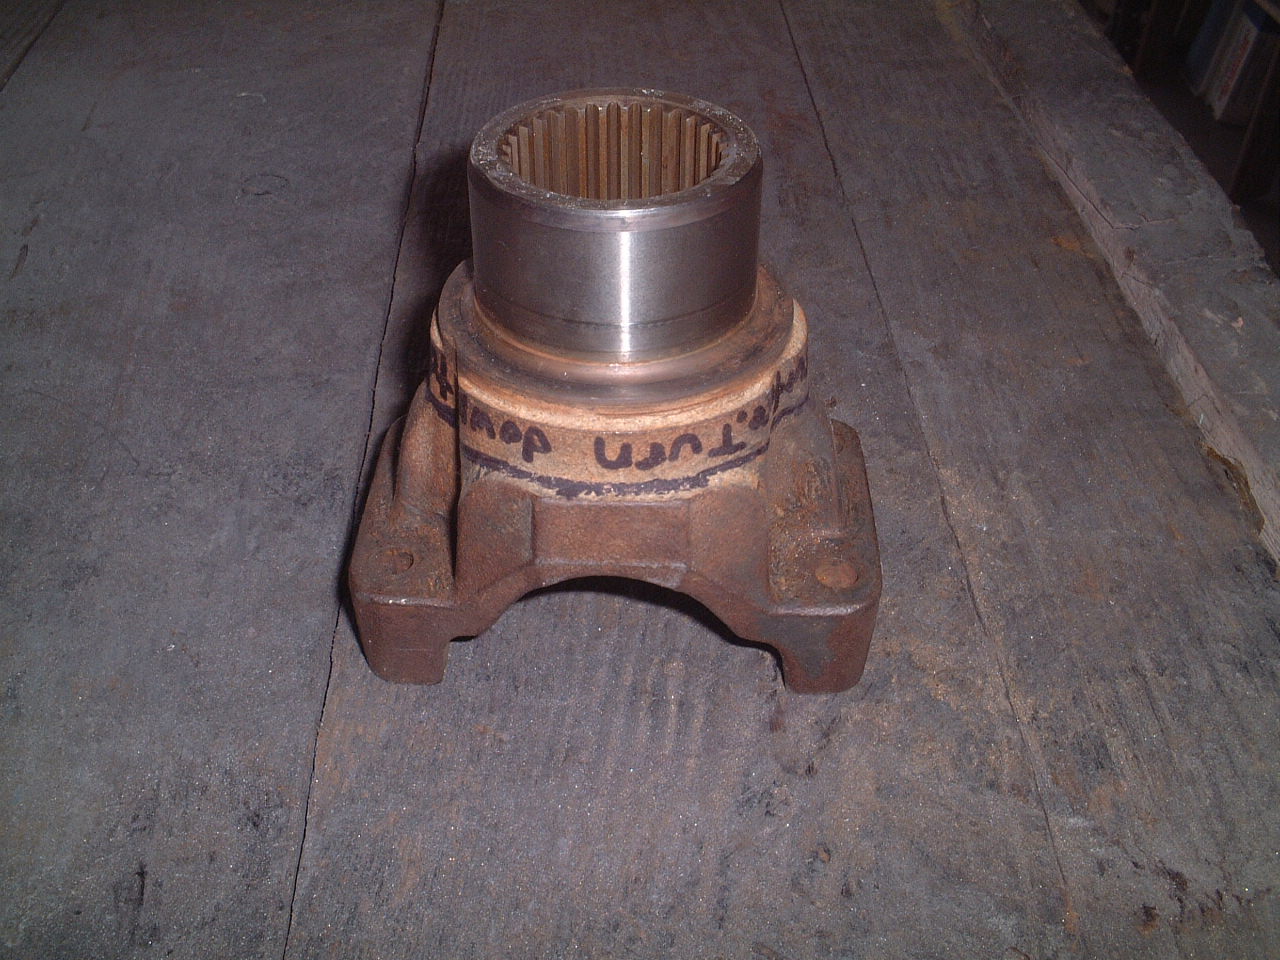

 To transfer power from the transmission output shaft to the transfer case input gear, you'll need to modify the existing spud shaft. The original Bronco spud shaft fits the stock 3 spd's 28-spline output shaft, and is too small and the wrong spline count to fit over the 2wd ZF's 29-spline, 1.495" diameter output shaft. Since the 2wd ZF has a driveshaft yoke on the end of the output shaft (you DID get a driveshaft yoke when you picked out your trans, didn't you?), and the Bronco's spud shaft fits the transfer case, if you cut down the ZF yoke to just a sleeve and weld it to the female end of the Bronco's spud shaft, you'll have just what you need. Cut the ZF yoke where the internal splines end, and carefully grind down what's left of the yoke ears until you've got a tubular internally splined sleeve about 1.8" inches long, and maintain the outer diameter of the existing oil seal. If your particular 2wd ZF didn't come with a driveshaft yoke, you can order one from Drivetrain.com (ZF part #1307304079) or your local Ford dealer (Ford part #E7TZ089A) for about $50.
 To connect the new sleeve to the existing spud shaft, you would be wise to enlist the assistance of a machine shop or driveshaft rebuilder. You want to make sure that the two pieces are concenctric and that the weld bead is STRONG - otherwise, the shaft will wobble while it's turning (destroying the bearings in short order), or the weld will break the first time you really plant your foot in the throttle. (Yeah, maybe you've got access to a big welder, and can stick metal together OK, but every ounce of torque will be going through this weld, and you've got to know your limitations.) If you're worried about the weld not being able to hold up under all that torque, don't be - most driveshaft shops weld thin-wall tubing to yokes for custom driveshafts every day, for everything from daily drivers to dragsters to 70,000 lb 18-wheelers. They can probably handle it.
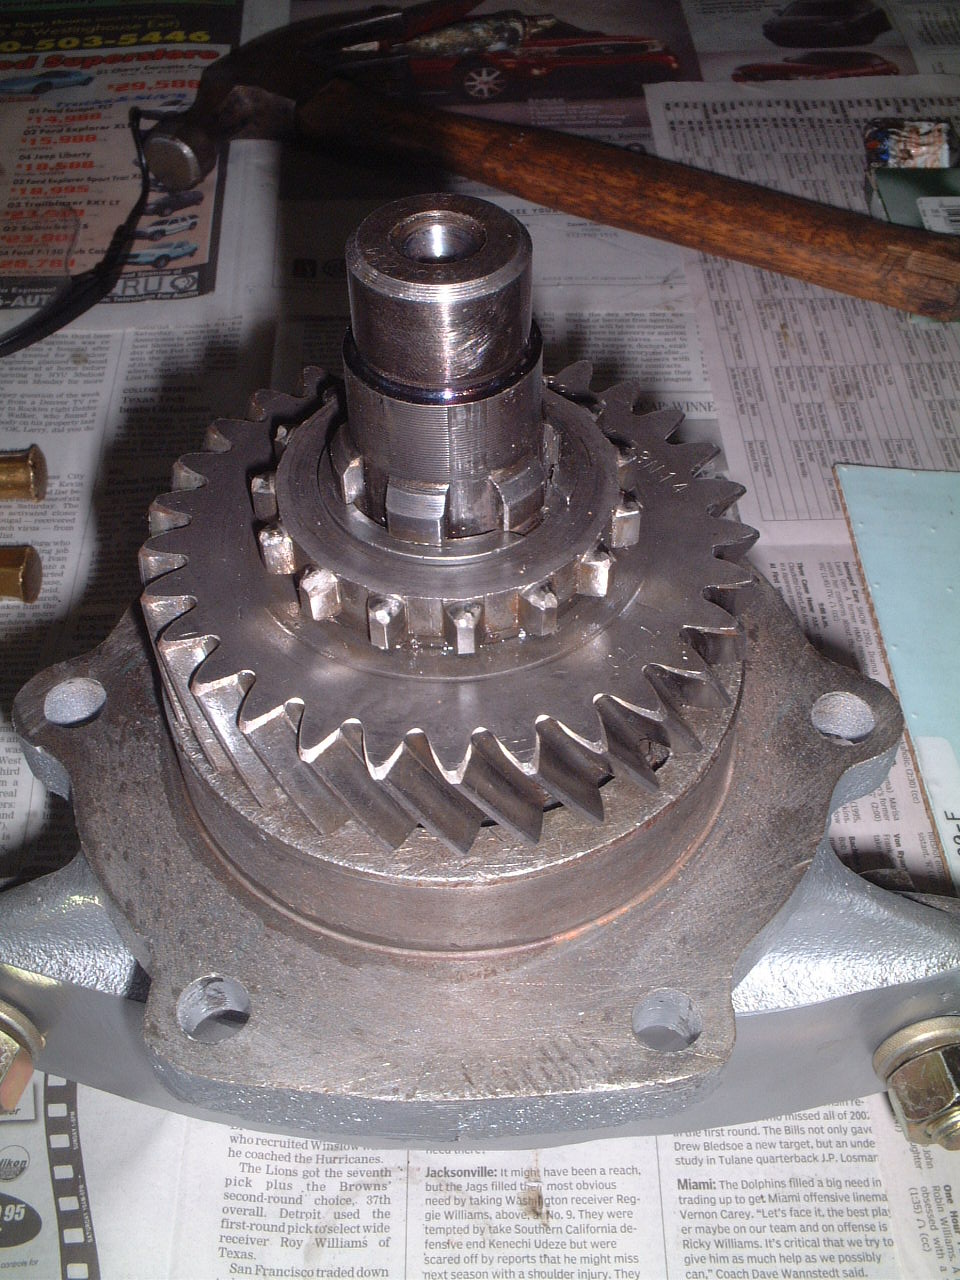
 Once you've got the spud shaft modified, you can start reassembling things. Press a new oil seal and bearing into the cut-down adapter, then slide the modified spud shaft through them from the transmission side. The bearing is a pretty tight fit over the shaft, so you'll need to either use a press or do some careful work with a brass drift and a hammer. Press (or drive) the shaft all the way through until the raised shoulder on it is up against the inner race of the bearing. Now, slide the transfer case input gear over the big splines on the end of the spud shaft as far as you can by hand, then either press it or drive it on until it bottoms against the other side of the inner bearing race, and just clears the snap ring groove in the spud shaft. Install the snap ring into the groove (this can be a real PITA without the right snap-ring pliers, by the way), and you're nearly done. All that's left is to turn the Tcase up on it's back, insert the 13 roller bearings into the input shaft counterbore (use a little grease to keep them in place), put a new gasket in place on the adapter mounting flange, carefully slide the adapter into place, and tighten the hardware to about 35 ft-lbs.


 At this point, you should be nearly done with the necessary modifications. The crossmember will slide over the two mounting ears at the rear of the ZF and they can be bolted together using the bracket underneath the crossmember. The modified spud shaft will slip over the ZF's output shaft splines, and the adapter will bolt directly to the crossmember in the stock location, without using the original bushings. Once you've got everything lined up and bolted together, you'll end up with a drivetrain combination like this:

 You can even use your stock T-case shifter - but you'll probably need to cut the shifter hole in the floor for clearance, since the T-case is now a little further back than stock. The crossmember brackets bolted to the frame will need to be moved back and up a little on the framerails - you'll need to lift everything up into position to determine their exact position on your particular vehicle, since it depends on whether you're running a body lift or not, how much of a lift, etc. Once you determine the correct location, you'll need to mark and drill new holes for the mounting bolts in the frame rails, since the "nut plate" in the factory location can't be moved. After the drivetrain is bolted back into the truck, you can measure for new driveshafts - the transfer case is now a few inches further back in the chassis, so the stock driveshafts won't fit. What I found interesting, though, was the fact that with the stock axles still under my truck, the measurements for both the front and rear driveshafts were EXACTLY the same - 30 1/2 inches from yoke to yoke. I'll be swapping out both axles soon (for a high-pinion Dana 44 front, Dana 60 rear), so I'll wait until those are in to see how much the measurements change before ordering driveshafts.


The new drivetrain actually fits extremely well into the Bronco - the only cutting needed will be for the ZF shifter tower and extending the D20 shifter hole in the floor tunnel rearward a few inches. The top of the ZF sits just barely below the floor with a 2" body lift, and the top of the transfer case just clears the "stiffening rib" running under the floor where the seats are, with the bottom of the transmission and transfer case even with the bottom of the frame rails. Even though the ZF is physically larger than the original 3 speed, you'll actually have more room to run headers and exhaust pipes because the ZF's internal hydraulic throwout bearing allows the removal of the old mechanical clutch linkage.
When I performed this transmission swap on my project truck, I took the opporuntity to rebuild the transfer case and re-install it in a "clocked" position, to raise the front output above the level of the bottom of the frame rails. This is not a REQUIRED modification for the ZF swap, so if the transfer case hanging down like a grappling hook and hitting nearly every good-sized rock you drive over doesn't bother you, you won't have to worry about the next few steps. But hey, you've come this far, why stop now? C'mon, it'll be fun.

 The stock Bronco Dana 20 transfer case is bolted to the rear of the adapter by 6 bolts in a symmetrical pattern. There is a 1/2" diameter "indexing pin" at the top of the bolt pattern, which is lightly pressed into the flange at the rear of the adapter. Once the pin is removed, the case can be rotated in respect to the adapter, and the bolt holes will line up in any of 6 other postions - however, none of them will be usable with the case actually installed in a Bronco. The next set of bolt holes in the adapter puts the front ouput too high and the case into the floorpan. Since I wanted to rebuild the transfer case anyway, I dissassembled it and used the adapter as a jig so I could drill and tap a new set of mounting holes (3/8"-16, same as stock) and indexing pin hole between the existing sets, which ended up being perfect. The front of the transfer case is a little thin between the original mounting hole bosses, so rather than rely on a few threads in the cast iron, I ran Grade 8 socket-head bolts from the inside of the case out through the tapped holes - much like studs, but even stronger since they are both threaded INTO the case AND clamp it and the adapter together. The adapter's 1" long, inner circular flange slips tightly into the case bore (much like a spindle fits into a steering knuckle on a front axle) to take the vertical and horizontal loads on the junction, and the (relocated) 1/2" diameter indexing pin prevents the adapter and case from rotating in respect to each other, so all the bolts really do is fasten the pieces together. I used allen-head set screws to block off the original tapped mounting holes.
Since the transfer case was now slightly rotated relative to the adapter, the stock shifter linkage would no longer fit. No big deal, since I wanted to convert the T-case over to a twin-stick setup anyway. I used the original shifter lever (after removing the internal spring-loaded mechanisim, bending the tubing a little, and cutting off a few inches off the bottom (where the old linkage attatched) as one stick. I recycled the Bronco's incredibly heavy duty original muffler bracket and some electrical conduit I had left over from a house wiring project to make the other shifter lever - basically, I just copied the shape of the other shifter, and used a longer pivot bolt to attach them both to the original adapter hole. Short sections of 3/8" threaded rod inserted and welded into the tops of the shifter tubes gave me a place to put knobs - which I made out of old billiard balls, drilled and tapped halfway through. To connect the bottom of the levers to the shift rails, I used some old 1/4" rod ends I had lying around, and welded short studs to the original shift rail connecting tabs.
I had to modify the ZF's stock shifter a little to fit under the dash and not interfere with the new twinstick shifters. I cut the shifter right at the base of the rubber insulating tube, drilled and tapped the center steel shaft, then inserted threaded rod (3/8-16) into it, with about 2 inches sticking out. I fabricated a small offset bracket and welded it to the original bottom of the ZF shifter, then bent and welded a short section of thick-wall tubing to it. The 2 inches of threaded rod on the end of the top of the ZF shifter fit into this tubing, which positions the shifter just below the bottom of the dash in 1st, 3rd, and 5th. I made sure to leave enough clearance for my right knee and the twinsticks when the shifter is in 2nd, 4th, and Reverse.
Tech article by Clay McGuill (eBronc)