• Welcome to ClassicBroncos! - You are currently viewing the forums as a GUEST. To take advantage of all the site features, please take a moment to register. It's fast, simple and absolutely free. So please join our community today!
    If you have problems registering or can't log into your account, please contact Admin.

Rust Repair - Advice Needed

Jmjuhl

Jr. Member
Joined
Aug 6, 2021
Messages
89
Loc.
Cypress, Texas
Trying to figure out a plan forward here ranging from blast/patch/repair all the way to a new tub. I bought a 74 that overall is in good shape but has rust in all the usual Bronco places in varying degrees.

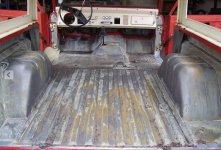
The inner and outer rockers on both sides will be replaced along with floor pans so I didn't share pictures of those. The main offending areas are the core support in front of the battery tray, the channel under the cowl, the rear wheel tubs where they meet the bed floor, and the drivers rear door post and the aux gas filler cover behind it…can't tell if it's into the inner quarter.

You can see the original “Hot Ginger Metallic” paint on the inner fender aprons, A pillars, and firewall that appear to be rock solid. Somewhere along the way somebody painted the green over it and my fear is what might be lurking underneath….could be nothing but before putting money into it I want to know.

My initial inclination is to patch tubs, floors, and driver door post and then have the whole body chemical dipped to check the extent of the damage to the core support and channel under the cowl. The cowl is the one that worries me the most since the pedal box bolts to it but so far it is just a quarter sized hole under driver and a few small holes under passenger…hit the rest with a screw driver and it's solid.

Not trying to make it a show truck but I don't want to put time, effort, and money into it to have to redo it all again in a few years. How would you guys proceed?

965ADC7C-84EE-48BF-B379-8088F27D6761.jpg
29C1D1B0-289E-4F4F-836D-FFBA3F7411BB.jpg
7B6E0C3F-0E70-4585-9786-7412D5649DC0.jpg
124D71F2-82A7-4DD8-A2C1-64E0F2826EF2.jpg
18FD74D9-0577-422E-9559-4DEF089C66CF.jpg
D75DDDD4-664F-4C6C-B0F1-CD34CB9B32D0.jpg
9579DE2F-5C9E-4AB8-83BA-F7B38B504CB0.jpg
AE110F9B-659D-4D52-87EB-A0706EDEF8E7.jpg
 

helo-mech

Sr. Member
Joined
Jun 22, 2007
Messages
621
For the core support forward of the windshield I cut all of mine out, put it on an angle and poured POR-15 from the top of the channel down to the bottom. I collected each time in a small container and repeated probably 5 times. I then soaked a rag in POR-15 and pulled it though another 4-5 times.

I then closed it all up with Steel Stick and Seam Sealer. I am sure others would recommend welding it up, but I wanted to be be able to get back in if I had future issues. I don't actually have a picture of it closed up, but I haven't had the interior leaking issues that I had prior to this procedure.

If you look at the FLIKR link in my signature you can see the POR-15 and bedliner I used in the other rust issues of my cab and interior door panels. I had my tub soda blasted prior to all of the interior work.

HOWEVER; if you are considering dipping your body, then I wouldn't do anything prior to the dip. It will reveal areas you never thought were of concern.
 

Attachments

  • Screen Shot 2021-10-13 at 10.30.19 PM.jpg
    Screen Shot 2021-10-13 at 10.30.19 PM.jpg
    82.4 KB · Views: 100
  • Screen Shot 2021-10-13 at 10.29.35 PM.jpg
    Screen Shot 2021-10-13 at 10.29.35 PM.jpg
    116.6 KB · Views: 179
  • Screen Shot 2021-10-13 at 10.29.10 PM.jpg
    Screen Shot 2021-10-13 at 10.29.10 PM.jpg
    75.5 KB · Views: 107
  • Screen Shot 2021-10-13 at 10.28.41 PM.jpg
    Screen Shot 2021-10-13 at 10.28.41 PM.jpg
    99.1 KB · Views: 171
  • Screen Shot 2021-10-13 at 10.28.16 PM.jpg
    Screen Shot 2021-10-13 at 10.28.16 PM.jpg
    104.3 KB · Views: 112
OP
OP
Jmjuhl

Jmjuhl

Jr. Member
Joined
Aug 6, 2021
Messages
89
Loc.
Cypress, Texas
For the core support forward of the windshield I cut all of mine out, put it on an angle and poured POR-15 from the top of the channel down to the bottom. I collected each time in a small container and repeated probably 5 times. I then soaked a rag in POR-15 and pulled it though another 4-5 times.

I then closed it all up with Steel Stick and Seam Sealer. I am sure others would recommend welding it up, but I wanted to be be able to get back in if I had future issues. I don't actually have a picture of it closed up, but I haven't had the interior leaking issues that I had prior to this procedure.

I think structural integrity is still there but I wonder at what point you just replace it vs. cutting it out?

I like your ingenuity. Seems to have worked pretty well.
 

nickgp

Bronco Guru
Joined
Jan 17, 2010
Messages
1,024
Patch and replace what's needed. An original body in my opinion is the real deal. Time to dodge the bullets!
 
OP
OP
Jmjuhl

Jmjuhl

Jr. Member
Joined
Aug 6, 2021
Messages
89
Loc.
Cypress, Texas
Patch and replace what's needed. An original body in my opinion is the real deal. Time to dodge the bullets!

That is kind of my thinking...it kind of turns into a math problem at this point. Cost to media blast or chemical dip sucks but at least I will know where ALL the issues are in the body and can eradicate all the rust. As long as cost to dip plus repair/patch stays below cost of new tub it makes a ton of sense. Plus I know everything fits together now and my gaps are good so I don't fight that battle.

Gamble is I dip it and find out it's cost prohibitive to repair.
 

helo-mech

Sr. Member
Joined
Jun 22, 2007
Messages
621
I guess I wonder too about how do you ever get in and re-prime/paint some of the enclosed portions of the paneling. Fact is the liquid of the dip will strip places you will never be able to get eyes on, much less prime and paint.

I had my floors soda blasted. I really liked the results other than I did it without pulling the body. I had hoped they could tape and cover the areas I didn't want blasted, but the dust got into every nook and cranny. If I was pulling the body, I wouldn't hesitate to do the soda blasting again, I just would not advise unless it is fully stripped.
 

Attachments

  • Screen Shot 2021-10-14 at 10.51.28 PM.jpg
    Screen Shot 2021-10-14 at 10.51.28 PM.jpg
    116.7 KB · Views: 105
  • Screen Shot 2021-10-14 at 10.51.51 PM.jpg
    Screen Shot 2021-10-14 at 10.51.51 PM.jpg
    143.9 KB · Views: 101
OP
OP
Jmjuhl

Jmjuhl

Jr. Member
Joined
Aug 6, 2021
Messages
89
Loc.
Cypress, Texas
I guess I wonder too about how do you ever get in and re-prime/paint some of the enclosed portions of the paneling. Fact is the liquid of the dip will strip places you will never be able to get eyes on, much less prime and paint.

I had the same thought as well. The place I got a quote from also does an epoxy e-coating dip after they neutralize the chemical dip so it would seep into unreachable areas. Still way better than bare metal and seam sealer that Ford used 45 years ago.
 

helo-mech

Sr. Member
Joined
Jun 22, 2007
Messages
621
I had the same thought as well. The place I got a quote from also does an epoxy e-coating dip after they neutralize the chemical dip so it would seep into unreachable areas. Still way better than bare metal and seam sealer that Ford used 45 years ago.

True; the epoxy primer should find the same areas. Are you doing the frame as well? There is a reason it is considered the ultimate fresh start.
 
OP
OP
Jmjuhl

Jmjuhl

Jr. Member
Joined
Aug 6, 2021
Messages
89
Loc.
Cypress, Texas
True; the epoxy primer should find the same areas. Are you doing the frame as well? There is a reason it is considered the ultimate fresh start.

Have a Kincer classic frame on order due in December and going to Powder coat it. My frame is usable but would require a ton of clean up of junk welded to the frame and not sure how square it is. Gives me a solid and perfectly square foundation to build on.
 

helo-mech

Sr. Member
Joined
Jun 22, 2007
Messages
621
Have a Kincer classic frame on order due in December and going to Powder coat it. My frame is usable but would require a ton of clean up of junk welded to the frame and not sure how square it is. Gives me a solid and perfectly square foundation to build on.

Well this is an entire different situation; sounds like you are on a serious build with some dips are in your future. I'm glad I don't have to make the decision on whether to dip or purchase, but if your panels all line up that has to be a good sign. Maybe do some exploratory sanding in the common rust areas to see what your body looks like along with running all the panels with a magnet looking for prior repairs. I've seen some guys replace some pretty large sections of a panel rather than changing it out. Like I said, I am glad I don't have to make this decision. I can see why you are checking options.

On another note are you gonna make the LEBC event in November?
 

Rustytruck

Bronco Guru
Joined
Feb 24, 2002
Messages
10,872
Before you jump in with both feet watch a few of Fitzees repair videos.
it will help put te jobs in perspective and not over think stuff.


ngsd

Contributor
Bronco Guru
Joined
Mar 2, 2019
Messages
2,701
This is always a dilemma when you are going deep on the budget. A new Kincer frame tells me that you want to do this right. Rust is like termites, what you don't see is where the damage is. I would definitely blast and inspect at the least to see how many areas need repair before I started embarking on replacement. The amount of rust I see says that there is more lurking.
 

hsach

Contributor
Members Only
Joined
Apr 19, 2013
Messages
433
This is what you will find when you look under that cowl, or worse. Mine didn't show any signs of rust under there, but I suspected it. It is an easy place to repair as long as it doesn't go further than the upper cowl. I decided to slowly peel back the panel until it became clear the entire channel had rust.

I like the other suggestion of Por-15 through there as well. As long as it is just surface rust and not structural. Is there any rust where the pedal assembly ties in?
 

Attachments

  • 20210825_180743.jpg
    20210825_180743.jpg
    128.9 KB · Views: 124
  • 20210829_180750.jpg
    20210829_180750.jpg
    132.2 KB · Views: 113
OP
OP
Jmjuhl

Jmjuhl

Jr. Member
Joined
Aug 6, 2021
Messages
89
Loc.
Cypress, Texas
On another note are you gonna make the LEBC event in November?

Going to try my best...I spend most weekends in November hunting but would like to make it work

Before you jump in with both feet watch a few of Fitzees repair videos.
it will help put te jobs in perspective and not over think stuff.


I had never watched his stuff before...appreciate the suggestion. Killed a few hours today watch a few of his videos.

This is always a dilemma when you are going deep on the budget. A new Kincer frame tells me that you want to do this right. Rust is like termites, what you don't see is where the damage is. I would definitely blast and inspect at the least to see how many areas need repair before I started embarking on replacement. The amount of rust I see says that there is more lurking.

Definitely not an unlimited budget by any means but I am a huge Cost/Benefit guy. If I am going to invest time and money into a frame off then its worth doing right...time spent cleaning/blasting/welding/straightening etc all add up. I know the new frame is square and it has the body lift built in so it gets rid of my bumper gaps. Your termite comment is why I am obsessing over it...worth doing right since I am in there.

Is there any rust where the pedal assembly ties in?

Outside of the two holes poking through on the sides underneath the pedal box and underneath appear solid. Going to likely do the same as you and peel back the cowl pieces along with a few other areas.

Will do some more sanding and discovery work as it will help putting my timeline together and finalizing my budget...with everything out of stock/or backlogged will need to get stuff on order. Not planning on doing body work until after chassis is assembled so I can work it on fresh body mounts but trying to think ahead.
 

jamesroney

Contributor
Bronco Guru
Joined
Sep 11, 2007
Messages
2,596
Loc.
Fremont, CA
I have a question. Are you going to do the work yourself, or do you have a shop that will be charging you by the hour?

If you are paying a shop...STOP now. Sell the tub (as-is) with no more exploration. Then get yourself on the list for a new tub.

If you are doing it yourself...STOP now. Sell the tub (as-is) with no more exploration. Go buy yourself a deluxe knock down kit.

If you are like me...then just ignore my advice. Peel back enough of the bedliner to see how the floors "really are." Then realize that you actually DO need Door pillars, and rockers, and a b-post. And maybe inner rockers. and floors for sure. But maybe the quarters are OK. So just the b-post. and a bed floor. and maybe a wheelhouse.

Take a look at these pictures from this week. If I had half a brain...I would have bought a new tub, and sold this one. I have spent WAY more hours cutting spot welds, and patching. But its starting to look decent.
 

Attachments

  • 6FABAF95-E53C-4E3E-B06B-C32B30A244B9.jpg
    6FABAF95-E53C-4E3E-B06B-C32B30A244B9.jpg
    86.7 KB · Views: 131
  • 49F1C177-B213-4AF4-95A3-E82874EF383C.jpg
    49F1C177-B213-4AF4-95A3-E82874EF383C.jpg
    131.8 KB · Views: 104
Last edited:

helo-mech

Sr. Member
Joined
Jun 22, 2007
Messages
621
Edit just for jamesroney

Want to meet up this weekend sometime and you can compare your tub to mine? This might at least give you some perspective on what the rust on 1 Bronco looks like compared to the rust on another Bronco.
 
Last edited:

TX SS

Sr. Member
Joined
Aug 29, 2013
Messages
796
Loc.
Houston
This looks a little rougher than what I started with. Better in front but worse in rear section. If you have spent on a Kincer chassis and want a really nice bronco I'd look for another tub or full bronco. Whatever you decide make sure you build/fit it to the chassis you are going to use. I've spent a lot of time trying to get gaps and body panel alignment very good and have had to cut and reweld new and old panels both. These things weren't great out of the factory so if you are looking for great be prepared to spend lots of time, lots of money or probably both. Mine is in pieces again so can't really show it off but happy to discuss or help give more feedback in addition to helo-mech.
 
OP
OP
Jmjuhl

Jmjuhl

Jr. Member
Joined
Aug 6, 2021
Messages
89
Loc.
Cypress, Texas
This looks a little rougher than what I started with. Better in front but worse in rear section. If you have spent on a Kincer chassis and want a really nice bronco I'd look for another tub or full bronco. Whatever you decide make sure you build/fit it to the chassis you are going to use. I've spent a lot of time trying to get gaps and body panel alignment very good and have had to cut and reweld new and old panels both. These things weren't great out of the factory so if you are looking for great be prepared to spend lots of time, lots of money or probably both. Mine is in pieces again so can't really show it off but happy to discuss or help give more feedback in addition to helo-mech.

Just read through your build thread and I'm impressed. I need to do some more exploration on my tub but I suspect you are right on new tub. Appreciate the advice.
 
Top