• Welcome to ClassicBroncos! - You are currently viewing the forums as a GUEST. To take advantage of all the site features, please take a moment to register. It's fast, simple and absolutely free. So please join our community today!
    If you have problems registering or can't log into your account, please contact Admin.

Randy’s ‘77 Retirement Project

OP
OP
Speedrdr

Speedrdr

Contributor
Legend in my own mind
Joined
Nov 27, 2017
Messages
2,028
Loc.
Paris, MS
My friend (schooled and certified welder) suggested that I put it in the pile that goes to the metal recycling place, said it could NOT be welded. He’s right, of course, but I’m stubborn, Cheap and have time (retired) to work on things. Did I mention I’m cheap? 😂

Randy
 
OP
OP
Speedrdr

Speedrdr

Contributor
Legend in my own mind
Joined
Nov 27, 2017
Messages
2,028
Loc.
Paris, MS
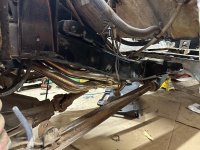
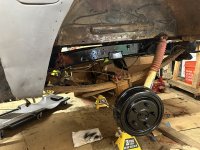
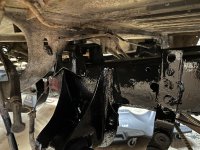
Have the frame almost completely prepped and painted. New body mounts in place after much finesse and fiddling about. Was planning on doing some fab workup to the P/S wheel tub to get that body mount done. EB neighbor came over for some consultation and convinced me to get rid of both front tubs and either fab the tubs myself or buy new ones. I’m ordering new ones tomorrow. At least I’ll have room to get my engine bay painting done.
Had I known this much of the body was going to be removed when I started this, I’d have done a frame off to begin with.

Randy
 

Attachments

  • IMG_3567.jpeg
    IMG_3567.jpeg
    223.6 KB · Views: 171
  • IMG_3566.jpeg
    IMG_3566.jpeg
    260.5 KB · Views: 161
  • IMG_3565.jpeg
    IMG_3565.jpeg
    109 KB · Views: 151
  • IMG_3568.jpeg
    IMG_3568.jpeg
    268 KB · Views: 152
  • IMG_3564.jpeg
    IMG_3564.jpeg
    212.4 KB · Views: 123
  • IMG_3569.jpeg
    IMG_3569.jpeg
    339.8 KB · Views: 175

cldonley

Contributor
Bronco Guru
Joined
Jul 4, 2011
Messages
1,398
Loc.
Robinson, TX
Have the frame almost completely prepped and painted. New body mounts in place after much finesse and fiddling about. Was planning on doing some fab workup to the P/S wheel tub to get that body mount done. EB neighbor came over for some consultation and convinced me to get rid of both front tubs and either fab the tubs myself or buy new ones. I’m ordering new ones tomorrow. At least I’ll have room to get my engine bay painting done.
Had I known this much of the body was going to be removed when I started this, I’d have done a frame off to begin with.

Randy
If I had known how much sheet metal I'd be replacing or repairing, I'd have bought a body kit an welded up a new one. The things we figure out half way through the game! Your rig is gonna be sharp when you're done. Are you going to do a serpentine upgrade on the motor while it's all apart?
 
OP
OP
Speedrdr

Speedrdr

Contributor
Legend in my own mind
Joined
Nov 27, 2017
Messages
2,028
Loc.
Paris, MS
If I had known how much sheet metal I'd be replacing or repairing, I'd have bought a body kit a welded up a new one. The things we figure out half way through the game! Your rig is gonna be sharp when you're done. Are you going to do a serpentine upgrade on the motor while it's all apart?
Not planning on it at this point in time, maybe later on. Every time FedEx or UPS pulls down the driveway, my wife asks a lot of questions. lol 😂 She hasn’t actually said it out , but in her looks and posture she’s thinking “what a black hole our money’s going in.”

Randy
 

cldonley

Contributor
Bronco Guru
Joined
Jul 4, 2011
Messages
1,398
Loc.
Robinson, TX
Not planning on it at this point in time, maybe later on. Every time FedEx or UPS pulls down the driveway, my wife asks a lot of questions. lol 😂 She hasn’t actually said it out , but in her looks and posture she’s thinking “what a black hole our money’s going in.”

Randy
Explain to her how it's an investment! Might be better than your 401k depending on what happens in November.
 
OP
OP
Speedrdr

Speedrdr

Contributor
Legend in my own mind
Joined
Nov 27, 2017
Messages
2,028
Loc.
Paris, MS
Explain to her how it's an investment! Might be better than your 401k depending on what happens in November.
I’m thinking she might POSSIBLY be wearing down. She actually told me to “not waste your time on these raggedy front wheel tubs. It will be cheaper to buy new ones than fool around with trying to make them fit.”
I ordered them the next morning.
As an aside, I hope to be able to be driving the ‘retirement project’ by Christmas.

Randy
 
OP
OP
Speedrdr

Speedrdr

Contributor
Legend in my own mind
Joined
Nov 27, 2017
Messages
2,028
Loc.
Paris, MS
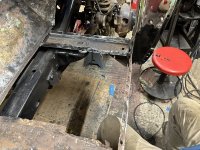
Floor on P/S closer to being wrapped up. A lot of fiddling around trying to get the best fit before going ahead and welding in place. Hope the D/S floor goes quicker. Lol

Randy
 

Attachments

  • IMG_3621.jpeg
    IMG_3621.jpeg
    298.8 KB · Views: 107
  • IMG_3623.jpeg
    IMG_3623.jpeg
    257.1 KB · Views: 127
OP
OP
Speedrdr

Speedrdr

Contributor
Legend in my own mind
Joined
Nov 27, 2017
Messages
2,028
Loc.
Paris, MS
Hallelujah! Pass side is installed. Have some cleanup to do once both pans and a new trans hump are in place. Shot a temp coat of primer so it doesn’t get all rusty by th time I’m ready to paint for serious. Slowly going.

Randy
 

Attachments

  • IMG_3641.jpeg
    IMG_3641.jpeg
    307.8 KB · Views: 94
OP
OP
Speedrdr

Speedrdr

Contributor
Legend in my own mind
Joined
Nov 27, 2017
Messages
2,028
Loc.
Paris, MS
Done with the P/S floor except for some cleanup and building platform for new(ish) seat. Starting on the D/S floor and found more rot and work. I wanted a project, may be a bit more than I expected. Lol

Randy
 

Attachments

  • IMG_3641.jpeg
    IMG_3641.jpeg
    307.8 KB · Views: 113
  • IMG_3643.jpeg
    IMG_3643.jpeg
    277.7 KB · Views: 122
  • IMG_3644.mov
    16 MB
OP
OP
Speedrdr

Speedrdr

Contributor
Legend in my own mind
Joined
Nov 27, 2017
Messages
2,028
Loc.
Paris, MS
Slowly but surely!!! Replacing the fuel hoses has been an ugly process. Not a lot of room between the bed and frame to manipulate hoses.
Making some progress on the fuel system. All the connections are completely made on the rear tank. Now onwards toward the front.
Need to re-hang the doors in preparation to get the rockers on and secured.


IMG_4195.jpeg
IMG_4198.jpeg
IMG_4197.jpeg
IMG_4196.jpeg
IMG_4200.jpeg
 
OP
OP
Speedrdr

Speedrdr

Contributor
Legend in my own mind
Joined
Nov 27, 2017
Messages
2,028
Loc.
Paris, MS
Since the fuel lines and brake lines have been such a pain, decided to work on building a mount for the P/S seat. As I’m turning Retirement Project into a 1/2 cab I won’t need the seat to fold forward.
IMG_4285.jpeg


I’m thinking having the P/S seat mounted on a solid box at the same level as the D/S seat should be stronger and safer (?)

IMG_4332.jpeg


Not gonna be a whole heap of storage, but will be a very secure lockbox when done.

IMG_4328.jpeg
 
OP
OP
Speedrdr

Speedrdr

Contributor
Legend in my own mind
Joined
Nov 27, 2017
Messages
2,028
Loc.
Paris, MS
Have the seat brackets made, attached and painted. It’s a good thing I’m mostly retired and have extra time (and limited $$) because I figure there’s about $2K in labor as many times as I built and rebuilt the mounting system.
IMG_4994.jpeg


I built in some thigh support in the D/S seat to help keep road fatigue at a minimum. And, no, there’s none for the P/S seat…they’re on their own! 😂

IMG_4998.jpeg


Thought I was at a point where I could mount the seats after painting the floor…but nope, not yet. Reckon I ought to stop viewing the floor when wearing my glasses as the floor keeps revealing repair needs. DRAT IT! Will have to take pics as I patch the floor tomorrow and get it ready for base coat of paint.
 
OP
OP
Speedrdr

Speedrdr

Contributor
Legend in my own mind
Joined
Nov 27, 2017
Messages
2,028
Loc.
Paris, MS
Decided to take time to throw the seats in temporarily to get a better idea of how they fit.

IMG_5005.jpeg


Driver’s seat is kinda tight under the steering wheel.


IMG_5006.jpeg


Probably gonna take it out and have a do-over. <sigh>. Think I’ll have a sign made that says: “2nd Time Shop. I do it better because I do it TWICE.”


IMG_5003.jpeg


And yet another patch in the floor. But looking on the bright side, at least I’m getting a signifiant amount of practice welding sheet metal. Almost considering ripping out the floor and welding in the new one that’s leaning against the wall and mocking me.
 

bigmuddy

Contributor
Bronco Guru
Joined
Dec 28, 2004
Messages
8,068
Loc.
Marthasville Missouri
I don't know how tall you are but with all the patchwork, I would have considered just lowering the whole floor and give you way more head room and better view through the windsheild.
 

DirtDonk

Contributor
Bronco Guru
Joined
Nov 3, 2003
Messages
51,619
Exactly. Not sure if you're going to be running a second tank, or if you're really hankering for some more fabrication, but lowering the driver's floor gives you a slew more options for seatage.
Almost all aftermarket and OE seats (what are yours out of again?) are too tall for even stock Bronco seat brackets. Puts your eyeballs at wiper motor level. Not good for normal around-town driving. Yes, you "get used to it" sort of. But it's never right.
And it looks like you raised your driver's seat even further with the brackets. Did you previously show the details? I'll go back and look, but figured I'd ask while typing.
You did mention how tight it was to the steering wheel, and that's what draws most to paying for a tilt-column in the first place. But raising the seat higher still, just makes it that much more of a need.

Have you sat in the driver's seat yet? Pay close attention to where your eyeballs line up. Don't worry about comfort and angle just yet. Find out if it's even remotely usable at the current setting.

Good luck!

Paul

 
OP
OP
Speedrdr

Speedrdr

Contributor
Legend in my own mind
Joined
Nov 27, 2017
Messages
2,028
Loc.
Paris, MS
I don't know how tall you are but with all the patchwork, I would have considered just lowering the whole floor and give you way more head room and better view through the windsheild.
I did consider that option. But have an aux tank that I wanted to keep.
 
OP
OP
Speedrdr

Speedrdr

Contributor
Legend in my own mind
Joined
Nov 27, 2017
Messages
2,028
Loc.
Paris, MS
Exactly. Not sure if you're going to be running a second tank, or if you're really hankering for some more fabrication, but lowering the driver's floor gives you a slew more options for seatage.

Yep, got a replacement front tank from y’all (WH) and didn’t want to give it up. Costs more than I want to spend right now.

Almost all aftermarket and OE seats (what are yours out of again?) are too tall for even stock Bronco seat brackets. Puts your eyeballs at wiper motor level. Not good for normal around-town driving. Yes, you "get used to it" sort of. But it's never right.

The seats are out of an ‘02 Mitsubishi Montero. I measured a crap load of seats in a pull-a-part before I settled on these seats.

And it looks like you raised your driver's seat even further with the brackets. Did you previously show the details? I'll go back and look, but figured I'd ask while typing.
You did mention how tight it was to the steering wheel, and that's what draws most to paying for a tilt-column in the first place. But raising the seat higher still, just makes it that much more of a need.

Have you sat in the driver's seat yet? Pay close attention to where your eyeballs line up. Don't worry about comfort and angle just yet. Find out if it's even remotely usable at the current setting.

Good luck!

Paul
I’m 5’10”, so not too terribly tall. I crawled up into the and was not unhappy with where I was looking through the (very filthy) windshield. My line of sight was about 4”down from the windshield frame.
Yeah, I had a brain fart making the D/S brackets. Gonna redo them.
 
Top