• Welcome to ClassicBroncos! - You are currently viewing the forums as a GUEST. To take advantage of all the site features, please take a moment to register. It's fast, simple and absolutely free. So please join our community today!
    If you have problems registering or can't log into your account, please contact Admin.

Radiator leaking from the fins

Gray035

Jr. Member
Joined
Apr 16, 2012
Messages
187
Loc.
Encinitas, CA
Anybody ever seen anything like this before? It looks like coolant is seeping out from where the fins meet the tank. The green stuff is sticky and thick. Not like any coolant leak I've ever seen. This radiator was in the bronco when I got it a year and a half ago. Doesn't look that old.
ga8a9aqe.jpg
 

AZ73

Contributor
Bronco Guru
Joined
Mar 28, 2012
Messages
3,610
I would look at the front of the radiator. It looks like that's being pulled through
 

Sun_and_Steel77

New Member
Joined
Jul 18, 2012
Messages
120
Loc.
Northern BC, Canada
My 3 month-old Champion radiator is doing the same thing from the exact same place you have pictured., it's leaking from where the tubes go into the tank. I rarely ever see a drop of coolant hit the garage floor though...it's a very slow leak/seep and I wonder if I should be expecting a catastrophic failure or not. I need to call Ledfoot racing and get it sorted out. Never seen temps above 200, proper mounts no abuse etc.
A quick search on google told me I'm not the only one with this problem.
Hard to be angry though...this Champion 3-core is amazing at cooling the truck, and for 200$ seems like a steal. We'll see how Ledfoot honors the warranty.
 
OP
OP
Gray035

Gray035

Jr. Member
Joined
Apr 16, 2012
Messages
187
Loc.
Encinitas, CA
There's no sign of a leak on the front. I'm just worried that I'm gonna be out somewhere and have a massive blowout or something. If it seeps for awhile until I find another radiator I don't mind. Anyone have suggestions for a cost effective replacement? The bronco has been an endless pit lately.
 

broncnaz

Bronco Guru
Joined
May 22, 2003
Messages
24,341
Cost effective may be the old standard copper/brass radiator. Of course they can do the same thing but are way easier to fix. If you can find anyone that fixes radiators anymore. With all the aluminum ones around which are considered throwaway and replace radiator shops are few and far between
 

DirtDonk

Contributor
Bronco Guru
Joined
Nov 3, 2003
Messages
49,360
What's the general condition of the electrical system on your rig Gray?
Reason I ask is that aluminum is generally more susceptible to damage from electrolysis and most EB's don't have enough grounds to reduce the possibility.
And it might be just about that age to have been effected by it.
With fewer ground paths for the general flow of electricity to follow on a typical EB, especially if the wiring has been futzed with, the coolant acts as a pathway for the current. When this happens, the metals deteriorate.
Cast iron can handle it for a long time.
Copper/brass a little less.
Aluminum much less.

Have you replaced the coolant since you bought the truck a year and a half ago? They're also more susceptible to the deterioration of anti-freeze than the copper/brass radiators are. So anyone with an aluminum radiator should more religiously follow the manufacturers recommendations. Like changing the coolant every other year or whatever it is these days.
I'd be a lot of Broncos don't get that much love. With the old radiators that was not as big a deal. With new ones, more of a big deal.

Not saying aluminum is bad. Just saying we have to do a few more things to keep them happy.
Such as:

1. Do you have a sacrificial anode in either the radiator cap ("Rad-Cap") or the drain plug?
2. Is the coolant less than 2 years old?
3. Are the mounts in good shape, so as not to add additional stresses to the seams, or to connect the radiator to the body electrically?

None of these things may be at issue here, of course. You might just have a good old standard leak. It happens even to aluminum radiators.
Personally, with no warranty or cheap fix available, and with such a small leak, I would flush it out, put new coolant in it, and add one of the new generation of fix-a-leak chemicals to the mix.
I use Solv-Tec sealant, which is considered (at least by the manufacturer) to be potentially a permanent fix. I've used it in several cases and can't argue the results. Or refute the "permanent" claim either, since so far every one of them is still running leak free at this point.
Including a fairly highly strung Audi Quattro A5 with a leaky head gasket (leaking into the number 4 cylinder) that runs better than it has in a long time and no longer sets off a check-engine light.

At this point, it's one of those, what do you have to lose scenarios.
But I understand the added concern if you're planning to use this Bronco out in the boonies. Seems better to fix the leak the old fashioned way at that point. But if that's not an option, or if it's not an available option immediately, the chemical fix might be a good temporary measure.

Or, as I like to say... "Temporary unless it works!" ;)

Paul
 
Last edited:
OP
OP
Gray035

Gray035

Jr. Member
Joined
Apr 16, 2012
Messages
187
Loc.
Encinitas, CA
Coolant was flushed and replaced right when I got it and them again a couple months ago when I had the radiator out working on other stuff. The wiring is stock but everything works. Ill have to look and see whether there is a good ground strap to the motor. The mounts are in poor condition. For awhile the upper mounts were running metal to metal until I stuck some hose in between as a temporary fix. If I get a new radiator I may build some new mounts. I guess it's time to start looking at radiators.
 

DirtDonk

Contributor
Bronco Guru
Joined
Nov 3, 2003
Messages
49,360
Just as important as the main ground to the engine are the main and peripheral body grounds.
If your starter cranks hard and fast, then your engine grounding is decent. That's what takes the most current, so a poor ground would really show in a slow or finicky starter.

But tying everything together between the engine and body, and all the body panels together, will go a long way towards keeping the cooling system healthy.
Tying (or "bonding" as they call it) the varied bits together is a key. So, with that in mind:

1. Make sure that your battery negative has a good stout sized (at least 10ga, but bigger here can be better) lead directly to the body.
2. Run a jumper between the core-support and the rest of the body. At the very least that will keep the headlights and turn signals happy, but can't hurt for the rest of the theory as well.
3. Run a ground strap/cable/wire between the engine and the body. Usually you'll see this as a braided strap between the intake manifold and the firewall, but it can be just about any place. Some of us make an additional battery-cable sized ground between the engine block and the frame. This is considered just so much extra fluff by the experts, but hey, as far as I'm concerned it falls perfectly into that "overkill is just enough" category.
4. Make sure that the alternator has good clean and unpainted mounting points. And if in doubt, add an additional ground wire/strap between the alternator body and the engine. I usually use the intake manifold for this as well. Sometimes even the same bolt that holds the ground to the firewall.

Yes, a lot of that is just excess. But I say it's cheap excess, so why not.
And it really doesn't take that long either. Again, so why not?

In your case, since you say your electrical stuff works well, you're probably not in the same boat as many EB owners are, with their finicky components and strange gremlins driving them nuts.
But it can still happen to an old rig like ours if you don't keep up on that grounding stuff.

Good luck with the new rad. Be nice to not have to deal with any leaks again.

Paul
 

hc37180

Jr. Member
Joined
Apr 21, 2012
Messages
229
Loc.
Seattle, WA
Hey Paul,
Hijacking a bit here but if you had some quick shots of how you set up these additional grounding points that would be awesome!
thx
Dave

Just as important as the main ground to the engine are the main and peripheral body grounds.
If your starter cranks hard and fast, then your engine grounding is decent. That's what takes the most current, so a poor ground would really show in a slow or finicky starter.

But tying everything together between the engine and body, and all the body panels together, will go a long way towards keeping the cooling system healthy.
Tying (or "bonding" as they call it) the varied bits together is a key. So, with that in mind:

1. Make sure that your battery negative has a good stout sized (at least 10ga, but bigger here can be better) lead directly to the body.
2. Run a jumper between the core-support and the rest of the body. At the very least that will keep the headlights and turn signals happy, but can't hurt for the rest of the theory as well.
3. Run a ground strap/cable/wire between the engine and the body. Usually you'll see this as a braided strap between the intake manifold and the firewall, but it can be just about any place. Some of us make an additional battery-cable sized ground between the engine block and the frame. This is considered just so much extra fluff by the experts, but hey, as far as I'm concerned it falls perfectly into that "overkill is just enough" category.
4. Make sure that the alternator has good clean and unpainted mounting points. And if in doubt, add an additional ground wire/strap between the alternator body and the engine. I usually use the intake manifold for this as well. Sometimes even the same bolt that holds the ground to the firewall.


Good luck with the new rad. Be nice to not have to deal with any leaks again.

Paul
 

DirtDonk

Contributor
Bronco Guru
Joined
Nov 3, 2003
Messages
49,360
I should have some by now, one would think. But I'm pretty sure I don't.
I'll dig around some, but if I don't find any I'll take some of a project I'm working on.
But those won't be available for awhile. One of them is heading to the Rubicon and the other is out of town too.

Get what I can though. In the meantime, maybe someone else has some close ups of good ground additions they've made?

Paul
 

DirtDonk

Contributor
Bronco Guru
Joined
Nov 3, 2003
Messages
49,360
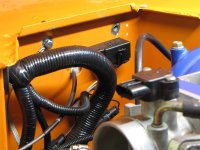
Here's one where you can just see what we did in one area.
Behind the engine on the upper firewall we drilled a hole, ground off the paint, put a bolt through from the inside (to act as a "stud") instead of just welding one to the body, and attached ground(s) there. After the fact, we'll just paint over it to reduce future corrosion. But for now, until we've finalized what's going there, it'll stay bare.

IMG_1014 (Medium).JPG

You can just see the braided strap that runs from there, down to a bolt on the intake manifold.
Where it attaches to the intake, I ran an additional wire (instead of braided strapping this time) to one of the alternator attaching bolts. The Explorer alternator attaching bolts typically have at least one with a top-stud perfect for this. The alts on these engines usually have a great contact patch with the engine. But I like overkill, as I've said.
And the RJM harness has a dedicated ground that we attached to the manifold as well.

You should try to avoid putting anything under one of the manifold attaching bolts if at all possible though. If you don't have one of the fancy double-stud attaching bolts, just attach it somewhere else convenient. I try not to put anything under an intake bolt that might either skew the torque reading, or worse yet, necessitate it's removal of the bolt for any reason. I hate leaks.
Most of the modern Fords, including this semi-Explorer setup, will have manifold bolts with upper studs for attaching things like the heater tubes and wiring harness clips. This is a great place to attach a ground strap, since you don't have to put it under the bolt itself, and can remove it at any time without messing with the intake seal.
Since the owner had used a fancy schmancy bolt kit with no studs, we went to Plan-B

In this setup, in lieu of a handy stud like that, I think we used one of the small bolts that holds the fuel-rail to the lower intake.

You can purchase pre-made straps like in the pic in typical lengths of about 9" to about 18" or so. They're on the HELP racks usually.
We had a roll of it handy, so just made our own to fit.

Paul
 
Top