• Welcome to ClassicBroncos! - You are currently viewing the forums as a GUEST. To take advantage of all the site features, please take a moment to register. It's fast, simple and absolutely free. So please join our community today!
    If you have problems registering or can't log into your account, please contact Admin.

Frame dimension dilemma

joshua

Contributor
Sr. Member
Joined
Jun 5, 2007
Messages
1,281
I have a home built bumper I bought off another member. He’s a pretty talented fabricator and has been fooling with ebs for a long time.
He used to build bumpers and sell them on this site.

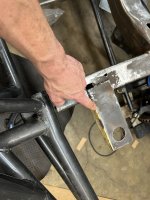
I’m having trouble fitting the front bumper that came off his truck. Now my truck was definitely in some sort of fight involving the front end. The passenger bottom rail has a big dent in it. And the top of the drivers had what looked like a perfect ballpeen hammer dent in the top.

I was able to get the drivers dent out but not the passengers was along the corner of the tube and could only do so much.

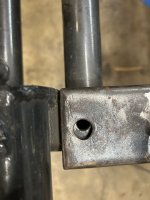
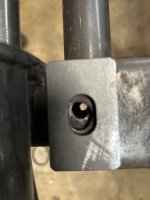
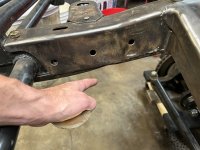
But when installing the bumper the frame rails are to wide to except the bumper. I had to grind down the walls of the quarter inch tube on the bumper to make it fit. Wasn’t much and was just on the bottom of the inside edge of the drivers.

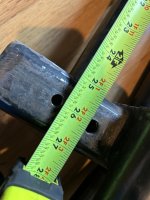
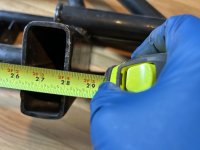
Problem is the holes are off. From what i could find is that stock the bumper holes are 27in apart. Mine 26 3/8s The bumper is 26 1/16

Is the bumper wrong, the frame, or the 27in stock size? I was going to try and move my frame rail in. Now idk. My frame rails are a quarter inch off in elevation though. That I would like to address.

Problem is the driver core support was caved in at one point. So both rails have been hit and idk which one to bend up or down 😬

These are not the bumpers I want in the end. But the price was right and what I had was absolutely garbage. I’m going to weld on bc broncos frame steering stiffener plate and paint the frame. After that it will be hard to move that rail I’m thinking.

I’m also welding on bumper reinforcement tabs. The are slotted so using this bumper should be okay
Just don’t want to be married to these in the end.

I know that’s a lot of questions in one post. But if you have any ideas pls lmk.
 

Attachments

  • IMG_5046.jpeg
    IMG_5046.jpeg
    148.7 KB · Views: 29
  • IMG_5042.jpeg
    IMG_5042.jpeg
    147.3 KB · Views: 29
  • IMG_5041.jpeg
    IMG_5041.jpeg
    103.4 KB · Views: 26
  • IMG_5047.jpeg
    IMG_5047.jpeg
    178.1 KB · Views: 26
  • IMG_5048.jpeg
    IMG_5048.jpeg
    118.4 KB · Views: 33
OP
OP
joshua

joshua

Contributor
Sr. Member
Joined
Jun 5, 2007
Messages
1,281
massage to fit then it is!
Ya I can definitely make this work. I’m just worried that my rails will not except any other bumper. And I’m wondering if there’s any way to make sure the rails are at the correct elevation.

This is my first attempt at getting a frame back to near square. So do I just guess on one rail and push it up or pull one down

I don’t care about perfection. But if you can tell the bumper is way crooked at quick glance, I can’t get down with that.

I’ll probably just guess. I was thinking there might be a concrete way to measure them.
 

FordBronc

Contributor
Bronco's, yea I have a couple.
Joined
Dec 26, 2010
Messages
1,472
Loc.
Polk County, Missouri
To get it "right" or as correct as it can be, the frame needs to go a actual frame machine. Then a pro-fessionial (said owner of the machine), with the proper tools and experience can to push, pull, press it to get it to be 100%. Come here for some nice informative diagrams.
https://www.supermotors.net/registry/21979/75575-4
b body 5.jpg
b body 6.png
b body 7.jpg
b body 8.jpg
b body 9.png
 
Last edited:

Steve83

Bronco Guru
Joined
Jul 16, 2003
Messages
9,112
Loc.
Memphis, TN, USA, Earth, Milky Way
To get it "right"...
Instead of ripping the images off & re-uploading them here, they'd be a LOT more-useful to the OP if you simply link the pages that contain them, which have a LOT more info than just what the image shows.
From what i could find is that stock the bumper holes are 27in apart...
BEFORE you grind or weld any more, take some time to browse this photo album, and study the relevant diagrams. The caption of the frame diagram explains how to get measurements between any 2 points down to ~1/16".

(click this text)


For some ideas on how to straighten the frame horns, study this page & the NEXT dozen:

(click this text)
 

FordBronc

Contributor
Bronco's, yea I have a couple.
Joined
Dec 26, 2010
Messages
1,472
Loc.
Polk County, Missouri
Sorry Steve83 I did not mean to "rip them off", I had them saved and thought they might be helpful to the OP. So I fixed it for ya. Thanks for the link, and for putting that info on there. I will save that to my favorites, and just post that next time.
 
Last edited:
OP
OP
joshua

joshua

Contributor
Sr. Member
Joined
Jun 5, 2007
Messages
1,281
I didn't mean ripping off like stealing - I meant like ripping a pic off a page out of a book; without context, the pic has far less meaning & use.
Ya, my biggest issue is trying to decide which one needs to go up or down, or both. I don’t have a good point to start from.

Close may have to do, this is a Minnesota truck and would never be perfect without completely starting over. I probably should have just sold it it for the title and frame and bought something different.

But I’ve had it since I was kid, drove it in high school in 98
Been off the road and collecting parts since 05

So I’m gonna save it even if it is a beater bronco.
 

Attachments

  • IMG_5054.jpeg
    IMG_5054.jpeg
    186.1 KB · Views: 38
  • IMG_5055.jpeg
    IMG_5055.jpeg
    194.3 KB · Views: 39
  • IMG_5056.jpeg
    IMG_5056.jpeg
    141.7 KB · Views: 38

Steve83

Bronco Guru
Joined
Jul 16, 2003
Messages
9,112
Loc.
Memphis, TN, USA, Earth, Milky Way
Ya, my biggest issue is trying to decide which one needs to go up or down, or both. I don’t have a good point to start from.
Did you read how I measured that one? Laser levels are getting cheaper all the time, and the only other "equipment" I used was a cheap pair of jack stands under the rear spring perches, & a bottle jack under the center of the front Xmbr. 3 points of contact means no torque twisting the frame - it totally relaxes. Mount the laser to something solid near a corner of the frame so it hits the whole thing without adjusting the laser. Shim up the higher of the leaf brackets so the laser hits the top of the frame at it; then shim the other up so it matches. Last, adjust the bottle jack so the middle body mounts meet the laser, and if you don't bump anything, you can start taking measurements when it gets dark.

 
OP
OP
joshua

joshua

Contributor
Sr. Member
Joined
Jun 5, 2007
Messages
1,281
Did you read how I measured that one? Laser levels are getting cheaper all the time, and the only other "equipment" I used was a cheap pair of jack stands under the rear spring perches, & a bottle jack under the center of the front Xmbr. 3 points of contact means no torque twisting the frame - it totally relaxes. Mount the laser to something solid near a corner of the frame so it hits the whole thing without adjusting the laser. Shim up the higher of the leaf brackets so the laser hits the top of the frame at it; then shim the other up so it matches. Last, adjust the bottle jack so the middle body mounts meet the laser, and if you don't bump anything, you can start taking measurements when it gets dark.

[/URL]
If I could figure out what the distance to this dotted line to the frame rail or should be I might have an a place to measure from to get the front rails where they should be.
 

Attachments

  • IMG_5059.jpeg
    IMG_5059.jpeg
    89.6 KB · Views: 30

Thumper63

Contributor
Jr. Member
Joined
Mar 7, 2019
Messages
122
Loc.
Aptos Ca
To get it "right" or as correct as it can be, the frame needs to go a actual frame machine. Then a pro-fessionial (said owner of the machine), with the proper tools and experience can to push, pull, press it to get it to be 100%. Come here for some nice informative diagrams.
https://www.supermotors.net/registry/21979/75575-4
View attachment 930201 View attachment 930202 View attachment 930203 View attachment 930204 View attachment 930205
FordBronc, Question I have is, can a skilled frame machine operator do this on my
Frame as it sits with my Bronco?
Or does it need to be just the bare frame off the truck? Forgive me as I have no experience with tweaking a frame. I’m pretty sure my frame is bit out of spec and it drives me nuts. I did take it to a body shop with a frame machine and he was a bit hesitant about tackling it. Appreciate your feedback.
Tom
 

Steve83

Bronco Guru
Joined
Jul 16, 2003
Messages
9,112
Loc.
Memphis, TN, USA, Earth, Milky Way
If I could figure out what the distance to this dotted line to the frame rail or should be I might have an a place to measure from to get the front rails where they should be.
Did you read the caption? Use a computer with a mouse to open the fullsize image, and use MSPaint (not 3D) to draw a select box between any 2 points you want to measure. If the points are in a horizontal or vertical line, you just divide the number of pixels by 16 to get inches. If they're not aligned, use Pythagoras.
 
OP
OP
joshua

joshua

Contributor
Sr. Member
Joined
Jun 5, 2007
Messages
1,281
Not only did I read it. I showed it to mechanical engineer. He had the same issue as I did. But thanks to the clarification.
 

73azbronco

Contributor
Bronco Guru
Joined
Nov 11, 2007
Messages
8,116
Like Pythagoras, what did he know about broncos...

I'm going to say if your just trying to get a bumper to fit, make the bumper fit the truck, not the other way around. Maybe the other guys frame was wrong?

Frame on body machine, way over the top unless you are trying for Barrett Jackson straight. Get the 90%, you will be happy and save time.
 
Last edited:
Top