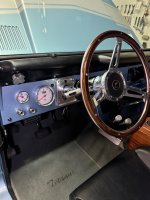
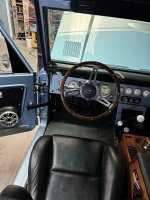
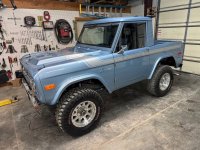
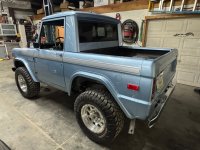
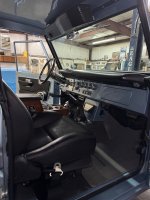
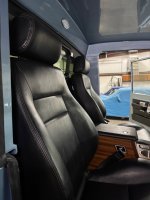
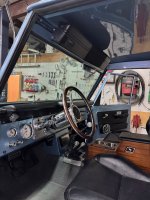
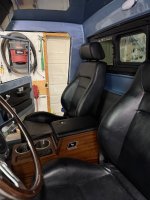
It's a real beauty. That second pic especially is calendar-worthy IMHO!I made another small change today. I have always liked a wood steering wheel. and I really like the one in my bronco. It is from wild horses, and I like the way it looked and felt. The only problem was it didn't match anything else in the bronco. I also never really liked my center console. it is a popular design and I see them in a lot of broncos, but I never really cared for the way it looked and I never really liked the cup holders. they sat too low and sometimes my bottles would fall out of them on sharp corners. anyway I found this new console on facebook. it is a custom mahogany console that matches my steering wheel. it also has a black top that matches my seats and dash pad, and the aluminum badges and trim tie into the rest of my bronco, so I think it looks good in there. since it was so nice today I took the bronco to play pickle ball and took some nice sunset pictures on the way home.
View attachment 931136 View attachment 931137 View attachment 931138 View attachment 931139 View attachment 931140 View attachment 931141 View attachment 931142 View attachment 931143 View attachment 931144 View attachment 931145 View attachment 931146


Community
Buy / Sell


Bronco Tech
3 Arm Wiper Setup
Fix Motor Mount
Roll Cage Braces
Throttle Body 65mm
Wheel Alignment
Heat Riser Replacement
Vent Window Repair
Center Console Mount
Straighten Bumper
Ford 6R80 6 spd
More Tech...
Fix Motor Mount
Roll Cage Braces
Throttle Body 65mm
Wheel Alignment
Heat Riser Replacement
Vent Window Repair
Center Console Mount
Straighten Bumper
Ford 6R80 6 spd
More Tech...

-
Welcome to ClassicBroncos! - You are currently viewing the forums as a GUEST. To take advantage of all the site features, please take a moment to register. It's fast, simple and absolutely free. So please join our community today!If you have problems registering or can't log into your account, please contact Admin.
You are using an out of date browser. It may not display this or other websites correctly.
You should upgrade or use an alternative browser.
You should upgrade or use an alternative browser.
project tetanus build thread.
- Thread starter mustanggarage
- Start date
Thats a great looking console. Who makes them?
OP
OP
- Joined
- Aug 14, 2018
- Messages
- 605
Jason Joliceour from vintage auto gear. https://grandwagoneering.com/collections/vintage-auto-gear-accessories
Thank you. Those are sweet.
OP
OP
- Joined
- Aug 14, 2018
- Messages
- 605
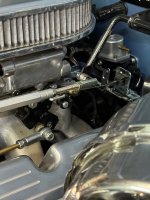
I drove the Bronco over to Des Moines a couple weeks ago for a cruise in with some members of the Iowa Bronco club on facebook. pretty much all Gen 6 owners so I wanted to take the 71 because some of them have never seen a first gen bronco up close. anyway I found out after that cruise that I have gotten spoiled lol. I have gotten used to my cruise control and I really missed it in the old truck. so I started thinking about it and decided that I could always try to add cruise. of course since my truck has all kinds of modifications I had to figure out a way to make it work. some of the things i had to work around are, I have an aftermarket Ididit steering column polished aluminum. I have a dual quad sniper system, I have a push button keyless ignition system, and I have a gps speedometer. so I started looking into options. dakota digital has an add on electronic cruise control. it has a few options for how to make it work. I found out they have a seperate module called a BIM module that allows you to set up a stand alone gps cruise system. they also have a polished aluminum handle for the controller. so I bought the system and started installing it. I have it in and it seems to be working so far. I will have to do some more testing but so far so good.
this is the cruise control system I used. https://www.dakotadigital.com/index...uct_id=48/category_id=477/mode=prod/prd48.htm
this is the expansion module that allows me to have a complete stand alone gps signal that does not tie into my speedometer at all. https://www.dakotadigital.com/index...t_id=837/category_id=646/mode=prod/prd837.htm
I could send the signal from the bim module to my speedometer, but I don't really see the need at this point. the bim module has a digital readout that shows the speed, but as long as it is able to hold a steady speed where I set it, it really doesn't matter if the two agree exactly.
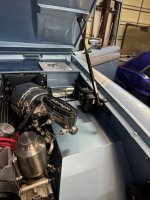
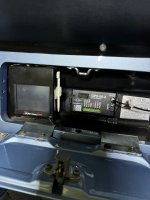
I wanted to mount the cruise module under the dash where the old fresh air vent used to go, but dakota digital doesn't recommend mounting them inside the cabin, so I mounted it on the fender. I didn't like any of the options for attaching the cable to the throttle linkage I had so I bought an aftermarket bracket from speedway and that seems to work so far. I mounted the bim module in the glove compartment, and I didn't want to mount the antenna where it could be seen and they said you can mount it under fiberglass so I mounted it in the fresh air duct on the passenger side. since the vent really doesn't do anything anymore it is hidden and seems to work fine so far.
this is the cruise control system I used. https://www.dakotadigital.com/index...uct_id=48/category_id=477/mode=prod/prd48.htm
this is the expansion module that allows me to have a complete stand alone gps signal that does not tie into my speedometer at all. https://www.dakotadigital.com/index...t_id=837/category_id=646/mode=prod/prd837.htm
I could send the signal from the bim module to my speedometer, but I don't really see the need at this point. the bim module has a digital readout that shows the speed, but as long as it is able to hold a steady speed where I set it, it really doesn't matter if the two agree exactly.
I wanted to mount the cruise module under the dash where the old fresh air vent used to go, but dakota digital doesn't recommend mounting them inside the cabin, so I mounted it on the fender. I didn't like any of the options for attaching the cable to the throttle linkage I had so I bought an aftermarket bracket from speedway and that seems to work so far. I mounted the bim module in the glove compartment, and I didn't want to mount the antenna where it could be seen and they said you can mount it under fiberglass so I mounted it in the fresh air duct on the passenger side. since the vent really doesn't do anything anymore it is hidden and seems to work fine so far.
Attachments

Nice addition. Something for me to look into on my build, down the road. Thanks for the post.
OP
OP
- Joined
- Aug 14, 2018
- Messages
- 605
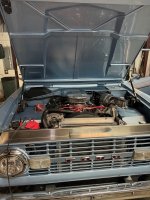
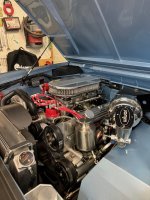
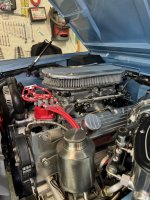
I had to replace the ac compressor due to a dumb mistake I made, so I decided to do some other minor things to "neaten up" the engine compartment. I ran the ac line out through the drivers side fender so it does not loop near the steering column or header, i replaced the power steering pump pulley with a black billet piece that is not painted, i replaced the upper radiator hose with a silicon version, and put new hose clamps on it, i replaced the alternator with a chrome version, and I re plumbed the fuel lines so they look nicer to me. nothing major, but I think the overall effect is positive.
.jpg")


.jpg")


Last edited:
Love the look of your half cab! That’s what I want mine to be when it grows up.I had to replace the ac compressor due to a dumb mistake I made, so I decided to do some other minor things to "neaten up" the engine compartment. I ran the ac line out through the drivers side fender so it does not loop near the steering column or header, i replaced the power steering pump pulley with a black billet piece that is not painted, i replaced the upper radiator hose with a silicon version, and put new hose clamps on it, i replaced the alternator with a chrome version, and I re plumbed the fuel lines so they look nicer to me. nothing major, but I think the overall effect is positive.
View attachment 938334 View attachment 938336 View attachment 938337 View attachment 938338 View attachment 938339 View attachment 938340
Randy
OP
OP
- Joined
- Aug 14, 2018
- Messages
- 605
thanks. it is in the works. I am waiting for my paint guy to get an opening. ultimately I plan to have it painted Brittany blue to match the rest of the truck. I have considered painting it silver to match the stripes, because I kind of like the way it sits now in just the gel coat.Love the look of your half cab! That’s what I want mine to be when it grows up.
Randy
That engine compartment is so clean. That’s a great looking rig
Always great to see pictures of your rig. One of my favorites and very inspirational.
OP
OP
- Joined
- Aug 14, 2018
- Messages
- 605
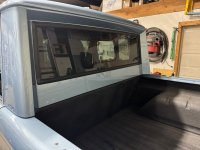
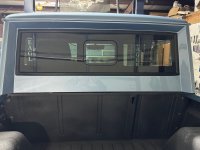
I got the bronco back from paint purgatory yesterday. Dan does really good work. it looks amazing. I had already fabricated a spacer for the windshield wiper motor so I got that bolted in, but i had to do some modification of the cover to get it to fit. it required some trimming and spacing of the mounting brackets to get it to fit, but everything is in place. I put the seats back in and mounted the new seat belts. the center console fits fine with the bulkhead. now all I need to do is finish wiring the dome light, and mount the roll bar and I will be back in business. I said from the beginning that crazy horse was my inspiration. so getting the half cab installed is the full realization of that vision. I am super happy with it.
Attachments

OP
OP
- Joined
- Aug 14, 2018
- Messages
- 605
here are some interior pics, but they are a bit dark I haven't driven it except off the trailer and it has been raining like mad here. they broke one of my windshield wiper arms at the body shop, I ordered a new one and it should be here tomorrow so I might be driving tomorrow if I can get a bit of help installing the roll bar. I think I am going to need to do a bit more trimming on that wiper motor cover it needs to be adjusted a bit, but I am tired tonight so, project for another day.
Attachments
Looks fantastic. Nice job!I got the bronco back from paint purgatory yesterday. Dan does really good work. it looks amazing. I had already fabricated a spacer for the windshield wiper motor so I got that bolted in, but i had to do some modification of the cover to get it to fit. it required some trimming and spacing of the mounting brackets to get it to fit, but everything is in place. I put the seats back in and mounted the new seat belts. the center console fits fine with the bulkhead. now all I need to do is finish wiring the dome light, and mount the roll bar and I will be back in business. I said from the beginning that crazy horse was my inspiration. so getting the half cab installed is the full realization of that vision. I am super happy with it.
OP
OP
- Joined
- Aug 14, 2018
- Messages
- 605
the roll bar is in, man that was a pain in the backside. It took some minor modification, like everything I do lol. but it is in, and it fits and looks good. I finished up everything except running the wiring for the dome light. I have it run from the light to the disconnect by the bulkhead, and the wire is run under the bronco I just need to crawl under there and route it under the dash and wire it into the courtesy light circuit. I am not going to wire it to the doors, just to the light switch like I have the under dash lights. it won't take long, but I am procrastinating on it. I decided to take it for a drive to get pizza tonight. its the first time I have been able to drive except on and off the trailer for 6 months. it looks good. and is now the full realization of my vision for a crazy horse tribute.


OP
OP
- Joined
- Aug 14, 2018
- Messages
- 605
I took care of a couple very minor details today. I am happy to say I am gradually running out of little things that annoy me about this rig.
First and most difficult I re routed the exhaust. I originally ran the exhaust before I set the body on the frame. then I thought I was satisfied with it so I spot welded the unions to keep them from shifting. well as time went on I became more and more unhappy with how low the pipes came out in the back. I would still like to see them tucked up a little higher, but that would require custom bending of the tubes. I am satisfied with them at this point. I also used band clamps to hold them together which I like a lot better than the standard exhaust clamps I used before. I also flipped the license plate on the front, so that it fits the way it was supposed to. It never even occurred to me that I had the plate mounted wrong till someone mentioned it the other day, lol. I added some wild horses license plate frames. and then I re routed my antenna for the GPS speedometer. I mounted it on top of my wiper cover. since this is a fiberglass top it is no obstruction to the antenna, and now it is basically invisible. I also mounted my fire extinguisher in the bed. Thor My new Shop supervisor approved the modifications and is now going to take a nap in front of the big fan. I am now ready to start driving it and making sure everything is road worthy so I can be ready for super celebration in Wisconsin. I also reserved a spot for the throwback event in Townsend in September. hopefully I can talk the wife into going, if not I may just go by myself.


First and most difficult I re routed the exhaust. I originally ran the exhaust before I set the body on the frame. then I thought I was satisfied with it so I spot welded the unions to keep them from shifting. well as time went on I became more and more unhappy with how low the pipes came out in the back. I would still like to see them tucked up a little higher, but that would require custom bending of the tubes. I am satisfied with them at this point. I also used band clamps to hold them together which I like a lot better than the standard exhaust clamps I used before. I also flipped the license plate on the front, so that it fits the way it was supposed to. It never even occurred to me that I had the plate mounted wrong till someone mentioned it the other day, lol. I added some wild horses license plate frames. and then I re routed my antenna for the GPS speedometer. I mounted it on top of my wiper cover. since this is a fiberglass top it is no obstruction to the antenna, and now it is basically invisible. I also mounted my fire extinguisher in the bed. Thor My new Shop supervisor approved the modifications and is now going to take a nap in front of the big fan. I am now ready to start driving it and making sure everything is road worthy so I can be ready for super celebration in Wisconsin. I also reserved a spot for the throwback event in Townsend in September. hopefully I can talk the wife into going, if not I may just go by myself.
Even with the AC compressor in the engine bay it doesn’t look all that crowded and/or busy. Particularly like the ‘air dam’ in front of the radiator and how it directs your eyes to the engine. I’ll bet it’s nice to keep tools from falling between the radiator and core support. Really has come together nicely!
OP
OP
- Joined
- Aug 14, 2018
- Messages
- 605
I’m pretty happy with how it looks right now. And the main thing is everything works like it’s supposed to. Now I just need to get the ac system charged and put the proper belt back on.Even with the AC compressor in the engine bay it doesn’t look all that crowded and/or busy. Particularly like the ‘air dam’ in front of the radiator and how it directs your eyes to the engine. I’ll bet it’s nice to keep tools from falling between the radiator and core support. Really has come together nicely!
Similar threads
City: BUFFALO
Price: $25000
- Replies
- 2
- Views
- 357
City: El Paso
Price: $6500
- Replies
- 0
- Views
- 205
- Locked
City: Your city
Price: $1
- Replies
- 2
- Views
- 159