


bchesley
Full Member
- Joined
- Dec 21, 2012
- Messages
- 327
I know the title sounds scary, but it will potentially fix your steering and front driveshaft woes. I unfortunately was forced in to addressing it on my rig with a busted front driveshaft. I broke on the first trail this year at the LEBC Round-up, and it ended my weekend of wheeling. I had to do something and I can’t afford a new custom front end. The only thing I knew to do was to cut and turn the knuckles. I have owned two International Scouts that I have done this too, but I had not seen or heard of this with Broncos. Here is my cut and turn project.
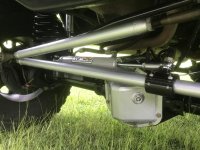
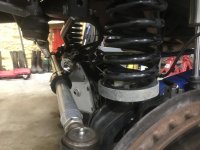
The front end setup prior to the turn was Duff long arms (has built in caster), Wild Horses 5.5 coils and 7 degree bushings. This netted me 7 degrees of caster per alignment shop. It drove like a dream at 70 as long as my tires were balanced. I really wanted to maintain the way it drove at speed and maintain that 7 Degrees. So out came the axle.
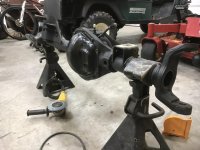
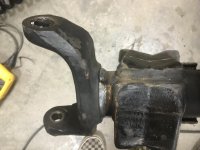
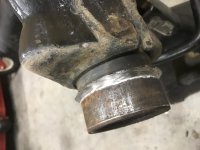
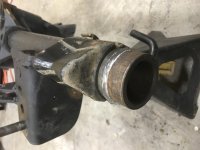
First is to remove knuckles from the axle via angle grinder. Grinding the weld off is a little slow because you need to be careful not to cut into the axle tube. Once the welds are ground down a big sledge hammer is your preferred tool to remove. I have about 3 total hours on removing mine and cleaning up the old welds.
Next, reinstall the axle with the correct pinion angle. Once the new pinion angle is set you reinstall the knuckles at desired degrees. The vehicle must be at ride height before you weld them permanently in place.
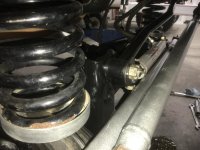
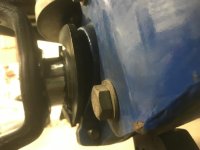
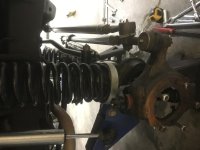
The bronco was a little different and it presented a little challenge. When you have a leaf spring style suspension there is only perches to rotate. Broncos have a track bar and mount that have to stay aligned too. The track bar bracket presented a challenge because I didn’t want to remove and rotate those brackets also. I had previously installed a Wild Horses track bar riser and it would be way too much to take it off.
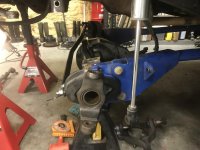
I decided I would just order several sets of bushings and play with it too see what I could get and keep all things aligned. In all of the photos below I reinstalled the axle with a 2 degree bushing backwards to spin the pinion up a total of 9 degrees. This was a little of a compromise because of the track bar bracket limitations. My main concern was if I had enough clearance for my steering over knuckle. Next step was to mock up my steering with the knuckles only hammered in place. This allowed me to make changes if it would not clear. It barely cleared so that told me that’s as far as I can rotate the pinion. I then triple checked the steering again for clearance to make it permanent and welded them in place.
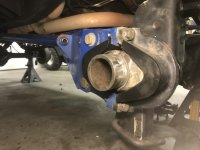
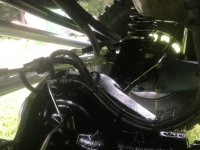
A fresh coat of paint and some new stainless brake lines to finish off the project. It drives just like it did before, but now I have a much improved pinion angle. I just need to order a new driveshaft to get back on the trails.
Also one last public service announcement on adjustable track bars. My Wild Horses TB that I have been running for 6 years seized up and it would not rotate. Use anti-seize on the threads if you ever think you might want to adjust it. Mine would not line up with the new rotated axle and housing. The bushing was now rotated 9 degrees and would not line up the holes for the bolt. I ended up ordering one from BC and I really like the Heim joint end. I put tons of anti-seize on the threads.
I have a few more photos I will add to the post. I hope that I have inspired someone to just do it. It fixed every issue with my front end and my bronco drives great.
The front end setup prior to the turn was Duff long arms (has built in caster), Wild Horses 5.5 coils and 7 degree bushings. This netted me 7 degrees of caster per alignment shop. It drove like a dream at 70 as long as my tires were balanced. I really wanted to maintain the way it drove at speed and maintain that 7 Degrees. So out came the axle.
First is to remove knuckles from the axle via angle grinder. Grinding the weld off is a little slow because you need to be careful not to cut into the axle tube. Once the welds are ground down a big sledge hammer is your preferred tool to remove. I have about 3 total hours on removing mine and cleaning up the old welds.
Next, reinstall the axle with the correct pinion angle. Once the new pinion angle is set you reinstall the knuckles at desired degrees. The vehicle must be at ride height before you weld them permanently in place.
The bronco was a little different and it presented a little challenge. When you have a leaf spring style suspension there is only perches to rotate. Broncos have a track bar and mount that have to stay aligned too. The track bar bracket presented a challenge because I didn’t want to remove and rotate those brackets also. I had previously installed a Wild Horses track bar riser and it would be way too much to take it off.
I decided I would just order several sets of bushings and play with it too see what I could get and keep all things aligned. In all of the photos below I reinstalled the axle with a 2 degree bushing backwards to spin the pinion up a total of 9 degrees. This was a little of a compromise because of the track bar bracket limitations. My main concern was if I had enough clearance for my steering over knuckle. Next step was to mock up my steering with the knuckles only hammered in place. This allowed me to make changes if it would not clear. It barely cleared so that told me that’s as far as I can rotate the pinion. I then triple checked the steering again for clearance to make it permanent and welded them in place.
A fresh coat of paint and some new stainless brake lines to finish off the project. It drives just like it did before, but now I have a much improved pinion angle. I just need to order a new driveshaft to get back on the trails.
Also one last public service announcement on adjustable track bars. My Wild Horses TB that I have been running for 6 years seized up and it would not rotate. Use anti-seize on the threads if you ever think you might want to adjust it. Mine would not line up with the new rotated axle and housing. The bushing was now rotated 9 degrees and would not line up the holes for the bolt. I ended up ordering one from BC and I really like the Heim joint end. I put tons of anti-seize on the threads.
I have a few more photos I will add to the post. I hope that I have inspired someone to just do it. It fixed every issue with my front end and my bronco drives great.

")
![IMG_1982[1].jpg](/forums/data/attachments/434/434343-5149d408112039d616a2f5c3264d3d35.jpg)