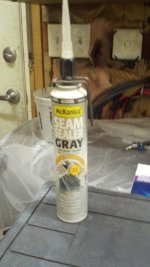
I would wait and give it the time it needs for full cure. whats your hurry?
Community
Message Forum
Photo Gallery
Event Calendar
Book Reviews
Bronco Wallpaper
Bronco FAQ
Link Back to CB!
Photo Gallery
Event Calendar
Book Reviews
Bronco Wallpaper
Bronco FAQ
Link Back to CB!

Buy / Sell


Bronco Tech
3 Arm Wiper Setup
Fix Motor Mount
Roll Cage Braces
Throttle Body 65mm
Wheel Alignment
Heat Riser Replacement
Vent Window Repair
Center Console Mount
Straighten Bumper
Ford 6R80 6 spd
More Tech...
Fix Motor Mount
Roll Cage Braces
Throttle Body 65mm
Wheel Alignment
Heat Riser Replacement
Vent Window Repair
Center Console Mount
Straighten Bumper
Ford 6R80 6 spd
More Tech...

Install the app
-
Welcome to ClassicBroncos! - You are currently viewing the forums as a GUEST. To take advantage of all the site features, please take a moment to register. It's fast, simple and absolutely free. So please join our community today!If you have problems registering or can't log into your account, please contact Admin.
You are using an out of date browser. It may not display this or other websites correctly.
You should upgrade or use an alternative browser.
You should upgrade or use an alternative browser.
1970 Build - For the Next Gen
- Thread starter Past_Miner
- Start date
broncoitis
Bronco Guru
- Joined
- Jul 23, 2010
- Messages
- 4,449
If the weather is anywhere near what you have hinted at out there in Utah right now, the cold is probably slowing it down. If your garage isn't heated in some way it may take awhile to cure. Otherwise, let it do its thing. ;D
- Joined
- Oct 22, 2003
- Messages
- 1,021
If the weather is anywhere near what you have hinted at out there in Utah right now, the cold is probably slowing it down. If your garage isn't heated in some way it may take awhile to cure. Otherwise, let it do its thing. ;D
It snowed a foot at my house about 10 days ago but has actually been unseasonably warm in the day time since then. It's still right at freezing at night though. It doesn't really matter because I have good insulation and no fear of high gas bills ;D. I have kept the garage at 70 degrees since the day before I shot the primer to keep the body panels somewhere sane for paint. I will happily wait instead of trying to remove it. I just wasn't sure if more heat was the answer. It just seems like it should have at least skinned over or something in the last 18 hours.
- Joined
- Oct 22, 2003
- Messages
- 1,021
whats your hurry?
Hah! good point, its not like I'm going to blow the schedule on this or anything. My kid has waited so long for this to be done that he grew up and went to work in the mines himself..... so much for driving it the last couple years of high school.
Last edited:
needabronco
Bronco Guru
Try a heat gun set on low and try to 'radiate' the heat slowly to help force cure the seam sealer.
Try a heat gun set on low and try to 'radiate' the heat slowly to help force cure the seam sealer.
Halogen flood lamps work good for heat too.
bigpitbull
BRONCO ADDICT
Just read this entire thread. There is some serious fab work in this build. Great info for someone thinking about taking on a serious project
- Joined
- Oct 22, 2003
- Messages
- 1,021
Well I just checked the sealer again this morning and it has finally started to set. Its still tacky but it is no longer liquid. Its too tacky to be sanding around though so I'm going to wait another day or two until the outside seams are completely dry so I don't coat them with dust that I can't remove.
Good to hear, what brand was the sealer?
- Joined
- Oct 22, 2003
- Messages
- 1,021
Good to hear, what brand was the sealer?
It's been another 12 hours and its still as tacky as it was this morning. Maybe the stuff has just gone bad. I used it last year on the trailer project and it worked pretty well. It was still hot outside though (about 85+ at night) so maybe its just the temperature thats causing my issues. The brand of the stuff is McKanica. I guess I should know better by now and just stick with Evercoat or 3M.
Attachments
Have you tryed the heat?
- Joined
- Oct 22, 2003
- Messages
- 1,021
I tried a halogen lamp for about an hour. The sheet metal was hot to the touch but it didn't seem to drive the sealer reaction any. I didn't even have time to check it this morning and I won't be able to do much with it tonight so i'm just leaving it alone for another 24 hours. I think it's eventually going to harden up. It's just going to take a few more days.
I know I won't be using it again.
I know I won't be using it again.
I feel bad for ya man, but I think you should start removing it and redoing with a trusted brand. I have been playing the same game lately with 2k primers and now I'm going back to the expensive stuff I trust!!
nathan.hall1
Sr. Member
I like the brush guard on the front, I wanna find one of those...
MPG_Bronco
Full Member
WOW, what a thread, love it all, what a transformation, thank you for all your posts and pic's I have had a full day of school online today.
Can't wait to see what's next, bummer the heat didn't work as that's what I was thinking to mention.
Can't wait to see what's next, bummer the heat didn't work as that's what I was thinking to mention.
- Joined
- Oct 22, 2003
- Messages
- 1,021
I feel bad for ya man, but I think you should start removing it and redoing with a trusted brand. I have been playing the same game lately with 2k primers and now I'm going back to the expensive stuff I trust!!
I hear you loud and clear. This stuff seems to be setting up now. The globs are getting pretty solid and its a lot les tacky. I'm not using any more though. I have some Evercoat Control Flow coming for the rest of the tub seams. It doesn't work well for the outer seams that need to be pretty but it sets up like, well like epoxy in about 10 minutes. I'm sticking with what I know.
Last edited:
- Joined
- Oct 22, 2003
- Messages
- 1,021
The seam sealer finally firmed up enough to get started back up. I may still have to peel it out of the outer seams but it should be fine under the tub. I warned everyone in post #1 that I wasn't real strong on the body work. Luckily, there aren't too many big problems on this tub. Here's what I was able to accomplish today.
Attachments
Well allll right, looks good!
- Joined
- Oct 22, 2003
- Messages
- 1,021
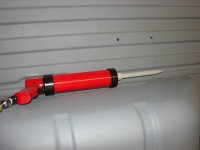
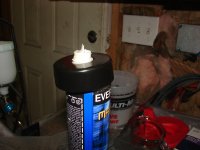
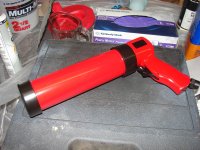
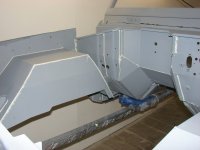
So I won't bore all of you with 50 pictures of me applying body filler just to grind 95% of it back off and then reapply. You will all just have to trust that I'm slowly getting the hang of it. These pictures are from last weekend. After the seam sealer disaster I bought a few more tubes of 2 part epoxy sealer and a pneumatic caulking gun to apply it with. The super-special Evercoat tubes won't fit in a standard gun so I had to make a few modifications to get it to work. I also ran out of this stuff too and ended up sourcing some 3M epoxy sealer at my local Napa. It's the black stuff in the picture under the tub. My son also took a couple of days off of work last weekend and drove over to visit and help out. In the end we finally got all of the seams done and were ready for some more primer.
Attachments
-
 DSC03552.JPG170.2 KB · Views: 67
 -
 DSC03549.JPG136.5 KB · Views: 69
 -
 DSC03547.JPG134 KB · Views: 60
 -
 DSC03546.JPG252.6 KB · Views: 61
 -
 DSC03545.JPG243.8 KB · Views: 57
 -
 DSC03544.JPG184.6 KB · Views: 54
 -
 DSC03543.JPG228.7 KB · Views: 53
 -
 DSC03542.JPG250.5 KB · Views: 56
 -
 DSC03564.JPG208.6 KB · Views: 64
 -
 DSC03556.JPG166.4 KB · Views: 57
- Joined
- Oct 22, 2003
- Messages
- 1,021
Some Color
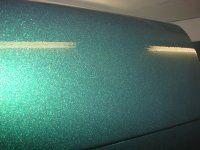
On Friday after work I pushed the tub out of the booth and gave it a good washing in the driveway. Good thing I did because it snowed a couple of inches over night and I'm not sure I could push the rotisserie around in the snow by myself. I let it dry overnight and shot another coat of sanding primer on the outer panels Saturday afternoon. I let that dry overnight and spent all morning today wet sanding. I finally got around to some color this afternoon. I have to say that it feels good. I ended up with a very faint orange peel, which I'm not happy about but I think I can get it out with some buffing compound. I also did a pretty poor job of cleaning the windshield frame so it will probably need a light sand and another coat of paint. I got a little close on the back side of the tail light housing while trying to spray around the rotisserie cross bar and ended up with a small run. It's the only one though.
I won't do much more until after Christmas. My son is working through the holiday but he is planning to come over for a few days after. Hopefully we can get the bed liner on the interior and bottom of the tub then.
My discharge filters were pretty caked up by the end of the day and there was quite a bit of mist in the air so these pictures aren't the greatest. You can get the idea though. This is a single stage urethane in metallic British Racing Green.


