MrT's build is traveling at warp speed compared to when I did my build. Looks great!


Community
Buy / Sell


Bronco Tech
3 Arm Wiper Setup
Fix Motor Mount
Roll Cage Braces
Throttle Body 65mm
Wheel Alignment
Heat Riser Replacement
Vent Window Repair
Center Console Mount
Straighten Bumper
Ford 6R80 6 spd
More Tech...
Fix Motor Mount
Roll Cage Braces
Throttle Body 65mm
Wheel Alignment
Heat Riser Replacement
Vent Window Repair
Center Console Mount
Straighten Bumper
Ford 6R80 6 spd
More Tech...

-
Welcome to ClassicBroncos! - You are currently viewing the forums as a GUEST. To take advantage of all the site features, please take a moment to register. It's fast, simple and absolutely free. So please join our community today!If you have problems registering or can't log into your account, please contact Admin.
You are using an out of date browser. It may not display this or other websites correctly.
You should upgrade or use an alternative browser.
You should upgrade or use an alternative browser.
1974 fiberglass tub dd build
- Thread starter MrT
- Start date
Looking good! Are you using an Explorer Serp set-up? Also, what fan and fan clutch is that?
Also I have the same Mustang valve covers and intake. I wish mine were polished like that!
Also I have the same Mustang valve covers and intake. I wish mine were polished like that!
MrT's build is traveling at warp speed compared to when I did my build. Looks great!
Thanks! Today I finished the ball joints and wheel bearings. I put the hubs on and I was prety happy with the progress until I realized I forgot the rotors! So I pulled one side off and the old studs looked too crappy to use. I ordered some but all that is on hold %)
Looking good! Are you using an Explorer Serp set-up? Also, what fan and fan clutch is that?
Also I have the same Mustang valve covers and intake. I wish mine were polished like that!
Thanks! I bought the Explorer setup from the guy that sells them in the classified section. I am real happy with the parts he sent and the time it saved. I don't know a lot about the fans but I think there is a later model plastic one and the earlier years have the metal one.
The valve covers are pretty nice, nice thick casting. They came on the engine along with a chrome intake. It is so smooth it looked like plastic until I pulled it off. The stuff is pretty blingy but I like it, it will be easy to clean.
man....you are kicking some ass!! cannot wait to see this come together!! keep after it and give me motivation to finish mine!
Thanks! I have been running into problems lately. Today is kind of a big one...
I was going to install the rear disc brakes today but instead I found this:
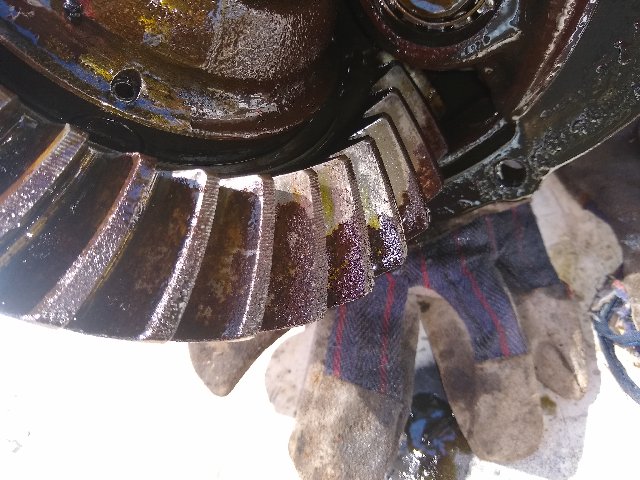
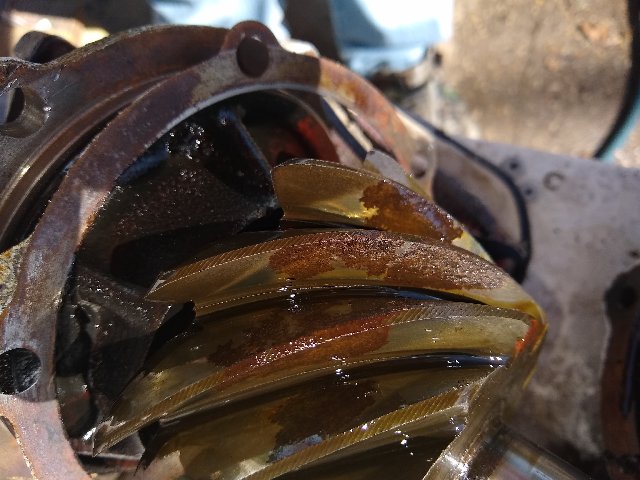
I plan on gears and a locker later but it's not in the budget now. I talked to the salvage yard I bought the axles from to see if they can help out. The guy there said it would be Tuesday before he would know if he had anything. I ordered new outer bearings and seals.
I did get my new studs today so hopefully I can get the front end together this weekend. I pulled the cover on it and everything looks good.
I had to change my starter for the correct one. I ordered for a manual and needed one for a automatic. The snout is shorter and the other one rubbed. (I have a manual)
I also exchanged the radiator I bought because it was for a manual and I needed one for an automatic. I am seeing a trend. The manual one was super thin and weighed about 1/2 as much as the new one does.
I sent back the Ruffstuff tie rod ends for the Y link. I am switching to heims and crossover steering. I ordered their Track bar kit so hopefully I can get that hooked up soon.
One step forward and two back it feels like. I may pull the third out of the rear end I pulled out to see if may have been upgraded to a 31 spline at some point. I really doubt it but who knows I could get lucky.
My neighbor has 5 or so nice classic cars and he stopped by and I got his opinion on the rear gears. He said he would clean it up and run it so I am. I spent a few days spraying Ospho on the rust, rinsing then hitting with a nylon wire wheel. I really don't think there will be any problems now they cleaned up great.
I finally got the front brakes and hubs together after a few hiccups.

I put the headers and exhaust on. I am really happy with the way they turned out.


I had new bearings and seals put on the axles and installed the rear disc brakes from JBG.

I am mocking up the heim crossover steering. I really don't like how low the tie rod is. I can buy flat top knuckle then I have to change the track bar mounts...ugh I think it will work fine the way it is but I like it up higher. I am not sure it's worth $300 out of the budget right now.
I can stack the tie rod and drag link on the passenger knuckle. I know people don't care for that but I have run it with 44's and put a ton of miles on that setup. There are still ad's for people selling steering setup like that. So bite the bullet, stack or hang low?
Next up is rear shock mounts, perches welded, brake line tabs welded and brake lines run.
I finally got the front brakes and hubs together after a few hiccups.
I put the headers and exhaust on. I am really happy with the way they turned out.
I had new bearings and seals put on the axles and installed the rear disc brakes from JBG.
I am mocking up the heim crossover steering. I really don't like how low the tie rod is. I can buy flat top knuckle then I have to change the track bar mounts...ugh I think it will work fine the way it is but I like it up higher. I am not sure it's worth $300 out of the budget right now.
I can stack the tie rod and drag link on the passenger knuckle. I know people don't care for that but I have run it with 44's and put a ton of miles on that setup. There are still ad's for people selling steering setup like that. So bite the bullet, stack or hang low?
Next up is rear shock mounts, perches welded, brake line tabs welded and brake lines run.
Time for an update. Big day today, first drive!
Just kidding.
I decided to copy Duff's saddle bracket. This is the best way I could find to get my track bar and drag link the same length and angle.
Step one cardboard pattern:

Step two cut out pattern in 1/4" plate, tack together, heat with MAPP gas and beat the hell out of it with a mini sledge:

Step three fail miserably. Hit knuckle on edge of pipe and give up.
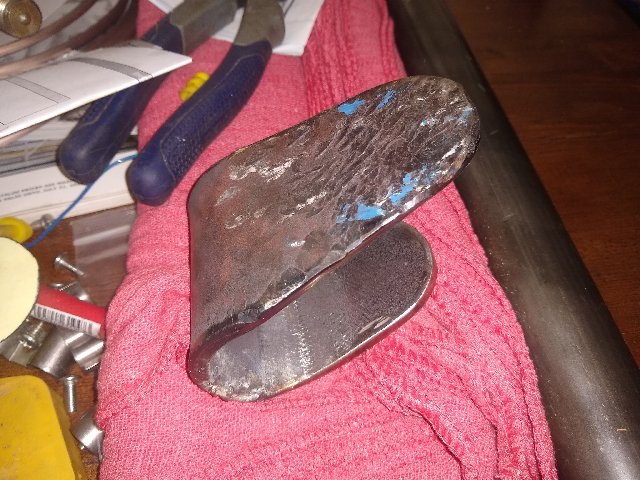

Step four wake up the next day smarter than the day before. I cut out a new pattern and put my tractor to work. At idle tilting the bucket beck bent the plate like butter.

Cleaned up and done:

I cleaned up and prepped the front for Raptor liner:

Sprayed it:

I ran most of the brake lines and fuel lines(twice) I don't have any good pictures of those on my phone. I picked up a new set of wheels. 17x9 Dirt life beadlocks. I ordered 37 12.50 17 Mastercraft MXT's This is one of the smaller lighter 37's(about the same as a BFG) Bald tires in picture, new ones coming. Mastercrafts are made by Cooper so they are pretty good tires:


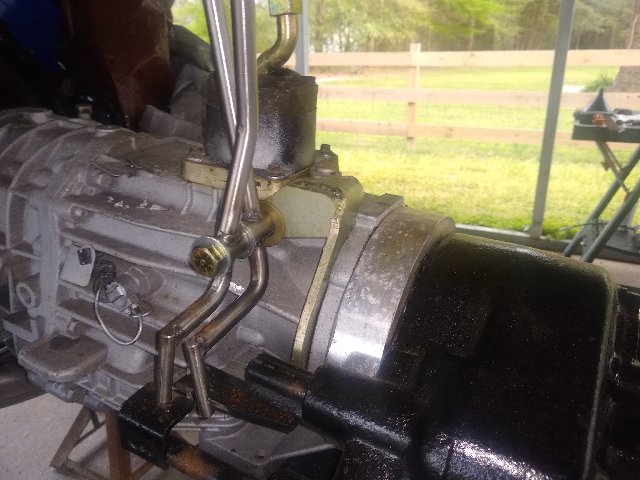
I test fit my twin sticks and found my sticks didn't match the bracket on the transmission. Luckily I figured out how to make them work. The first picture just a bolt locating the shifters. The second shows the bracket out of angle iron I made and welded n:

Then for the big step today...body meet frame! I also stuck the doors on because I couldn't help it. They need shims and they hit the cowl/dash area. Not sure why the do that, the shims will make that part worse.


That's it for now. Up next welding the steering. I need to buy a lot of stuff, A/C, seats, gauges, steering column and stuff that goes with it, roll cage etc.
Just kidding.
I decided to copy Duff's saddle bracket. This is the best way I could find to get my track bar and drag link the same length and angle.
Step one cardboard pattern:
Step two cut out pattern in 1/4" plate, tack together, heat with MAPP gas and beat the hell out of it with a mini sledge:
Step three fail miserably. Hit knuckle on edge of pipe and give up.
Step four wake up the next day smarter than the day before. I cut out a new pattern and put my tractor to work. At idle tilting the bucket beck bent the plate like butter.
Cleaned up and done:
I cleaned up and prepped the front for Raptor liner:
Sprayed it:
I ran most of the brake lines and fuel lines(twice) I don't have any good pictures of those on my phone. I picked up a new set of wheels. 17x9 Dirt life beadlocks. I ordered 37 12.50 17 Mastercraft MXT's This is one of the smaller lighter 37's(about the same as a BFG) Bald tires in picture, new ones coming. Mastercrafts are made by Cooper so they are pretty good tires:
I test fit my twin sticks and found my sticks didn't match the bracket on the transmission. Luckily I figured out how to make them work. The first picture just a bolt locating the shifters. The second shows the bracket out of angle iron I made and welded n:
Then for the big step today...body meet frame! I also stuck the doors on because I couldn't help it. They need shims and they hit the cowl/dash area. Not sure why the do that, the shims will make that part worse.
That's it for now. Up next welding the steering. I need to buy a lot of stuff, A/C, seats, gauges, steering column and stuff that goes with it, roll cage etc.
- Joined
- Apr 19, 2014
- Messages
- 2,471
Nice, very nice! Good progress, gonna be a dandy ride!
Coming along nice there T. Good use of the tractor for a metal brake. Close ups of the battle scars are always a plus too. Gotta love those cuts right on the joint, takes a lot longer to heal.
Thanks!Nice, very nice! Good progress, gonna be a dandy ride!
Coming along nice there T. Good use of the tractor for a metal brake. Close ups of the battle scars are always a plus too. Gotta love those cuts right on the joint, takes a lot longer to heal.
Thanks, the tractor comes in handy all the time even though we don't have the land to justify having it. Super glue works great until you hit it again and again. its the gift that keeps on giving.
Today I had to make a mount for my clutch slave cylinder. There really isn't a very good place for it to go but I ended up making a nifty bracket. It's not the prettiest but it solves a problem.
Metal from the scrap bucket:

This small tab sticking out was what I chose to use. It is about 5/16 thick and my file is laying on a bolt hole. There is a small shoulder that had to be filed down to get it flat as possible:

Here is what I came up with. The large holes are for a socket to fit in. 1 bolt through the side and one through the top using the tab. I will have to hook it up to see how freely it moves on the fork and make changes if needed.


Two of my tires came in today. First picture is beside a new Toyo 35. The second both mocked up on one side. I ordered new flares and a pile of other parts.


I'm enjoying your build, thank you!
Thanks!Keep going!! impressive!!
Thanks I appreciate that.I'm enjoying your build, thank you!
Thanks!Looking good there... Keep on plugging away
PM sent.Man, you aren't messing around. I'm "up" in Daphne, and I would love to see that BD tub. I am not ready to buy one yet, but I think I have made my mind up when the time comes it will be fiberglass.
A friend came by and helped me weld up the steering and trackbar plus the bracket. I bought a new Hobart 190, love it.


hmmm I lost a few pictures of the steering.
I cut out for the rear flares. What a huge chunk to take out.


II took the pedals apart and cut this tab off so the clutch aster could connect directly to the arm.


Started on the booster and master. I had to bend the lines a little different and still need one adapter.

I screwed up and couldn't get the inner fenders in with the body on. I trimmed them up and will put a rubber piece with plastic pins like a newer truck would have. I do like that I can remove them later when I need room in the engine compartment. It took a lot of work to get the level and even(as I could) The drivers side will need wedges made to fit right.


I got a new tilt column and I don't need this hole so I made a inner and outer plate. The lower column mount is screwed to the inner plate.


I will probably fill the small gap with epoxy and spray the plate with Raptor liner.

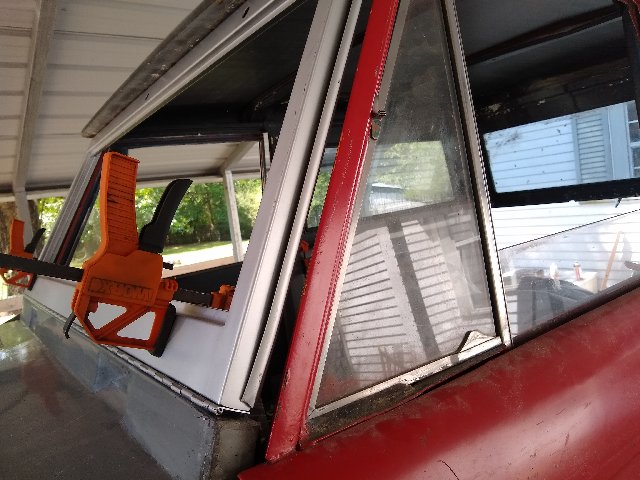
I started on the windshield frame and doors because I have a Tom's plate style cage coming that I want to be able to weld up when it gets here. I also need to see if there are any big problems to address.I have a few...The bolts that hold the widshield frame on need to be wafer style(need to buy) The bolts come through and hit against the glass so there is no room for nuts. I think I can simply re drill the holes offset a little.

Pretty big gap but the new seal seam to fill it up. I think my door uppers need to be cut and welded back in a better spot. Two welds are broken now.
hmmm I lost a few pictures of the steering.
I cut out for the rear flares. What a huge chunk to take out.
II took the pedals apart and cut this tab off so the clutch aster could connect directly to the arm.
Started on the booster and master. I had to bend the lines a little different and still need one adapter.
I screwed up and couldn't get the inner fenders in with the body on. I trimmed them up and will put a rubber piece with plastic pins like a newer truck would have. I do like that I can remove them later when I need room in the engine compartment. It took a lot of work to get the level and even(as I could) The drivers side will need wedges made to fit right.
I got a new tilt column and I don't need this hole so I made a inner and outer plate. The lower column mount is screwed to the inner plate.
I will probably fill the small gap with epoxy and spray the plate with Raptor liner.
I started on the windshield frame and doors because I have a Tom's plate style cage coming that I want to be able to weld up when it gets here. I also need to see if there are any big problems to address.I have a few...The bolts that hold the widshield frame on need to be wafer style(need to buy) The bolts come through and hit against the glass so there is no room for nuts. I think I can simply re drill the holes offset a little.
Pretty big gap but the new seal seam to fill it up. I think my door uppers need to be cut and welded back in a better spot. Two welds are broken now.
The doors are going to need some work. The body line, bottom and rear gaps are decent.

The doors needed a pretty good stack of shims on the bottom hinges to get those gaps right. I test fitted the drivers fender and there is a large gap at the lower hinge. What do you do for this? Add metal to the door?

Also I forgot to get a picture but the is cracked metal around the latches in both doors. Are there repair plates or how do you go about fixing it?
I also got the filler neck put in along with the return line.

The doors needed a pretty good stack of shims on the bottom hinges to get those gaps right. I test fitted the drivers fender and there is a large gap at the lower hinge. What do you do for this? Add metal to the door?
Also I forgot to get a picture but the is cracked metal around the latches in both doors. Are there repair plates or how do you go about fixing it?
I also got the filler neck put in along with the return line.
Looking Good!
Similar threads
- Locked
- Replies
- 2
- Views
- 873
- Replies
- 26
- Views
- 612
City: Fort Myers
Price: $30000
- Replies
- 2
- Views
- 463