• Welcome to ClassicBroncos! - You are currently viewing the forums as a GUEST. To take advantage of all the site features, please take a moment to register. It's fast, simple and absolutely free. So please join our community today!
    If you have problems registering or can't log into your account, please contact Admin.

74 Explorer (swap) - The "Great Pumpkin" Build

OP
OP
1buckeyefan1

1buckeyefan1

Sr. Member
Joined
Sep 21, 2017
Messages
632
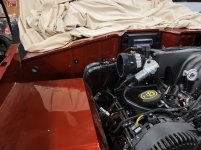
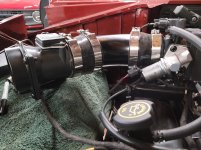
Thankfully I had a bracket that I bought here a few years ago from Jsmall to utilize the Explorer throttle cable. Borrowed another idea for the connector utilizing the original Bronco gas pedal
 

Attachments

  • throttle cable pedal.jpg
    throttle cable pedal.jpg
    31.4 KB · Views: 27
  • explorer throttle cable bracket.jpg
    explorer throttle cable bracket.jpg
    261.8 KB · Views: 26
Last edited:
OP
OP
1buckeyefan1

1buckeyefan1

Sr. Member
Joined
Sep 21, 2017
Messages
632
Thanks for the recommendations for Silicone Intakes.. I was able to DIY my own intake kit for ~$100.
 

Attachments

  • air intake.jpg
    air intake.jpg
    186.4 KB · Views: 29
  • intake assembled.jpg
    intake assembled.jpg
    247 KB · Views: 26
  • intake filter.jpg
    intake filter.jpg
    295.5 KB · Views: 28
OP
OP
1buckeyefan1

1buckeyefan1

Sr. Member
Joined
Sep 21, 2017
Messages
632
Decided to paint my dash now vs. later when I did the body. Borrowed the Marschariot mod for the voltmeter. Had to marry up my Painless harness w/ the EFIguy harness.. which is still a work in progress. I'm not getting any power to my dash lights yet, more to work on this week
 

Attachments

  • dash painted.jpg
    dash painted.jpg
    154.4 KB · Views: 27
  • dash intalled.jpg
    dash intalled.jpg
    222.9 KB · Views: 23
  • voltmeter 1.jpg
    voltmeter 1.jpg
    69.7 KB · Views: 24
  • voltmeter 2.jpg
    voltmeter 2.jpg
    63.6 KB · Views: 20
  • voltmeter labels.jpg
    voltmeter labels.jpg
    222.9 KB · Views: 22
OP
OP
1buckeyefan1

1buckeyefan1

Sr. Member
Joined
Sep 21, 2017
Messages
632
Finally got brave last night and decided to try and fire it up. Charged battery up and dumped a few gallons of gas in. Got solenoids clicking, but no start. Added a few more gallons of gas and found leaks at every fitting in my fuel lines. Torqued them down even further, using my feet on the frame rail to get max leverage.

It fired right up! Found another leak on my power steering fittings, torqued them down.

Now I'm getting oil in my passenger side header and it's smoking a ton from that side. I posted another thread asking for advice and consensus so far is to haul it outside and let it run up to operating temps. I'll keep everyone posted.

Finally.. sorry for the mass update.. I've been at it for 5yrs now and have gained a ton of ideas. I especially enjoyed the threads with pictures so I could borrow their ideas. I'm trying to make this thread an aggregate of the ideas i've used. I hope it can help others as much as y'all have helped me.
 

Attachments

  • first fire up.jpg
    first fire up.jpg
    217.5 KB · Views: 38
  • engine bay.jpg
    engine bay.jpg
    256.5 KB · Views: 38
  • oil in exhaust header.jpg
    oil in exhaust header.jpg
    176.9 KB · Views: 40
OP
OP
1buckeyefan1

1buckeyefan1

Sr. Member
Joined
Sep 21, 2017
Messages
632
Where there's smoke, there's a fire!!!
That's great that it's alive !

Yep, it's a step in the right direction! Just waiting for a dry day now to haul it outside and see if the oil burns off.

I'm also now trying to diagnose a transmission leak somewhere around the AA ZF clocking ring. It seems to me originated fr the center of the 1" thick aluminum clocking ring, which I know is impossible. It has to be coming from the trans facing seal and then centering itself before dripping downward.

I ensured I added in the timkin seal before installing it. I even torqued down the bolts further. Any tips before I pull it? Any advice on a better gasket than what shipped with the AA kit? PXL_20221207_003531749.jpg
 

Tjmiller

Newbie
Joined
Sep 16, 2015
Messages
10
Started mocking up the 4R70W transmission cooler. Based on Doug/904's mounting design. Since I wasn't using the internal radiator cooler, I wanted a large external cooler, so I went with a B&M 70266. I realize that rotating it 90 degrees is best to avoid air pockets, but based on Doug and other's experience, this produced the cleanest/tightest install w/ limited room. I borrowed the idea from another thread to run the braided flex lines through the frame rail.
That looks awesome! I think I will run my lines inside the frame too. Do you know what size the 4r70w cooling line connections are?
TM
 

bax

Contributor
Old Member
Joined
Aug 22, 2005
Messages
14,492
I would dry that leak up real good and wait and see if it still leaks. From the oil on the ring it looks more like the fluid was dripped onto the ring and not coming from around the gasket.
 

Tiko433

Contributor
I know just enough to be dangerous
Joined
Jul 9, 2014
Messages
1,830
Loc.
South West Florida
Yep, it's a step in the right direction! Just waiting for a dry day now to haul it outside and see if the oil burns off.

I'm also now trying to diagnose a transmission leak somewhere around the AA ZF clocking ring. It seems to me originated fr the center of the 1" thick aluminum clocking ring, which I know is impossible. It has to be coming from the trans facing seal and then centering itself before dripping downward.

I ensured I added in the timkin seal before installing it. I even torqued down the bolts further. Any tips before I pull it? Any advice on a better gasket than what shipped with the AA kit? View attachment 892486
Is that a top loader transmission? Does the shifter bolt in up top ? I ask because I had the same little drip for my AX15. Over the course of 2 years I pulled the transfer case clean it reseal it only to have come back , annoying as hell! Last time after the transfer case was out I took a good look and found it was actually leaking for where the shifter bolts to the top of the transmission. It’s worth a peek.
 
Last edited:
Top