• Welcome to ClassicBroncos! - You are currently viewing the forums as a GUEST. To take advantage of all the site features, please take a moment to register. It's fast, simple and absolutely free. So please join our community today!
    If you have problems registering or can't log into your account, please contact Admin.

Angled Bezels in Dash

txtruk15

Contributor
Sr. Member
Joined
Apr 1, 2017
Messages
753
Loc.
Highland Village, TX
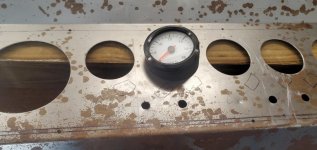
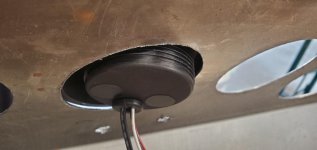
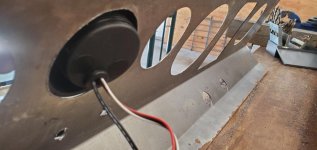
Back to working on dash overlay and installing gauges. Would love to use these angled bezels but just can't figure out a way to get them set in place. Any thoughts/suggestions? I'm thinking a bracket of some sort but not sure how to fasten to gauge with the angle - the threaded part of the gauge back is not long enough to get the plastic collar on and hold to the back of the dash overlay...
 

Attachments

  • 20211107_110829.jpg
    20211107_110829.jpg
    75.5 KB · Views: 95
  • 20211107_110850.jpg
    20211107_110850.jpg
    42.3 KB · Views: 83
  • 20211107_110909.jpg
    20211107_110909.jpg
    58.5 KB · Views: 78

DirtDonk

Contributor
Bronco Guru
Joined
Nov 3, 2003
Messages
48,456
Well that sucks! The angled bezels are definitely the way to go. Sorry your gauges are not long enough. Is the bezel from the same manufacturer as the gauges? Looks like a VDO from here, but probably a lot of them out there similar. What brand are yours?

Good luck. Not sure how to make it work, but will think on the matter some!%)

Paul
 
OP
OP
txtruk15

txtruk15

Contributor
Sr. Member
Joined
Apr 1, 2017
Messages
753
Loc.
Highland Village, TX
the gauges are speedhut, the bezels are pretty much the same size as the ones summit, various marine shops and hot rod shops sell....unlike some of the other gauges which have machine screws that stick out the back, these speed hut gauge don't have that to work with....
 

DirtDonk

Contributor
Bronco Guru
Joined
Nov 3, 2003
Messages
48,456
The screw-on mounting bezel on the back is a more and more common mounting method these days. Either some gauges have more depth to the threads to work with, OR (and this seems likely) your angle bezels (beveled bezels?;)) are too thick and holding the gauge too far off the dash.
In fact they do look pretty thick, but I don't know how easy it would be to trim them down to the minimum needed. That thin section should/could be extremely thin and that might gain you another 1/8" or so of thread. Not much, but might help?

Paul
 

jmhend

Bronco Guru
Joined
Dec 25, 2007
Messages
2,741
Yeah I'm with Paul. Trim the angle bezel a little. Do it with PVC or wood first as a test fit.

Sent from my SM-N960U using Tapatalk
 

m_m70

Contributor
Sr. Member
Joined
Jun 14, 2001
Messages
1,653
Loc.
Pacifica, CA
there's something wrong there.......
do these bezels go with the gauges? If so, does the back have an angled spacer same as the front? I'm thinking you need the same angled spacer front AND behind for the "nut" to hold the gauge properly.

hope this makes sense........
 

DirtDonk

Contributor
Bronco Guru
Joined
Nov 3, 2003
Messages
48,456
Correct. At least for best results anyway.
But the locking ring can still hold them in place, and you "might" be able to angle the retainer as well.
But certainly adding an angle thingy to the back would be the best way.

It's not even certain at this point that enough material can be shaved off of the existing ones to allow the gauges to extend all the way through the panel. Looks like it'll be close as to whether there is enough threaded body to stick through. That's the first mock-up. Next would be making sure that the odd angle can be held tightly.

Paul
 
OP
OP
txtruk15

txtruk15

Contributor
Sr. Member
Joined
Apr 1, 2017
Messages
753
Loc.
Highland Village, TX
yeah, the angled bezels did NOT come with the speedhut gauges. they're after market like these:

https://www.summitracing.com/parts/ems-msang-258bk

I'm hoping it's possible to shave off some of the backside of these bezels to give more room on the backside behind the overlay so enough of the thread will poke out of the back to get some sort of flat faceplate over the back and then thread on the ring over that - at least in theory that's what I think could work...

it's either that, or just settle for straight ahead face plate the normal way ;-(
 
Top