• Welcome to ClassicBroncos! - You are currently viewing the forums as a GUEST. To take advantage of all the site features, please take a moment to register. It's fast, simple and absolutely free. So please join our community today!
    If you have problems registering or can't log into your account, please contact Admin.

BC Broncos Soft Top Install-Part 1

Bituman

Full Member
Joined
Jan 23, 2008
Messages
276
Loc.
Phoenix Mtn Preserve
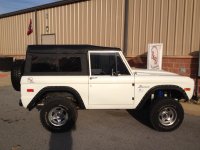
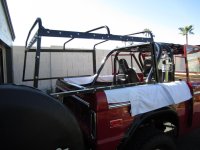
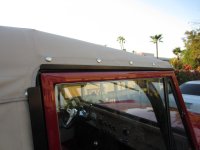
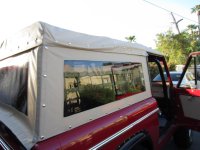
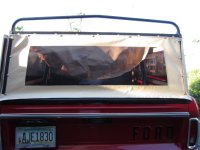
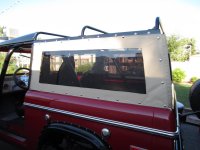
Last August I bought a soft top from BC Broncos to replace my Besttop soft top. I wanted to replace the Besttop because it just was not working as I had originally thought. This is not a knock on the Besttop. It is a high quality top. But it was a PITA to remove it and install the bikini top and vice versa. I finally decided that I would just prefer a safari-style top. That’s why I selected the BC soft top. Last July I had the opportunity to squeeze in a trip to BCB in Ingram, TX as part of a business trip. Roxanne and Jason were very kind in helping me out. Plus, I was lucky that Jason had just installed a top when I got there. Seeing how the top was constructed and went together helped me make my final decision to purchase the BC top. One of the benefits of this top is that you can select from a bunch of different colors. The color I finally selected matched very well the color of my dash and door panels.

I decided to take a bunch of photos of the installation and post them up. Maybe that will help some of you that purchase one of these tops. It may also help some of you decide whether or not you want the BC top. In case you are wondering, it should take you about a day to install, once you have removed any previous hardware, etc. And I only called BCB twice! Chuck and Jason each fielded a phone call from me. Anyway, here goes.

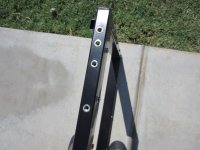
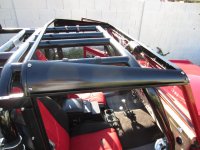
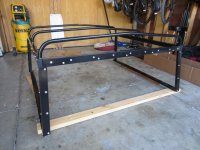
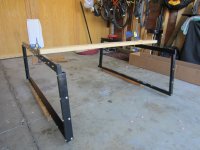
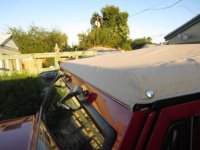
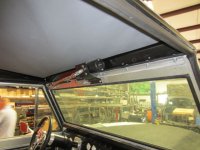
The included directions are reasonably good, but with a couple of omissions. First, one of the major steps not discussed in the directions is to get rid of the wiper motor cover (you won’t be able to use it), and reinstall the wiper motor clocked 180 degrees from its original position. There is a bracket provided for this as shown in the photo. The second omission is that you need to install a tailgate protector (included) along the top of the tailgate. To this you will attach a strip of velcro that holds down the back panel. I did not have to install this because I already had a tailgate protector.

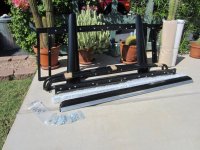
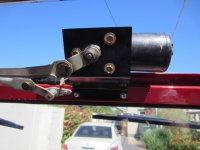
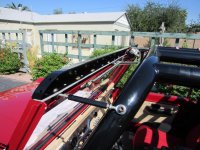
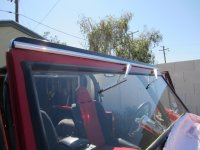
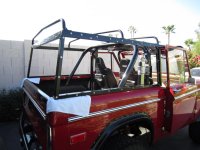
The following photos show what comes in the boxes. Assembly of the frame is really easy because some of the connectors are pre-installed. The design is very well conceived. There is a photo of the new wiper motor bracket and a front and rear view of the windshield header. One thing I forgot to mention is that you will need to purchase some type of seals to go under the windshield header and also between the bed and frame. Seals are not included in the kit. I probably could have found something fancier, but I just went to my local auto parts store and bought the seal that goes under a camper shell.
 

Attachments

  • IMG_0303.jpg
    IMG_0303.jpg
    129.6 KB · Views: 853
  • IMG_0307.jpg
    IMG_0307.jpg
    86.1 KB · Views: 758
  • IMG_0299.jpg
    IMG_0299.jpg
    63.4 KB · Views: 816
  • IMG_0314.jpg
    IMG_0314.jpg
    133.8 KB · Views: 906
  • IMG_0318.jpg
    IMG_0318.jpg
    82.3 KB · Views: 776
Last edited:
OP
OP
Bituman

Bituman

Full Member
Joined
Jan 23, 2008
Messages
276
Loc.
Phoenix Mtn Preserve
BC Broncos Soft Top Install-Part 2

Here are photos of the frame side panels. The photo is a rear view. Next are photos of the frame with the top bows installed and without the rear header installed. By the way, the rear bow could be installed two ways, only one of which is correct. That is, install the bow with the triangular gusset facing toward the front.

The next photos show the frame partially and completely installed on to the bed. I did this install by myself so I just draped some thick towels over the top of the bed. Again, there needs to be a seal between the frame and bed. The holes in the frame line up perfectly with existing holes. The front most attachment is a stud that is attached to the frame. That helps in mounting the frame, but is a gigantic PITA later on when you are trying to get a nut onto the stud. There is just no way to get a wrench, ratchet, or other tool to turn on the nut. It would be much better to leave this attachment as a hole. At least then you could tighten the bolt from the top. As it is, I got the nut tightened as tight as I could by hand using a socket and extension. I included a drop of thread locker. The last photo shows the over door panels installed.
 

Attachments

  • IMG_0347.jpg
    IMG_0347.jpg
    109 KB · Views: 910
  • IMG_0340.jpg
    IMG_0340.jpg
    100.6 KB · Views: 893
  • IMG_0335.jpg
    IMG_0335.jpg
    82.1 KB · Views: 815
  • IMG_0329.jpg
    IMG_0329.jpg
    103.1 KB · Views: 729
  • IMG_0326.jpg
    IMG_0326.jpg
    95.9 KB · Views: 707
  • IMG_0321.jpg
    IMG_0321.jpg
    86.8 KB · Views: 752
OP
OP
Bituman

Bituman

Full Member
Joined
Jan 23, 2008
Messages
276
Loc.
Phoenix Mtn Preserve
BC Broncos Soft Top Install-Part 3

These photos show the side and back panels installed, along with the top panel. The front of the top goes into the slot on the windshield header. This design is very similar to the Besttop. There is a photo of the snaps over the door. You will need to drill matching holes in the over door panels for installation of the male snaps. The last photo shows the almost finished product.

I still need to drill the holes in the over door panels and install the snaps. Also, if you look closely in the final photo you will notice that the vertical adjustment piece that mates up with the back side of the door window frame is missing. (Driver's side is installed per directions.) It turns out that I need to trim about a quarter inch off the bottom of that piece so that the door will close properly. The reason I have not yet drilled the holes is because I wanted to wait a few days for the canvas to stretch in our Arizona sun so that it is closest to its final shape. Some of the snaps are VERY difficult to snap together, and I think this is not only to be expected, but also very desireable. I think for the canvas to fit well, it needs to be a little smaller than necessary and stretch to fit. I am depending on a week or so in our still hot Arizona sun to accomplish this.

Overall, this was a very easy top to install and I think some of the reported problems with the first version of the BC top have been well solved. I also think its an attractive top that, in my case, restored the original lines of the original hard top.

Hope this helps.

Bob
 

Attachments

  • IMG_0372.jpg
    IMG_0372.jpg
    118.6 KB · Views: 2,169
  • IMG_0369.jpg
    IMG_0369.jpg
    61.6 KB · Views: 824
  • IMG_0367.jpg
    IMG_0367.jpg
    81.5 KB · Views: 825
  • IMG_0364.jpg
    IMG_0364.jpg
    85.7 KB · Views: 825
  • IMG_0360.jpg
    IMG_0360.jpg
    72.5 KB · Views: 791
  • IMG_0356.jpg
    IMG_0356.jpg
    81.8 KB · Views: 863

sprdv1

Contributor
REBEL
Joined
Mar 8, 2007
Messages
81,824
Nice write up.. Looks Very Sharp on your Rig...
 

chuck

Bronco Guru
Joined
Aug 14, 2001
Messages
6,474
Loc.
Ingram, Texas
Thank you for the write up. I will be making some changes in the instructions. To address your issues, first I did not include the header and bed side rubber. It was a decision that may have been wrong. My thinking was that most people have the stock rubber so do not need it so why pay for new if what you have is good. I know you can't tell by looking at the cost buy I try to hold the cost down. But on the other side re-using the old/good rubber is about like using the old bolts.
The snaps over the doors, I can't put the snaps in the over door panel because that piece allows adjustment of the door hole and can be used to get a little slack in the canvas. Each EB is a little different so the two parts of the snaps would not align.
The stud, the stock bed rail hole is right over the upright part of the side frame and I use that hole to align the sides. I did not want to have people drilling a new hole in their bed rail so a stud fixed the problem but it is a bitch to get the nut tight. I'm thinking a wing nut would be better.
Tailgate protector, the tailgate protector is not required. You could stick the velcro to the tailgate direct. My thought was I wouldn't want the velcro stuck to my paint.
Snaping the snaps, if you slide the front in then snap the rear corners next all the other snaps will be easier.
Adjustable side panel, again because all EBs are not the same I made the back of the door hole adjustable. But your problem seems different. I would like to see a picture of the problem if I could bother you for one?
 
OP
OP
Bituman

Bituman

Full Member
Joined
Jan 23, 2008
Messages
276
Loc.
Phoenix Mtn Preserve
Thank you for the write up. I will be making some changes in the instructions. To address your issues, first I did not include the header and bed side rubber. It was a decision that may have been wrong. My thinking was that most people have the stock rubber so do not need it so why pay for new if what you have is good. I know you can't tell by looking at the cost buy I try to hold the cost down. But on the other side re-using the old/good rubber is about like using the old bolts.
The snaps over the doors, I can't put the snaps in the over door panel because that piece allows adjustment of the door hole and can be used to get a little slack in the canvas. Each EB is a little different so the two parts of the snaps would not align.
The stud, the stock bed rail hole is right over the upright part of the side frame and I use that hole to align the sides. I did not want to have people drilling a new hole in their bed rail so a stud fixed the problem but it is a bitch to get the nut tight. I'm thinking a wing nut would be better.
Tailgate protector, the tailgate protector is not required. You could stick the velcro to the tailgate direct. My thought was I wouldn't want the velcro stuck to my paint.
Snaping the snaps, if you slide the front in then snap the rear corners next all the other snaps will be easier.
Adjustable side panel, again because all EBs are not the same I made the back of the door hole adjustable. But your problem seems different. I would like to see a picture of the problem if I could bother you for one?

At first I thought your instructions were a little sparse. But once I was finished, I realized it's such an easy install that the instructions were fine. But you really do need to include some instructions on installing the new wiper motor bracket. Fortunately for me, I snapped a picture of that when I was at your shop with Jason. So I was already prepared for that step. Attached is that photo. May want to include something like that in instructions.

No problem on not including seals. I payed something like $7 at Checker for the seals. If a person wants something a little nicer, they could order seals actually made for an EB from you.

Yes, if I were you I would not pre-install those snaps. That area around the door needs to have some adjustment. Although I said some of the snaps were particularly hard to snap, I think that is actually a good thing. The canvas comes a little small. Now that it has expanded a little in the sun, the snaps are somewhat easier. Don't change a thing. The canvas fits perfectly.

Actually, a wing nut would solve the PITA in tightening that front stud. Just a thought, why not put the stud in one of the holes that is more accessible? Or just not use the stud and put a hole in the frame for a regular bolt.

The vertical side piece that I need to trim is no big deal. That piece has front to back adjustment, but no adjustment up and down. I think this is just another example of these old trucks each having slightly different geometry. I'll send you a photo of the conflict with the door later this week since I'm travelling now. But this is really not a problem.

Just to be clear, my comments were not intended to be nit picky. I think the BC top is easier to install than the Besttop.

Bob
 

Attachments

  • Wiper Mechanism 2.jpg
    Wiper Mechanism 2.jpg
    52.8 KB · Views: 692

Greg_B

Bronco Guru
Joined
Apr 15, 2010
Messages
2,087
Loc.
Cohutta, GA
I almost bought one of these last Christmas when he had a sale... I am considering it again this year if he gets his heart right :)

Greg
 

JSmall

Bronco Guru
Joined
Feb 18, 2004
Messages
3,223
I wouldn't mind a sale price :) The top and your Bronco look great
 

Scoop

Contributor
Have Bronco, Will Travel
Joined
Feb 1, 2006
Messages
10,664
Loc.
Cuchara, CO
Very nice top. What's with the wrinkles above the side windows? Should those smooth out in the sun after a while?

attachment.php
 
OP
OP
Bituman

Bituman

Full Member
Joined
Jan 23, 2008
Messages
276
Loc.
Phoenix Mtn Preserve
I took that photo with the canvas just installed. The wrinkle was caused by the top piece not being fully stretched out with all the snaps snapped. By now that has largely gone away.

Bob
 

sbolejack

Sr. Member
Joined
May 3, 2006
Messages
357
Loc.
Rogers, AR
Bob,

Working on installing my top and did you find the canvas to be super tight? The snaps across the rear are nearly an inch short. Maybe the canvas will stretch as I keep working it.

Steve
 
OP
OP
Bituman

Bituman

Full Member
Joined
Jan 23, 2008
Messages
276
Loc.
Phoenix Mtn Preserve
Bob,

Working on installing my top and did you find the canvas to be super tight? The snaps across the rear are nearly an inch short. Maybe the canvas will stretch as I keep working it.

Steve

Yes, I had exactly the same problem. Two or three snaps were almost impossible and the rest were very, very difficult. Mine were off by anywhere from 1/2-3/4". The problem is the geometry of the rear hoop. BCB (i.e., Chuck) is working on a fix that involves an adjustable rear hoop. I spent a LOT of time trying some different things, making measurements, taking pictures, and e-mailing back and forth with him. I believe he is on the right track and making a good faith effort to make this right. I still like the BCB design a lot. It's just that the angle on that rear hoop is super critical for the fitment of the canvas in the back. No ETA yet on the fix, but my impression is that it will be very soon. I had not intended to post about this until I saw the fix, but after all, you asked and I didn't want to ignore your question. I'll post up with some photos when I know more, hopefully soon. Stay tuned...

Bob
 

sbolejack

Sr. Member
Joined
May 3, 2006
Messages
357
Loc.
Rogers, AR
Top Installed

Got the new top installed and I think it looks pretty slick if I must say so myself. :D
 

Attachments

  • image.jpg
    image.jpg
    107.2 KB · Views: 535
Top