• Welcome to ClassicBroncos! - You are currently viewing the forums as a GUEST. To take advantage of all the site features, please take a moment to register. It's fast, simple and absolutely free. So please join our community today!
    If you have problems registering or can't log into your account, please contact Admin.

Ben's 73 Build Thread

OP
OP
Bferrari

Bferrari

Sr. Member
Joined
Mar 6, 2013
Messages
856
The work has continued... Had a slight mishap happen. Was rolling the rotisserie out of the shop and had a wheel kick the wrong way which tossed the tub into the side of the shop door. OOOOPS!:eek: After many choice cuss words and a few thrown tools I evaluated the situation and went to work fixing my f-up.

IMG_8417.jpg IMG_8424.jpg IMG_8434.jpg IMG_8438.jpg IMG_8547.jpg

Needless to say, came up with a quick MacGyver fix to not let this happen again.

IMG_8442.jpg

Finished off the hood and tailgate.

IMG_8425.jpg IMG_8478.jpg

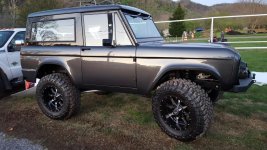
Then tucked her away to deviate on to things and take a break from the paint fiasco.

IMG_8572.jpg
 
OP
OP
Bferrari

Bferrari

Sr. Member
Joined
Mar 6, 2013
Messages
856
Moved on to rebuilding the 4r70w transmission and Dana 20 transfercase, installing the Advanced Adapters kit to marry the two together.

IMG_8574.jpg IMG_8579.jpg IMG_8581.jpg IMG_8593.jpg IMG_8616.jpg
 
OP
OP
Bferrari

Bferrari

Sr. Member
Joined
Mar 6, 2013
Messages
856
In an effort to help get me back on schedule due to the garage door mishap, my buddy Steve graciously offered to strip the chassis down and setup the long arms, shock mounts, 4x4x2 steering box and fuel tank. Can't thank the guy enough, it was a lot of work! We got it back over to the shop and dropped the motor/tranny/txfr case in and finished our mock up. This past weekend we tore everything back down, loaded it up and I took it to get powder coated.

IMG_8552.jpg IMG_8553.jpg IMG_8595.jpg IMG_8596.jpg IMG_8612.jpg IMG_8613.jpg IMG_8614.jpg
 
OP
OP
Bferrari

Bferrari

Sr. Member
Joined
Mar 6, 2013
Messages
856
That color is sharp! What color is it? Did you buy a harbor freight car tent to paint in? if so genius!

Painted it a new ford color, 2015 Ford Guard Metallic. Has a lot of movement and looks amazing in person. As for the paint tent, or as I refer to it as my "hillbilly paint booth", it started life as a Costco quonset hut which I widened, draped with plastic, vented, lighted, etc. It was worked well and kept the overspray to a minimum in the shop.
 

.94 OR

Contributor
Bronco Guru
Joined
Jul 5, 2009
Messages
1,785
The scuff sucks but at least it happened at the easiest time to fix it.

That thing looks sweet.
 
OP
OP
Bferrari

Bferrari

Sr. Member
Joined
Mar 6, 2013
Messages
856
The scuff sucks but at least it happened at the easiest time to fix it.

That thing looks sweet.

That's the truth, still aggravating thinking of the man hours spent getting there just to redo it again. Lessons learned! Hope I got it out of my system cause I am starting to get anxious to drive this thing! Thanks for the compliment!
 

broncoitis

Bronco Guru
Joined
Jul 23, 2010
Messages
4,449
Wow Ben, that looks killer and sorry to hear that you scuffed the paint moving it! That really sucks but at least you have the means and ability to fix something like that and make it look like it never happened! Really awesome work your doing on that truck brother!
 

mattyq17

Bronco Guru
Joined
Jul 11, 2007
Messages
1,597
Kicking ass Ben!!! I am back to working the day shift on Tuesday we will have to meet up so I can take a gander at all your hard work.
 

jspurl3

Sr. Member
Joined
Dec 30, 2008
Messages
818
Loc.
Baton Rouge, LA
Just stumbled on to this thread! Great job! I can't wait to see this thing done! You've probably seen this one before but just in case here's another similar beauty... Definitely following thread!
 

Attachments

  • image.jpeg
    image.jpeg
    126.1 KB · Views: 329

71 CA Bronco

Sr. Member
Joined
Nov 25, 2015
Messages
764
I just read through this entire build again. This is going to be one awesome Bronco. I was fortunate to see if first hand. Can't wait to see it finished.

Ben,
Thanks again for the door supports. Let your buddy up there know I can send them back up your way once I'm done with my final alignment.

Oh yea, and don't let that measly work stuff keep you from the Bronco project. ;D
 

warthog6x6

Jr. Member
Joined
Jun 5, 2016
Messages
88
Loc.
Decatur, Texas
Ben,
A great thread indeed. Brilliant work on the graft, seats, door strap replacement, plus many many other items. Looking to see what all you do for the drive train. :cool:
 
OP
OP
Bferrari

Bferrari

Sr. Member
Joined
Mar 6, 2013
Messages
856
Got everything broken down and off to the powder coater, boy what a difference!

IMG_8640.jpg

While the chassis was at powder coat I seam sealed the inside of the tub then shot al's liner HNR then topped it with Raptor.

IMG_8646.jpg IMG_8649.jpg IMG_8690.jpg

Set up the Dana 44 with 4.88 ring and pinion, air locker, full size ford disc brakes, T-bird calipers and 1 ton steering.

IMG_8707.jpg IMG_8824.jpg IMG_8906.jpg IMG_8907.jpg IMG_8909.jpg IMG_8911.jpg
 
OP
OP
Bferrari

Bferrari

Sr. Member
Joined
Mar 6, 2013
Messages
856
Went to work on the 9". Yukon case with 4:88's and a 31 spline ARB air locker.

IMG_8963.jpg

Installed new 31 spline axles with explorer discs into a super 9 housing.

IMG_8970.jpg IMG_9253.jpg IMG_9256.jpg

Got motor/tranny/txfr case set in for the last time. Now on to plumbing so I can set the tub on the chassis!

IMG_9264.jpg IMG_9265.jpg
 

mattyq17

Bronco Guru
Joined
Jul 11, 2007
Messages
1,597
Looks great Ben, now I have to come by on Sunday and help out, or just sit and watch you work while I drink beer!!!!
 
OP
OP
Bferrari

Bferrari

Sr. Member
Joined
Mar 6, 2013
Messages
856
Thanks Guys! There is always cold beer stocked up in the shop waiting for my amigos, the more the merrier!
 
Top