• Welcome to ClassicBroncos! - You are currently viewing the forums as a GUEST. To take advantage of all the site features, please take a moment to register. It's fast, simple and absolutely free. So please join our community today!
    If you have problems registering or can't log into your account, please contact Admin.

Blasting the tub----Primer before bedliner hurt?

crews44

Sr. Member
Joined
Sep 11, 2008
Messages
384
Loc.
Mullica Hill, NJ
All,

I am media blasting my tub this weekend and was going to prime it till I can get back at replacing panels. I plan on doing the floors and underside with herculiner or similar down the line. Does anyone know if the primer will cause any problems with the bed liner down the road?

I was going to either try a weld thru primer or an epoxy....what does everyone think??
Thanks.

I am just getting started with the rebuild and have everything stripped down and now starting to media blast away. This is going to be fun and all the information on this site has given me the confidence to do and not worry!!
 

stevemus1

Jr. Member
Joined
Apr 3, 2010
Messages
111
Loc.
Phila Burbs
I'm not a painting expert by any means, but I did chassis saver and grizzley grip on my entire floors/rockers, cowl... you name it! When I was researching, I saw a few guys who had epox-primed prior to herculiner on jeep tubs.... i did chassis saver right over my floors that were rusty by not rotted...just light sanded....

hope that helps a bit
 

trailpsycho

Bronco Guru
Joined
Dec 11, 2003
Messages
4,856
Crews-

My advice would be to do your panel replacement before you media blast. If its pretty bad in some areas, you can pre-blast it with some "black beauty" or similar (not panels, but floors, cowl, rockers, kick panels...ie--places you will likely need to do repair. Spot blasting the problem areas allows you not to have to freak out about the rest of the body. Get those areas cleaned up, do the metal fixes/replacements, THEN take the finished product in for media blasting. That way you dont have a project that languishes around un-protected. As I did an area, I used cold-galvanizing compound or weld-thru primer....which was all later stripped in the media blasting stage, from there it went to primer.

So, the answer to the other half of your question is YES, do use a primer. Epoxy or a quality etching primer is what you want below your liner. Epoxy is probably the best, but you need to check with the Liner-product that you will be using to make sure if its compatible and to find out what the cure times in between need to be. I went with Line-X...underneath it we sprayed an etching primer. I wanted epoxy, but was assured that the etch-primer would provide excellent rust prevention and adhesion properties for the Line-X.

Another thing to consider...what "media" will you be using for your "blasting". SOme of my panels were done in soda, some with silica or alumina, some were a little coarser. All of my panels were metal conditioned afterward to ensure that any soda was quenched and removed prior to primer. Soda leaves a residue that gets into the pores. This is great for storage, b/c it acts as a rust inhibitor, but if not quenched and removed ( by dilute acid wash--usually phosphate --metal conditioner. Some use vinegar, but there are better products...thats what metal conditioners are for and they promote adhesion)..as I was saying...if not quenched and removed, the bicarbonate (soda) will react with the paint, affect adehesion and likely bubble and ruin the paint job.

Let us know what products you are using. You really should consult someone 'in the know' and not go by just internet gossip...not when it comes to paint. What may work for one guy and another guy may not work for you if you combine their two partial methods. Make sure that the plan and materials you plan to use will work well in conjunction with each other. Thats why there are "paint systems" and "product lines"...some of it is marketing, but alot of it comes down to science as well...so make sure you do your research and talk to some pros or experienced folk who can give you solid advice.

Good luck. ...while it was alot of work, some of the most fun and "best learning" I had during my project was doing the stripping, welding, fabrication and sheet metal repair. Try to think about upgrades or personalizations you want to do now and try to factor them in...access panels, sealing up unused holes, etc. It sucks to have to cut, weld or re-engineer something that you have already "finished". Installing upgrades and configuring the truck before and during tear-down, makes reassembly much faster. Keep in mind tolerances will become tighter once you have 1/16, 1/8 or 1/6" thick bedliner on everything.

Again...Good luck!

John
 
OP
OP
crews44

crews44

Sr. Member
Joined
Sep 11, 2008
Messages
384
Loc.
Mullica Hill, NJ
Thanks Trailpyscho.....

Going about panel replacement before is a good plan as well. My train of thought was media blast so I can see all of the damage then replace what needs to be replaced. I have a feeling I'm gonna blast out a bunch of body filler and such.

My old man did a side business blasting for a long time so I have some experience there. Soda, or sodium Bicarbonate, is good for the reasons you listed but I really have to get aggressive as there is a lot of corrosion and rust to get rid of. I will be blasting with A/O abrasive being carefull not to build up to much heat as to warp any panels....in reality the only thing I have to worry about is 1 rear qtr panel as all the other potential problem areas are going to be replaced.

I then am going to prep it and spray with U-tech 380 epoxy primer. They, paint techs, said body filler and other materials can be laid on top of this and you can weld through it too.

All in all, i am going to live and learn and hopefully not make too many rookie mistakes. Thanks for all the input it is appreciated.....

I am treating this as a learning experience and not looking to do a concourse quality redo. Just something to keep me busy and build something I can be proud of not show judges....
 

72-Madisyn

Full Member
Joined
Dec 21, 2007
Messages
211
Loc.
Medford
every full resto that I have done,(including the one that I am in the middle of right now), I sandblast first, usually finding alot more hidden damage or previous repairs that werent done correctly, then use PPG epoxy DP primer, and start my panel replacement and body work on top of that. Epoxy primers can go right over metal, and give an excellent corrosion protection.
I like to epxoy prime the whole thing again after all body work and welding has been done, let it sit for about a week, cut into it and then use a good high build primer. As far as bedliner goes, can be applied right over any primer, if you are farming out for it then they still have the same prep work to do and if you are doing it yourself then you get the great joy of prepping.
 

bax

Contributor
Old Member
Joined
Aug 22, 2005
Messages
14,494
Do not put bed liner material over etching primer. They do not like each other. You can use an etching primer but cover it with an epoxy before the bed liner.
 

Revelation

Bronco Guru
Joined
Oct 9, 2004
Messages
4,814
Do not put bed liner material over etching primer. They do not like each other. You can use an etching primer but cover it with an epoxy before the bed liner.

The Gator II in mine is over etching primer, the SEM is the no like etch Primer.
 

bax

Contributor
Old Member
Joined
Aug 22, 2005
Messages
14,494
the SEM ABSOLUTELY HATES IT!!!. I would not use any bed liner material over it.
 

00gyrhed

Bronco Guru
Joined
Aug 3, 2006
Messages
2,428
I put durabak on mine and I called durabak before I primed. They told me the freshly sand blasted surface was better that primer for holding durabak.

I agree, I much prefer to do all the panel replacement before I sand blast. It doesn't take long to find all the spots and even if you miss a few you will likely get all the big hard to fix ones anyway. Then when you sand blast teh body you blast teh fixes too.
 

72-Madisyn

Full Member
Joined
Dec 21, 2007
Messages
211
Loc.
Medford
I am in the middle of a 71 chevy PU for my boss. He bought it as a "virgin" truck, factory big block, according to the original owner it has never seen an accident or a new paint job. Now keep in mind, my boss has owned a large body shop for the last 16 years, all finishes on this truck looked original, could never tell its been worked on in any aspect. He bought it for a good price, drove it for a few months then got a wild hair and figured time to do the resto the truck deserves. We tore it down and blasted it......now we are only using one bedside and the roof of the cab.
You never know what is under old paint, may look great even to the trained eye but could be a nightmare. This is why I have always sandblasted and sealed the metal before ANY work begins. Not the first time i have been in this boat, saw the same thing on the first resto I ever did but i didnt blast that one first. A learning moment to say the least......
 

777mechanic

Sr. Member
Joined
Sep 6, 2008
Messages
370
Loc.
centennial colorado
i've just completed my tub , had it blasted got home and found rocker with a hole so i replaced it with a new one and first primer and sealed the areas . where it was welded i used weld through primer . after completion of metal work i poxy primered bottom with a couple coats and then sem sealed every crack hole , any where water may rest . then sprayed rubberized undercoat on all areas on the bottom . viperwolf helped and thinks she may just float after all the sem i used , being king of sem is the way to go !!
 

trailpsycho

Bronco Guru
Joined
Dec 11, 2003
Messages
4,856
Sounds like you have experience. Its unclear oftentimes how much some posters know about sheetmetal, materials, blasting, etc when they start one of these builds...so I was giving my perspective.

I guess if something (vehicle) is new to you, then, true, you never know what is under the top layer. As the 3rd owner of my truck, and having owned it since 94, I knew what was under the top layer. In fact, I pulled off a sandblast and paint while I was in grad school--on a SERIOUS budget (96/97). But it did what was intended, lasted another 10 yrs until I could do it right--for me anyway.

Either way, it does sound like you have a plan. Good luck. Post up pics as you go, we all love build pics. I learned alot from following the successes and foils of others.

Cheers!

John
 
OP
OP
crews44

crews44

Sr. Member
Joined
Sep 11, 2008
Messages
384
Loc.
Mullica Hill, NJ
Thanks John.....It should be a fun weekend at 85 degree weather in a Tyvek suit blasting...Maybe I'll loose a couple pounds....

I'll try and take some pics as I go...might need some advice. I have a feeling I'm going to find some surprises...
 
OP
OP
crews44

crews44

Sr. Member
Joined
Sep 11, 2008
Messages
384
Loc.
Mullica Hill, NJ
Well through the first day its been up and down. Making good progress but discovering what a terd I have on my hands. I cut off core support, inner fenders and front wheels wells as the PO did a bad job patching in "home made" kick panels. It is a hack...

About the only thing I think I wont be replacing in rear floor, quarter panels, door post, windsheild cowl panel, firewall and most of the floor channels are fine. oh and rear wheel wells. I just priced about 2k in new sheet metal from JBG....ugh.....That all new metal tub isn't looking too bad right now...

Having fun though....sweating my ars off!

no knock John but I am glad I blasted first there would have been a bunch of bad spots I missed.....Strikers are swiss cheese and I have a couple pin holes in the windsheild cowl that can be patched......This is going to be a lot of work.....fun fun

Somebody please tell me they were in the same spot before and pulled it off........
 
OP
OP
crews44

crews44

Sr. Member
Joined
Sep 11, 2008
Messages
384
Loc.
Mullica Hill, NJ
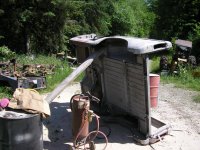
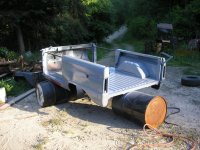
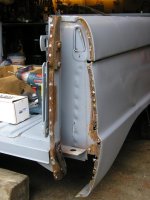
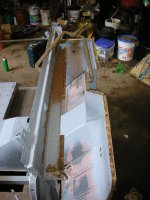
Well here are some pics...I just upgraded to be able to post pics. As you can see I did this kinda of redneck style. I definately have a lot of work to do. I've actually made some good progress since these pics were taken and I'll post more as I am going to start a build thread...
 

Attachments

  • Bronco Pics 001.jpg
    Bronco Pics 001.jpg
    170.1 KB · Views: 43
  • Bronco Pics 009.jpg
    Bronco Pics 009.jpg
    141.4 KB · Views: 48
  • Bronco Pics 012.jpg
    Bronco Pics 012.jpg
    135.7 KB · Views: 48
  • Bronco Pics 021.jpg
    Bronco Pics 021.jpg
    92.8 KB · Views: 48
  • Bronco Pics 020.jpg
    Bronco Pics 020.jpg
    101.7 KB · Views: 45

DirtDonk

Contributor
Bronco Guru
Joined
Nov 3, 2003
Messages
48,431
Great pics crews! thanks.
Not redneck. Those are just the new 55 gallon "high-clearance dollies" we're seeing there. can be rolled around the work area no matter what the floor/ground condition is. And in two planes at once too.

Looking good. I take it that you found something on your rear corner that you didn't like? Looks like it was yanked after the initial blasting. You have replacements yet? Just wondering how they fit.

Keep the progress pics coming.

Paul
 
Top