• Welcome to ClassicBroncos! - You are currently viewing the forums as a GUEST. To take advantage of all the site features, please take a moment to register. It's fast, simple and absolutely free. So please join our community today!
    If you have problems registering or can't log into your account, please contact Admin.

Bond fiberglass to steel?

OP
OP
Bitch'nBronco

Bitch'nBronco

Contributor
Loose Cannon
Joined
Dec 1, 2005
Messages
3,504
Loc.
Ringwood, NJ
No turning back now
 

Attachments

  • 20250308_165857.jpg
    20250308_165857.jpg
    120.1 KB · Views: 40

Speedrdr

Contributor
OLD night owl
Joined
Nov 27, 2017
Messages
1,649
Loc.
Paris, MS
@Bitch'nBronco, is the white line I drew where the cut line is going to be? Trying to figure out how far toward the front the scoop is going to wind up. Anxious to see your finished product!

Randy
 

Attachments

  • IMG_4133.jpeg
    IMG_4133.jpeg
    77.2 KB · Views: 26
OP
OP
Bitch'nBronco

Bitch'nBronco

Contributor
Loose Cannon
Joined
Dec 1, 2005
Messages
3,504
Loc.
Ringwood, NJ
Randy,

Pretty much, I'm going to put a 2" tape line around the cowl and cut so I have a good sized flange to bond the cowl to the hood. I'm going to reuse the pieces I cut off to add structure to the cowl. As for how far forward, im not sure yet. Since the cowl is 4" tall at the back, I need to do some testing with opening the hood to see how far back I can go without hitting the windshield. I'm guessing it's going to start about 2" ahead of the factory hood bump.
 
OP
OP
Bitch'nBronco

Bitch'nBronco

Contributor
Loose Cannon
Joined
Dec 1, 2005
Messages
3,504
Loc.
Ringwood, NJ
More progress, im about as far as I can go without starting to glass stuff together. It's a rough draft but I think it's starting to shape up nicely. I love the view of the vent from inside the Bronco. Kind of wish the cowl was maybe an inch shorter but I don't feel like shortening it.
 

Attachments

  • 20250309_190202.jpg
    20250309_190202.jpg
    176.7 KB · Views: 46
  • 20250309_143823.jpg
    20250309_143823.jpg
    218.7 KB · Views: 39
  • 20250309_134839.jpg
    20250309_134839.jpg
    180.6 KB · Views: 43
  • 20250309_134809.jpg
    20250309_134809.jpg
    156.8 KB · Views: 42
  • 20250309_134735.jpg
    20250309_134735.jpg
    196.3 KB · Views: 36
  • 20250309_121929.jpg
    20250309_121929.jpg
    135.1 KB · Views: 46

ba123

Contributor
Bronco Guru
Joined
Oct 29, 2022
Messages
1,959
Loc.
CA
I like your Raptor influence. That's my daily as well and I used a Raptor Start button...I did have to design and 3d print a holder to make it work but your Raptor influence is a little more involved! Kudos on making it your own!
 
OP
OP
Bitch'nBronco

Bitch'nBronco

Contributor
Loose Cannon
Joined
Dec 1, 2005
Messages
3,504
Loc.
Ringwood, NJ
@ba123 that sounds pretty cool, they're great trucks for sure. I wanted to include a little of it in this hood. Excited to see how it turns out, and even more excited to stop making fiberglass dust lol.
 

Speedrdr

Contributor
OLD night owl
Joined
Nov 27, 2017
Messages
1,649
Loc.
Paris, MS
Are you going to cover up a portion of the fresh air sections of the hood?

Randy
 
OP
OP
Bitch'nBronco

Bitch'nBronco

Contributor
Loose Cannon
Joined
Dec 1, 2005
Messages
3,504
Loc.
Ringwood, NJ
I haven't decided what I'm going to do with those yet. I may just fill them completely since I really don't use either of them. My heater gets fresh air from the cabin (permanent recirculate) and I don't use the fresh air vent. If its hot out, usually I have the top off anyway. The hood has to go to the body shop to get that rust spot fixed where the steel cracked a few years ago, and I may have them delete the vents while they're at it.
 

bigmuddy

Contributor
Bronco Guru
Joined
Dec 28, 2004
Messages
7,358
Loc.
Marthasville Missouri
I wonder how the raptor vent would fit in the scoop on the proflow hood?? Mine has already been painted so I won't do it but it looks like there would be plenty of room unless the raptor vent is hella wide?
 

Speedrdr

Contributor
OLD night owl
Joined
Nov 27, 2017
Messages
1,649
Loc.
Paris, MS
I haven't decided what I'm going to do with those yet. I may just fill them completely since I really don't use either of them. My heater gets fresh air from the cabin (permanent recirculate) and I don't use the fresh air vent. If its hot out, usually I have the top off anyway. The hood has to go to the body shop to get that rust spot fixed where the steel cracked a few years ago, and I may have them delete the vents while they're at it.
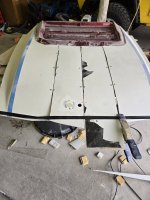
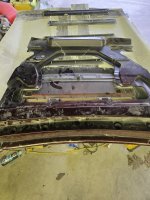
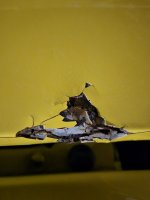
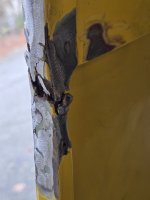
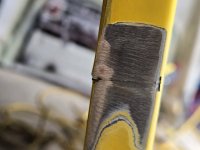
Was just curious about that. Could not really tell for sure and certain whether it could be cut to fit inside the vents. Pretty sure the hood could have a 4-6” section be cut out and put back together so the vents are cleared…BUT that’s way more work than I am willing to do. Lol
Look forward to seeing the completed hood.

Randy
 
OP
OP
Bitch'nBronco

Bitch'nBronco

Contributor
Loose Cannon
Joined
Dec 1, 2005
Messages
3,504
Loc.
Ringwood, NJ
If I didn't include the raptor vent, I would have been able to keep both the fresh air vents and this project would have been way easier lol. I was thinking about how I could section the cowl to shrink it down a bit to keep the hood vents, but I think I'm just going to fill them, you're right it would be a lot of extra work haha
 
OP
OP
Bitch'nBronco

Bitch'nBronco

Contributor
Loose Cannon
Joined
Dec 1, 2005
Messages
3,504
Loc.
Ringwood, NJ
I wonder how the raptor vent would fit in the scoop on the proflow hood?? Mine has already been painted so I won't do it but it looks like there would be plenty of room unless the raptor vent is hella wide
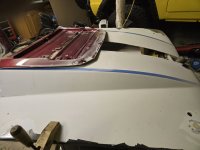
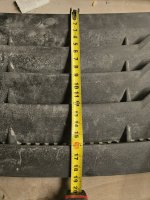
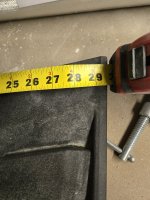
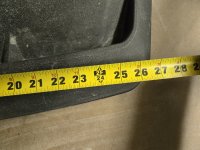
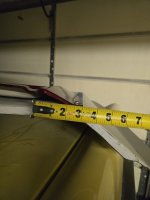
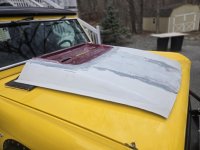
Here are some measurements of just the vent, if you made your own mount for the vent I'll bet it would fit. I asked WH about the pro flow cowl width and they said 35"

If you cut up a raptor hood for it's mount, add about 3" to each side, the total width with the mount is 35.5ish"
 

Attachments

  • 20250312_174739.jpg
    20250312_174739.jpg
    316.4 KB · Views: 17
  • 20250312_174759.jpg
    20250312_174759.jpg
    230.2 KB · Views: 14
  • 20250312_174815.jpg
    20250312_174815.jpg
    240.3 KB · Views: 15
  • 20250312_175030.jpg
    20250312_175030.jpg
    113 KB · Views: 13
OP
OP
Bitch'nBronco

Bitch'nBronco

Contributor
Loose Cannon
Joined
Dec 1, 2005
Messages
3,504
Loc.
Ringwood, NJ
I decided to recess the vent instead of bonding it to the top of the cowl. Got the top side prepped for glass and test fit the raptor underhood structure. It'll fit, but it needs a bunch of trimming
 

Attachments

  • 20250314_184857.jpg
    20250314_184857.jpg
    153.9 KB · Views: 24
  • 20250314_182237.jpg
    20250314_182237.jpg
    241.1 KB · Views: 22
OP
OP
Bitch'nBronco

Bitch'nBronco

Contributor
Loose Cannon
Joined
Dec 1, 2005
Messages
3,504
Loc.
Ringwood, NJ
I finished glassing the top and bottom of the cowl. It's really solid and ready for body work. I also trimmed the inner structure of the Raptor hood a little more, I think I'm going to panel bond that in and then glass in the edges.
 

Attachments

  • 20250316_194507.jpg
    20250316_194507.jpg
    242.4 KB · Views: 24
  • 20250316_194818.jpg
    20250316_194818.jpg
    210.5 KB · Views: 20
  • 20250316_194558.jpg
    20250316_194558.jpg
    241.5 KB · Views: 22
  • 20250316_194835.jpg
    20250316_194835.jpg
    186 KB · Views: 24
OP
OP
Bitch'nBronco

Bitch'nBronco

Contributor
Loose Cannon
Joined
Dec 1, 2005
Messages
3,504
Loc.
Ringwood, NJ
More progress today, not entirely sure I like lol. The vent is body worked in, I decided to wait until I have the cowl mounted to to the hood before I bodywork the center section anymore. It's hard to put any sort of pressure on the sanding block without the fiberglass deflecting.
 

Attachments

  • 20250329_164203.jpg
    20250329_164203.jpg
    115.3 KB · Views: 12
  • 20250329_164151.jpg
    20250329_164151.jpg
    166 KB · Views: 12
OP
OP
Bitch'nBronco

Bitch'nBronco

Contributor
Loose Cannon
Joined
Dec 1, 2005
Messages
3,504
Loc.
Ringwood, NJ
My .02 I think I would taper the front all the way down to the front of the hood somehow.
maybe you were going to do that anyway?
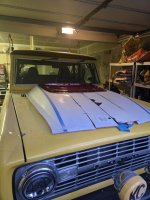
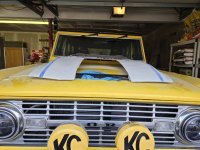
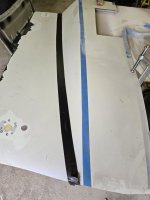
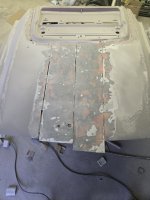
That's the plan, where it is sitting in the picture is where I could get it to sit for a photo without sliding down the hood. It'll be a little further forward and tapered into the nose of the hood.
 
OP
OP
Bitch'nBronco

Bitch'nBronco

Contributor
Loose Cannon
Joined
Dec 1, 2005
Messages
3,504
Loc.
Ringwood, NJ
Pulled the hood off and started cleaning spots that needed to be repaired. Few cracks and a bad spot that needs to he cut out and replaced.
 

Attachments

  • 20250330_133917.jpg
    20250330_133917.jpg
    83.1 KB · Views: 11
  • 20250330_135911.jpg
    20250330_135911.jpg
    122 KB · Views: 9
  • 20250330_135903.jpg
    20250330_135903.jpg
    179.3 KB · Views: 8
  • 20250330_135849.jpg
    20250330_135849.jpg
    118.6 KB · Views: 8
  • 20250330_135855.jpg
    20250330_135855.jpg
    117.1 KB · Views: 11
Top