• Welcome to ClassicBroncos! - You are currently viewing the forums as a GUEST. To take advantage of all the site features, please take a moment to register. It's fast, simple and absolutely free. So please join our community today!
    If you have problems registering or can't log into your account, please contact Admin.

BroncoBub Build

OP
OP
BroncoBub

BroncoBub

Sr. Member
Joined
Oct 14, 2018
Messages
708
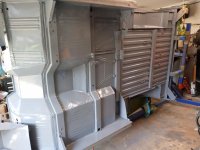
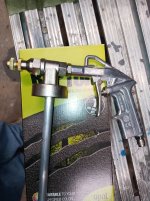
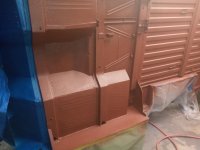
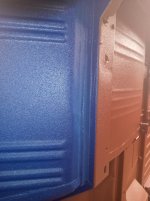
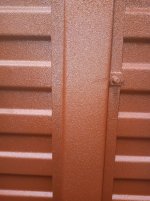
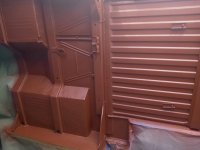
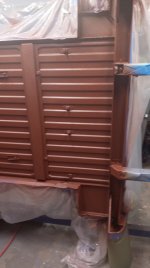
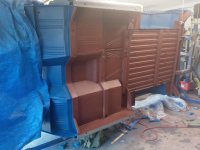
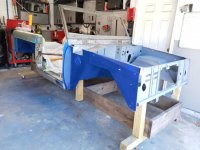
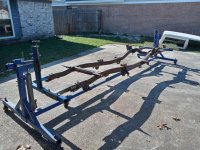
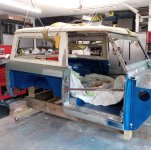
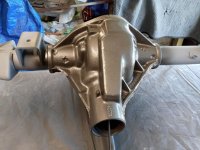
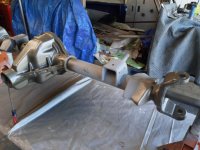
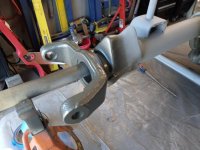
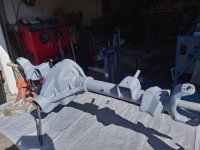
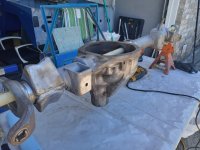
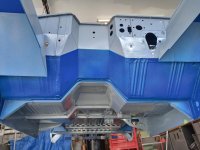
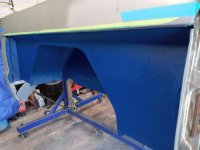
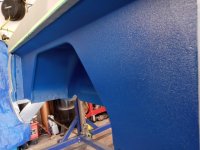
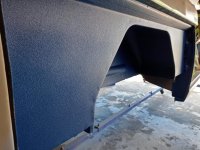
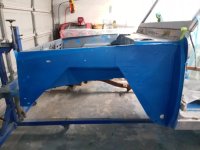
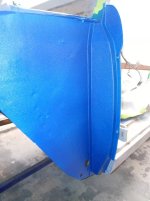
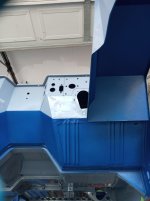
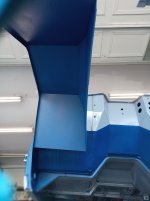
Raptor liner all done on inner quarters, wheel wells and in front of the floor boards and outer aprons. Very happy with the results. The texture came out as expected with the number of videos I watched. The pictures show stripping or fogging effect but, in person it's all uniform. Plus it's darker in person also. Looks really nice!

Bub
 

Attachments

  • 20201214_132425_HDR.jpg
    20201214_132425_HDR.jpg
    100.4 KB · Views: 100
  • 20201214_132045(1).jpg
    20201214_132045(1).jpg
    69.9 KB · Views: 100
  • 20201214_132107(2).jpg
    20201214_132107(2).jpg
    89.7 KB · Views: 91
  • 20201214_132115_HDR(1).jpg
    20201214_132115_HDR(1).jpg
    152.2 KB · Views: 90
  • 20201214_184003.jpg
    20201214_184003.jpg
    70.5 KB · Views: 81
  • 20201214_184153.jpg
    20201214_184153.jpg
    141.8 KB · Views: 82
  • 20201214_132541(1).jpg
    20201214_132541(1).jpg
    99.4 KB · Views: 70
  • 20201214_132528.jpg
    20201214_132528.jpg
    82.7 KB · Views: 76
OP
OP
BroncoBub

BroncoBub

Sr. Member
Joined
Oct 14, 2018
Messages
708
Next up raptor line under the rest of the undercarriage in a red/brownish color.
 

Attachments

  • 20201211_133234.jpg
    20201211_133234.jpg
    90.6 KB · Views: 49
  • brown ox under body.jpg
    brown ox under body.jpg
    153.8 KB · Views: 46

chuckyb

Contributor
Sr. Member
Joined
Oct 25, 2016
Messages
941
Looks great, Bub. I hope that aux tank bracket gets there quickly so you can bolt it on and spray it altogether. I love the red oxide look underneath.
 
OP
OP
BroncoBub

BroncoBub

Sr. Member
Joined
Oct 14, 2018
Messages
708
Looks great, Bub. I hope that aux tank bracket gets there quickly so you can bolt it on and spray it altogether. I love the red oxide look underneath.[/Q

Me too! I'm going to wait until it gets here before I shoot the bottom.

Thanks
 
OP
OP
BroncoBub

BroncoBub

Sr. Member
Joined
Oct 14, 2018
Messages
708
Just incase someone wanted to spray raptor liner I used the UP4880 gun. It has the adjustable nozzle for different texture patterns. I also picked up the tint for the tub area. Nice match to the can which also matched the bottom.
 

Attachments

  • 20201215_142121.jpg
    20201215_142121.jpg
    105.2 KB · Views: 53
  • 20201215_142213.jpg
    20201215_142213.jpg
    130 KB · Views: 47
  • 20201215_142208.jpg
    20201215_142208.jpg
    187.7 KB · Views: 46
  • 20201215_145852.jpg
    20201215_145852.jpg
    87 KB · Views: 50
OP
OP
BroncoBub

BroncoBub

Sr. Member
Joined
Oct 14, 2018
Messages
708
Raptor completed on undercarriage/bed etc....Looks fantastic in my eyes. Better than I thought. Upped the zozzle by 1 turn to give it a little more texture. Just right. Color matches the can perfectly. Very very satisfied. Now on to the next chapter of the build. Once it's dried I'll move ot on the the body cart. Of course the camara (phone) pictures look light.


Bub
 

Attachments

  • 20201217_124050.jpg
    20201217_124050.jpg
    63.8 KB · Views: 84
  • 20201217_124018.jpg
    20201217_124018.jpg
    165 KB · Views: 86
  • 20201217_124558.jpg
    20201217_124558.jpg
    227.9 KB · Views: 87
  • 20201217_123847.jpg
    20201217_123847.jpg
    62.4 KB · Views: 81
  • 20201217_123847 (1).jpg
    20201217_123847 (1).jpg
    62.4 KB · Views: 89
  • 20201217_123810.jpg
    20201217_123810.jpg
    54.2 KB · Views: 87
  • 20201217_125319.jpg
    20201217_125319.jpg
    74.1 KB · Views: 81
OP
OP
BroncoBub

BroncoBub

Sr. Member
Joined
Oct 14, 2018
Messages
708
Body is now on the body cart. Frame is on rotisserie waiting restoration. That will be next up on the list.
 

Attachments

  • 20201219_125157_HDR.jpg
    20201219_125157_HDR.jpg
    96.3 KB · Views: 75
  • 20201219_125211.jpg
    20201219_125211.jpg
    93.2 KB · Views: 77
  • 20201219_131545_HDR.jpg
    20201219_131545_HDR.jpg
    182.8 KB · Views: 69
OP
OP
BroncoBub

BroncoBub

Sr. Member
Joined
Oct 14, 2018
Messages
708
Put the top on to get it out of the way for now. It almost looks like a Bronco again. ;D
 

Attachments

  • Message_1608745324138.jpg
    Message_1608745324138.jpg
    140.1 KB · Views: 70

chuckyb

Contributor
Sr. Member
Joined
Oct 25, 2016
Messages
941
Looks awesome, you'll be really happy with that liner underneath.
 
OP
OP
BroncoBub

BroncoBub

Sr. Member
Joined
Oct 14, 2018
Messages
708
Started sandblasting front suspension parts and give them a little paint and shine
 

Attachments

  • Message_1609879329139.jpg
    Message_1609879329139.jpg
    94.6 KB · Views: 45
  • Message_1609879309044.jpg
    Message_1609879309044.jpg
    97.2 KB · Views: 41
  • 20210104_192415.jpg
    20210104_192415.jpg
    80.9 KB · Views: 38
OP
OP
BroncoBub

BroncoBub

Sr. Member
Joined
Oct 14, 2018
Messages
708
Blasted some front brake knuckles hubs and spindle. Gave a coat of primer than paint.
 

Attachments

  • Message_1609879329139.jpg
    Message_1609879329139.jpg
    94.6 KB · Views: 38
  • Message_1609879309044.jpg
    Message_1609879309044.jpg
    97.2 KB · Views: 38
  • 20210104_192415.jpg
    20210104_192415.jpg
    80.9 KB · Views: 37
  • 20210104_125120.jpg
    20210104_125120.jpg
    81.9 KB · Views: 38
  • 20210104_123041_HDR.jpg
    20210104_123041_HDR.jpg
    206.8 KB · Views: 43
OP
OP
BroncoBub

BroncoBub

Sr. Member
Joined
Oct 14, 2018
Messages
708
Dana 44 restoration

I know its overkill but, I figured since I had it down this for to metal I might as well make it look nice. Pictures tell it all. Need to paint the tubes. Replacing all bearing and races seals etc...Timken bearings.

Bub
 

Attachments

  • 20210120_115703.jpg
    20210120_115703.jpg
    74 KB · Views: 52
  • 20210120_115723.jpg
    20210120_115723.jpg
    108.7 KB · Views: 51
  • 20210120_115732.jpg
    20210120_115732.jpg
    95.5 KB · Views: 51
  • 20210120_115648.jpg
    20210120_115648.jpg
    89.5 KB · Views: 51
  • 20210119_132607_HDR.jpg
    20210119_132607_HDR.jpg
    76.8 KB · Views: 53
  • 20210119_113051_HDR.jpg
    20210119_113051_HDR.jpg
    99 KB · Views: 49
  • 20210119_113943_HDR.jpg
    20210119_113943_HDR.jpg
    102.1 KB · Views: 52
  • 20210119_113030_HDR.jpg
    20210119_113030_HDR.jpg
    112.4 KB · Views: 56
  • 20210117_121432.jpg
    20210117_121432.jpg
    90.1 KB · Views: 45
  • Message_1610557423737.jpg
    Message_1610557423737.jpg
    106.3 KB · Views: 41
  • 20210120_140155.jpg
    20210120_140155.jpg
    62.4 KB · Views: 48
  • 20210120_140209.jpg
    20210120_140209.jpg
    74.3 KB · Views: 49
OP
OP
BroncoBub

BroncoBub

Sr. Member
Joined
Oct 14, 2018
Messages
708
Dana 44 axles yokes blasted primed painted. New spicer u-joints installed.
 

Attachments

  • 20210123_125043.jpg
    20210123_125043.jpg
    148.3 KB · Views: 35
  • 20210123_124911.jpg
    20210123_124911.jpg
    138.2 KB · Views: 37
  • 20210123_124920.jpg
    20210123_124920.jpg
    79 KB · Views: 35
  • 20210123_132751.jpg
    20210123_132751.jpg
    190.9 KB · Views: 39

sprdv1

Contributor
REBEL
Joined
Mar 8, 2007
Messages
81,964
Turned out great brother..

Raptor completed on undercarriage/bed etc....Looks fantastic in my eyes. Better than I thought. Upped the zozzle by 1 turn to give it a little more texture. Just right. Color matches the can perfectly. Very very satisfied. Now on to the next chapter of the build. Once it's dried I'll move ot on the the body cart. Of course the camara (phone) pictures look light.


Bub
 
Top