• Welcome to ClassicBroncos! - You are currently viewing the forums as a GUEST. To take advantage of all the site features, please take a moment to register. It's fast, simple and absolutely free. So please join our community today!
    If you have problems registering or can't log into your account, please contact Admin.

Chuck’s Borg-Warner Rancho Overdrive thread

OP
OP
chuckyb

chuckyb

Contributor
Sr. Member
Joined
Oct 25, 2016
Messages
941
OD Relay

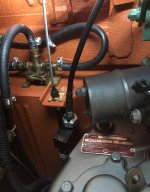
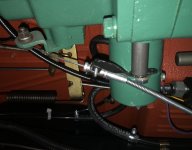
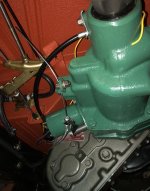
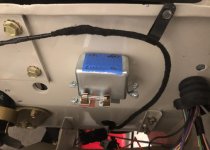
After a lot of fruitless searches for the “ correct” placement of some of the components, I’ve made some decisions. By correct, I mean where the techs at Ken Roggy Ford would have installed them back in 1968. For the OD Relay, I have installed it on the outer firewall on the drivers side. The OD cable release handle will be situated to the right of the emergency brake handle. I found a nice 1968 Mustang air vent cable bracket to secure it.

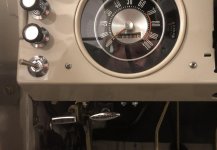
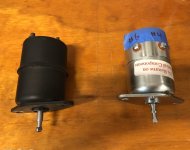
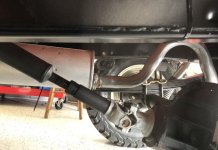
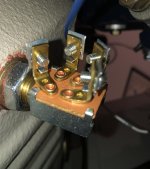
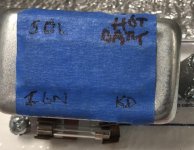
I am providing a pic of the relay with the notes on which terminal leads where. If I’ve made any mistakes, I will correct it as I proceed. Also, a pic of the underside view of the kick down switch as it is installed in the floorboard under the gas pedal. I’m currently underway with building my wiring harness which will connect the relay, OD solenoid, kick down switch, and governor.
 

Attachments

  • BFDA7735-2E60-47F4-918C-6D5B12185A3C.jpg
    BFDA7735-2E60-47F4-918C-6D5B12185A3C.jpg
    90.7 KB · Views: 50
  • 7F99188B-248D-45E6-90DA-5D9CDEC25AEB.jpg
    7F99188B-248D-45E6-90DA-5D9CDEC25AEB.jpg
    62.6 KB · Views: 54
  • 0D5C2ACA-3CFF-471C-8DC7-09D3D5A6FEE4.jpg
    0D5C2ACA-3CFF-471C-8DC7-09D3D5A6FEE4.jpg
    96 KB · Views: 53

Sporto

Sr. Member
Joined
Oct 10, 2005
Messages
907
This looks amazing Chuck. I am really interested in hearing how all of this works out for you when all completed. You have really put your time in on this project for sure.

Good luck!

Rich
 

DirtDonk

Contributor
Bronco Guru
Joined
Nov 3, 2003
Messages
47,811
No idea if this has anything to do with anything, but talking about relays and their location, this '72 came through the Wild Horses garage at one point a couple of years ago and had this bank of "Ford" branded relays on the wheel well:

IMG_0786 (Large).jpg

I believe I even brought it up here on the forum and we did not determine what they might have been.
Just thought I'd throw them back in here as a point of interest.

Paul
 
OP
OP
chuckyb

chuckyb

Contributor
Sr. Member
Joined
Oct 25, 2016
Messages
941
No idea if this has anything to do with anything, but talking about relays and their location, this '72 came through the Wild Horses garage at one point a couple of years ago and had this bank of "Ford" branded relays on the wheel well:

View attachment 490249

I believe I even brought it up here on the forum and we did not determine what they might have been.
Just thought I'd throw them back in here as a point of interest.

Paul

Hi Paul, that’s cool. I have no idea if it is related. For my research, I have some old Borg Warner manuals, but they were used for many cars and trucks (mostly cars), but are not specific to a vehicle make or model. The BW manuals make mention of installing the OD on the firewall, so that’s what I went with. If there are any leads or pictures from a Bronco that had it dealer installed, or other Bronco specific documentation, it would be great to see and learn!
 
OP
OP
chuckyb

chuckyb

Contributor
Sr. Member
Joined
Oct 25, 2016
Messages
941
Speedometer cable and ratio adapter

Hopefully this helps someone. The stock speedometer cable no longer is operational with the addition of the overdrive unit. A new cable is required to attach to the overdrive unit instead. The cable needs to be longer to reach back to the overdrive and also the speedometer gear is not the same type, it is a T-10 transmission type which is a Borg Warner transmission which seems to be most common on older GMs.

My engine builder helped me with the math to understand the number of teeth needed on the gear in order for the speedometer to read correctly.

The overdrive gear that meshes with the speedometer gear has five starts.
I plan on using 30” tires so that equates to 673 revolutions per mile.
My rear axle ratio is 3.50.
(673x3.50x5) / 1000 = 11.7775 teeth.
Round up to 12 teeth needed.

The closest T-10 speedometer gear that we could find had 19 teeth. So, a customized speedometer cable with a ratio adapter was required. I found a nice place to tuck the ratio adapter up by the e-brake cable and D20. Here’s how it looks installed. One more problem hopefully solved!
 

Attachments

  • 73E131A5-DAC6-44AE-8BA3-CF2BC0561C39.jpg
    73E131A5-DAC6-44AE-8BA3-CF2BC0561C39.jpg
    107.4 KB · Views: 48
  • 7E50DB74-9313-4169-912E-BB2B29DF5875.jpg
    7E50DB74-9313-4169-912E-BB2B29DF5875.jpg
    91.8 KB · Views: 46
  • 1E87F393-632C-4A62-8CF4-E2C805020C93.jpg
    1E87F393-632C-4A62-8CF4-E2C805020C93.jpg
    142.1 KB · Views: 43

red hot71

Sr. Member
Joined
Nov 26, 2009
Messages
648
Loc.
kent wash.
My friend in the day had one in a stock 67 chevy c-10. V-8 3 speed with overdrive. It had OD in 2nd & 3rd.
You would hit 28+ let off the gas and the OD would shift like a automatic trans and kick out when your speed drop below 28.
Treat'em like glass. Don't spin your wheels from dirt onto asphalt or wheel hop it while in OD mode, it'll break in a heart beat.
When we got his working after clean wire contacts, it was cool it worked great.
We came off the freeway and the place we were going was closed, we backed up into the dirt spun the tires hit the pavement POP it was over.
 
OP
OP
chuckyb

chuckyb

Contributor
Sr. Member
Joined
Oct 25, 2016
Messages
941
Thanks for the compliments, encouragement and caution. I’ve read that reversing while in OD can be fatal to the needle bearings. I’ve talked to Herm a couple of times and found both him and Randy at Fifth Ave Internet garage to be great resources.
 
Last edited:

jmhend

Bronco Guru
Joined
Dec 25, 2007
Messages
2,738
Hey Chuck, awesome write up thanks!!! Did I miss the post where you said it’s amazing? How is it driving at highway speeds?

Jason
 
OP
OP
chuckyb

chuckyb

Contributor
Sr. Member
Joined
Oct 25, 2016
Messages
941
Hey Chuck, awesome write up thanks!!! Did I miss the post where you said it’s amazing? How is it driving at highway speeds?

Jason

Jason, sorry for delay on this. Thanks but you didn’t miss it. I haven’t driven it yet but hopefully sometime in 2020.

Here are some updates to catch up on progress. I have decided to install the overdrive release cable handle next to the e-brake. I have it routed through the firewall using an extra speedometer cable seal. I have routed the cable basically with the speedometer cable. After finalizing the routing I cut the cable housing to length and then crimped the cable housing and mounted to the overdrive solenoid. As you can see the cable itself does still need a final trimming. The cable seems to function nice and smooth and seems to engage and disengage the lever on the OD as it should.

Speaking of the OD solenoid, I have found that the original was not correct for the application. The incorrect one (black in the side-by-side picture) has fewer terminals. After bench testing it, it seemed functional but does not allow for a terminal to deactivate it from the kick down switch. So another expense to get the correct one. The correct one is unpainted / silver in the side-by-side picture and painted green in the pictures showing the installed overdrive.

I have labeled the solenoid terminals in the picture. The #4 terminal routes to the OD relay and activates the solenoid, engaging the OD. The #6 terminal routes from the kick down switch, which serves to deactivate the OD when you “put the pedal to the metal “, allowing for better acceleration.

Everything is installed and wired up now except the yellow wire to the governor which can be seen loose in the fourth picture. There is not much left to do aside from a road test to see if it works correctly. I have not yet started the Bronco much less driven at highway speed, but I’ll plan on posting again once I do.
 

Attachments

  • 80907F4E-C401-40C4-AA2A-C9423282EB70.jpg
    80907F4E-C401-40C4-AA2A-C9423282EB70.jpg
    61.4 KB · Views: 48
  • 93DE7A5F-C089-4295-A36E-AEE87A741980.jpg
    93DE7A5F-C089-4295-A36E-AEE87A741980.jpg
    80.4 KB · Views: 47
  • 463848D0-71E2-46EF-A04D-782249635AC9.jpg
    463848D0-71E2-46EF-A04D-782249635AC9.jpg
    82.7 KB · Views: 51
  • 334306E4-6ED0-4A58-89A8-9C2BBCACE573.jpg
    334306E4-6ED0-4A58-89A8-9C2BBCACE573.jpg
    122.4 KB · Views: 49

bax

Contributor
Old Member
Joined
Aug 22, 2005
Messages
14,493
Wow, that’s really long! You may be looking at a TruHi-9 third member to make it work.

Mark

I agree. Perhaps using a six cylinder intermediate housing would help some
 
OP
OP
chuckyb

chuckyb

Contributor
Sr. Member
Joined
Oct 25, 2016
Messages
941
I agree. Perhaps using a six cylinder intermediate housing would help some

Hi guys, not sure what the concern is here. The combined length of transfer case and overdrive, pinion angle, or something else? I do have 4 degree shims on the axle to help with pinion angle. I just installed my shortened driveshaft, here is how it looks.
 

Attachments

  • 7A4B61A9-D467-4772-82F3-0AD148763A53.jpg
    7A4B61A9-D467-4772-82F3-0AD148763A53.jpg
    95.7 KB · Views: 55
  • 14887255-03D0-43BB-88E0-C06D6E9EA57C.jpg
    14887255-03D0-43BB-88E0-C06D6E9EA57C.jpg
    83.3 KB · Views: 52

DirtDonk

Contributor
Bronco Guru
Joined
Nov 3, 2003
Messages
47,811
To paraphrase Roy Scheider.... I think you're going to need a bigger... shim.

Your rear pinion is pointed too low in my opinion (at least from this angle it looks it) so you are going to experience vibrations during deceleration and light-throttle cruise at higher speeds.
Also, I don't remember if this is a stick shift of auto, but if a stick you may feel vibrations when you shift too.

So yes, their concern about the overall length is manifesting itself in the angle of the dangle.

Paul
 

bax

Contributor
Old Member
Joined
Aug 22, 2005
Messages
14,493
I agree. You need more shim to fix that pinion angle. You will get some vibration with that set up. I mentioned the six cylinder adapter because it is something like 3'' shorter than the V8 adapter. Plus its an easy bolt in thing. But hey I like it all.
 
OP
OP
chuckyb

chuckyb

Contributor
Sr. Member
Joined
Oct 25, 2016
Messages
941
Thanks all. Paul, it is stock 3 on the tree.

We got it fired up for engine break-in this weekend and were confident enough to drive it around slowly for a bit. Maybe 20mph tops, not fast enough or ambitious enough to test the overdrive. First start in 20 years!

The ride was rattly and bumpy, especially when shifting and getting toward the 20 mph range. No doubt some of the ride problems are due to caster and camber needing adjustment but I am sure the pinion is an issue.

The four degree shim solution was OD PO recommendation based upon what he did for his stock 3 speed set up, but clearly it is not sufficient. I've got some more shims on the way and I'm reading up on how to measure and address the angles to the appropriate tolerances (seems basically 1.5 to 3 degree range at each end of the driveshaft). I'll see if I can make the more simple solution work before attempting the more complex.
 

bax

Contributor
Old Member
Joined
Aug 22, 2005
Messages
14,493
Best way is to not use the shims at the leaf spring perches. You are better off to cut the perches off and weld the old or better yet some new perches back on after setting the pinion angle.
 

DirtDonk

Contributor
Bronco Guru
Joined
Nov 3, 2003
Messages
47,811
Those are cool. I was looking up angle finders on Amazon a few weeks ago to replace my dead one, and got a case of "too-many-choices!" and had to go lie down to recover!;D

Paul
 
Top