• Just a reminder that you won't be able to start new posts or reply to existings posts in the Archive forum.

    This is where all the old posts go so they can still be used for reference and searched.
  • Welcome to ClassicBroncos! - You are currently viewing the forums as a GUEST. To take advantage of all the site features, please take a moment to register. It's fast, simple and absolutely free. So please join our community today!
    If you have problems registering or can't log into your account, please contact Admin.

Crossbreed

OP
OP
R

raleigh

New Member
Joined
Jul 18, 2016
Messages
64
Loc.
In the garage
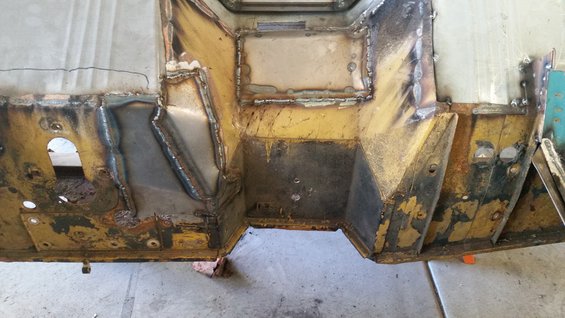
Worked on the firewall today, got the sections that were removed patched, looks pretty good.

firewall-1.jpg


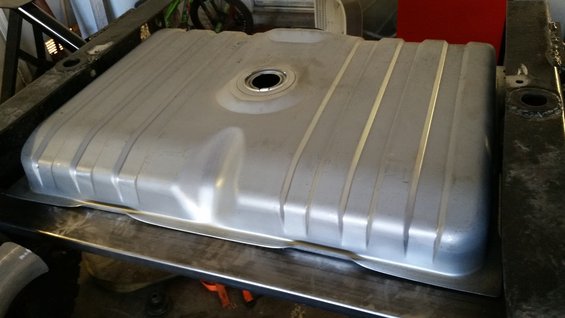
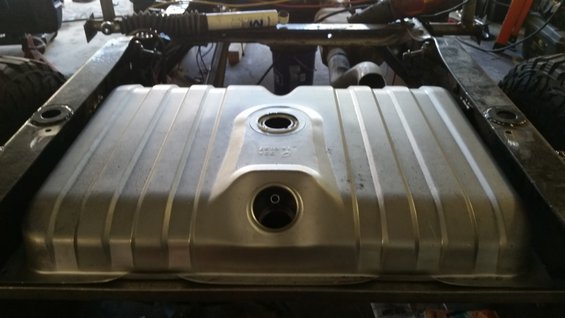
Next I cut out the cross member from in front of the old tank and used a length of 1" x 3" .120 wall to make a new front tank support and a length of 1" x 1" to make the rear support. The rear will be bolted in to make it easier to remove the tank if needed.

gas-tank-1.jpg

gas-tank-2.jpg


While I was doing that my buddy Greg worked on cleaning the under carriage, looks great.
Should be able to get the undercoating sprayed this weekend.
 
OP
OP
R

raleigh

New Member
Joined
Jul 18, 2016
Messages
64
Loc.
In the garage
Had a productive day today, almost got the body ready to go back on the chassis.
Got all of the cleaning and stripping done then sprayed all the bare metal with some white epoxy primer I had left over.
Seam sealed all the joints in the floor and sprayed the undercoating. Ran out so I'll have to finish up on Tuesday.
undercoating-3.jpg

undercoating-2.jpg


Also painted much of the firewall and fenderwells with some epoxy paint.
Not sure if I will apply the undercoating the fenderwells or not.
undercoating-1.jpg

firewall-2.jpg


Capped the sliders, now just need to tap them for the air lines and hose connections.
sliders-3.jpg

sliders-4.jpg


Decided the rear corners needed some straightening so I added this 4" .120 strip to the support, much stronger now.
Thought about just cutting them off and I still might but I will give this a try for now.
conrer-1.jpg
 
Last edited:
OP
OP
R

raleigh

New Member
Joined
Jul 18, 2016
Messages
64
Loc.
In the garage
Fabbed up some solid motor mounts this morning.
The old rubber mounts were shot, in fact one of them had completely split.

The base plate is made from 1/4" plate and the mount is made from 1" x 3" .120 tube with a 1/2" bolt welded through it.
I cut the block mount tabs off the old motor mounts and welded them to the plate, they fit perfectly.
engine-mounts.jpg


Also pulled the transmission and transfercase to do a little clean up and reseal a couple of places that had small leaks.
 
OP
OP
R

raleigh

New Member
Joined
Jul 18, 2016
Messages
64
Loc.
In the garage
Me and my buddy Greg got a ton of work done today. Patched up most of the trim and tire carrier holes, and the fuel filler holes while Greg tackled the sanding of the quarters.
Should be in epoxy in the next day or 2!

bronco-2.jpg

bronco-3.jpg

bronco-4.jpg
 

broncoitis

Bronco Guru
Joined
Jul 23, 2010
Messages
4,449
Good Job! Your are definitely makin it happen. Not to bring up something already mentioned but do you have a target date to have it on the road by? Lookin good!
 
OP
OP
R

raleigh

New Member
Joined
Jul 18, 2016
Messages
64
Loc.
In the garage
Good Job! Your are definitely makin it happen. Not to bring up something already mentioned but do you have a target date to have it on the road by? Lookin good!

Thanks man, the goal is October 15th, absolute deadline is the 28th of October.
I need to have it done by then to get a couple shake down runs in before my club's event, The Hump n' Bump the first weekend in November.

2 coats of epoxy primer done on the tub, now it is time to get to work on the wiring and the hit the cage!
Time is ticking away, can not wait to drive this thing...

primer-1.jpg

primer-2.jpg
 
OP
OP
R

raleigh

New Member
Joined
Jul 18, 2016
Messages
64
Loc.
In the garage
Mocked up the seats today, I'll be making the brackets for those tomorrow.
The front seats are a bit higher than I wanted but I can see just fine, wish they were 2" lower though
seat-mock-up.jpg


Also layed out the dash and ordered the hole saws for the gauges.
dash-layout.jpg
 

Scoop

Contributor
Have Bronco, Will Travel
Joined
Feb 1, 2006
Messages
10,806
Loc.
Cuchara, CO
Yeah, I think you'll find those seats will be too tall. You will be leaning over to see traffic lights. Most of us who have swapped in different seats go through this issue! I'm using Miata seats which are very low. I had some Honda seats which were a bit higher than I liked. With all your floor mods you might think about lowering the driver's side floor. Several folks have done that.

But it's looking great! Nice progress!
 

Prizefighter

Bronco Guru
Joined
Feb 24, 2010
Messages
1,192
I remember when you put those seats in your Bronco and described how well they fit, Ford Edge seats. I've been on the lookout for some for my 78 since.
 
OP
OP
R

raleigh

New Member
Joined
Jul 18, 2016
Messages
64
Loc.
In the garage
Yeah, I think you'll find those seats will be too tall. You will be leaning over to see traffic lights. Most of us who have swapped in different seats go through this issue! I'm using Miata seats which are very low. I had some Honda seats which were a bit higher than I liked. With all your floor mods you might think about lowering the driver's side floor. Several folks have done that.

But it's looking great! Nice progress!

They are definitely high, but I am short and they will be temporary.
Early next year I am eyeballing a set of Beard seas with the rear bench so I am not going to do anything drastic right now.
 
OP
OP
R

raleigh

New Member
Joined
Jul 18, 2016
Messages
64
Loc.
In the garage
Had a productive day, taking advantage of the cooler temps! Got a good portion of the engine harness in and started on the lighting. Mounted the battery holder and the gauges in the dash, more tomorrow...

20160917_183431.jpg

20160917_183449.jpg

20160917_183552.jpg


Pics are not the best, I'll get some better pics tomorrow
 
OP
OP
R

raleigh

New Member
Joined
Jul 18, 2016
Messages
64
Loc.
In the garage
A few detailed pics of this weekend's work. The whole weekend was devoted to electrical.
I cut out a couple of the connectors that were not in the best shape and replaced them with newer parts.
I am also removing crimp connectors with soldier and shrink tube.
Went to the junk yard yesterday morning and snagged a 6 relay box, these will operate the headlights, air compressor, fuel pump and rock lights.
If all goes well this week I should be able to start the engine next weekend!
wiring-1.jpg

wiring-2.jpg


Today I finished up the engine bay wiring and installed the radiator, condenser and fans.
Everything fits perfectly, I have just over an inch of clearance between the fans and the engine.
radiator-3.jpg

radiator-4.jpg

radiator-5.jpg
 

broncoitis

Bronco Guru
Joined
Jul 23, 2010
Messages
4,449
Nice! Definitely a motivated build you have going! Can't wait to see it finished!
 
OP
OP
R

raleigh

New Member
Joined
Jul 18, 2016
Messages
64
Loc.
In the garage
Thanks guys, So I have been busting ass on the Bronco but haven't gotten many pics but here is what I have

Got the Willwood master cylinder set up installed and bled. I had to have the brake line shortened to do this.
These are a dual MC set up, one for front and one for rear, they are not power but have a 7:1 pedal ratio so power is not really needed.
mc-1.jpg


Decided I was tired of the junk rag joints so I got a Flaming River Ujoint for the box, really nice piece, well worth the $80
steering-joint.jpg


Got the dash pretty well finished, need to do the ducts for the AC and get a defrost duct
dash-1.jpg

dash-2.jpg


Got some new seats, unfortunately the Edge seats were just too tall.
Also got the ACC rubber flooring, I put the peal and seal under that with some additional insulation under the seats
And of course I was able to get some work on the cage done, I need to get 2 more sticks of DOM to finish it
cage-1.jpg


Was ready to fire the engine and found that the Holley finally gave up on me so I had to figure another fuel system.
Ordered a FITech 400, it will be here tomorrow, i had planned on using that money for a doubler, oh well.
 

broncoitis

Bronco Guru
Joined
Jul 23, 2010
Messages
4,449
I like the seat that you decided to go with! I had problems with my seating height because of my long torso and settled on Corbeaus which those look to be as well or very similar to mine! Was able to literally mount them on the floor and with the shaved bottom the seating position for me is pretty good now. They are literally 1/2" off the floor and adjust front to back so I am happy!

Nice job! Sorry to hear about the Holley!
 

Scoop

Contributor
Have Bronco, Will Travel
Joined
Feb 1, 2006
Messages
10,806
Loc.
Cuchara, CO
They are definitely high, but I am short and they will be temporary.
Early next year I am eyeballing a set of Beard seas with the rear bench so I am not going to do anything drastic right now.

Famous "last words"! ;D

The new seats look great! And the dash looks good too. I'll be interested is hearing how the dual MC works.
 
OP
OP
R

raleigh

New Member
Joined
Jul 18, 2016
Messages
64
Loc.
In the garage
Famous "last words"! ;D

The new seats look great! And the dash looks good too. I'll be interested is hearing how the dual MC works.

Still want the Beard seats, these were cheap and fit the Bronco so much better lol

I will post up how the brakes do, these are both 1" bore MC so I expect it should do pretty well. The brakes are huge and the Bronco is pretty light, pedal feels nice and solid, about 3" of compression before it stops and I am standing on it.
 

Scoop

Contributor
Have Bronco, Will Travel
Joined
Feb 1, 2006
Messages
10,806
Loc.
Cuchara, CO
The seats look like the ones I had in my '66. One caution - enter and exit very gingerly. You'll soon discover what I mean if you haven't already! %)
 
Top