• Welcome to ClassicBroncos! - You are currently viewing the forums as a GUEST. To take advantage of all the site features, please take a moment to register. It's fast, simple and absolutely free. So please join our community today!
    If you have problems registering or can't log into your account, please contact Admin.

Daughter and Dad '74 restoration

SuperBroncoDuty

Jr. Member
Joined
Sep 22, 2021
Messages
68
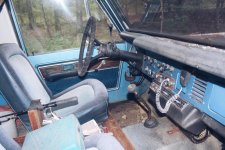
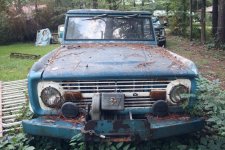
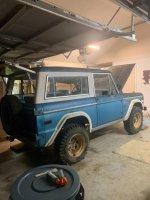
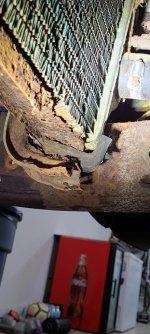
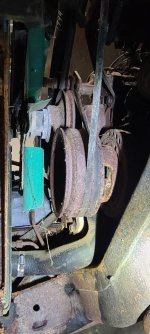
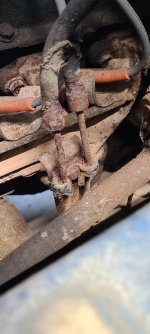
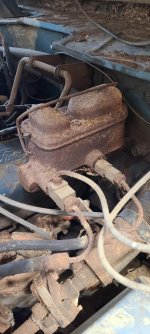
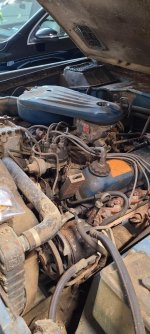
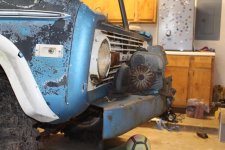
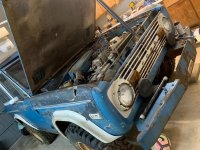
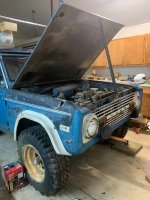
Long story short, my dad gave my 18 year old daughter his '74 Bronco Explorer that he just quit driving and it's been sitting for over 25 years. Not sure how much of a restoration this is going to be or how long it's going to take but looks like we have a nice project ahead of us. Might just be that we get it running and make it look as good as we can. Due to space and funds, I highly doubt this will be a frame off restoration. Guess we have to take it a day at a time and one part at a time. So far all we've done this week is get it loaded and unloaded and more less cleaning here and there and looking at it lol
 

Attachments

  • BRONCO 6.jpg
    BRONCO 6.jpg
    172.7 KB · Views: 187
  • BRONCO 2.jpg
    BRONCO 2.jpg
    115.9 KB · Views: 171
  • BRONCO 3.jpg
    BRONCO 3.jpg
    143.5 KB · Views: 157
  • BRONCO 4.jpg
    BRONCO 4.jpg
    232 KB · Views: 158
  • BRONCO ON TRAILER.jpg
    BRONCO ON TRAILER.jpg
    120.5 KB · Views: 164
OP
OP
S

SuperBroncoDuty

Jr. Member
Joined
Sep 22, 2021
Messages
68
Sitting in the garage after hitting it with the pressure washer
 

Attachments

  • BRONCO 25.jpg
    BRONCO 25.jpg
    103.9 KB · Views: 158
  • BRONCO 23.jpg
    BRONCO 23.jpg
    90.6 KB · Views: 150
OP
OP
S

SuperBroncoDuty

Jr. Member
Joined
Sep 22, 2021
Messages
68
Don't have a clue at what most of this it is I'm looking at but not all it looks pretty lol. The list is going to be longer than I hoped
 

Attachments

  • BRONCO 39.jpg
    BRONCO 39.jpg
    100.8 KB · Views: 118
  • BRONCO 38.jpg
    BRONCO 38.jpg
    85.1 KB · Views: 114
  • BRONCO 37.jpg
    BRONCO 37.jpg
    73.4 KB · Views: 120
  • BRONCO 36.jpg
    BRONCO 36.jpg
    65.8 KB · Views: 116
  • BRONCO 34.jpg
    BRONCO 34.jpg
    86.5 KB · Views: 128
  • BRONCO 33.jpg
    BRONCO 33.jpg
    94.6 KB · Views: 126
  • BRONCO 32.jpg
    BRONCO 32.jpg
    102.5 KB · Views: 144
  • BRONCO 31.jpg
    BRONCO 31.jpg
    78.2 KB · Views: 152
Last edited:
OP
OP
S

SuperBroncoDuty

Jr. Member
Joined
Sep 22, 2021
Messages
68
Made some progress last night. Removed the front bumper and winch
 

Attachments

  • BRONCO 26.jpg
    BRONCO 26.jpg
    96.7 KB · Views: 104
  • BRONCO 28.jpg
    BRONCO 28.jpg
    140.1 KB · Views: 101
  • BRONCO 30.jpg
    BRONCO 30.jpg
    117.1 KB · Views: 100

Hopstr

Contributor
Jr. Member
Joined
Feb 26, 2012
Messages
144
Looks like a great Father Daughter project!
Are those front fenders fiberglass?
 

cannunz546

Contributor
Bronco Owner and Admirer
Joined
Sep 2, 2017
Messages
539
Loc.
Northwest Suburbs, Chicago
So nice you are keeping this truck in the Family! Looks like a great project and some long days and weekends ahead. What could be better? The combined Bronco knowledge on this site is incredible. I'm looking forward to seeing this project progress. Good luck!
 
OP
OP
S

SuperBroncoDuty

Jr. Member
Joined
Sep 22, 2021
Messages
68
The right front fender and hood is fiberglass. He said back in the day a tree fell against the top of the fender a limb mashed down the hood. Not sure why he went with that though. I'm going to go back to metal
 
OP
OP
S

SuperBroncoDuty

Jr. Member
Joined
Sep 22, 2021
Messages
68
I'm hoping I can search on this site instead of posting something I need an answer on. There are some major bronco brainiacs here and thankful for and hopefully after this project, i'll add that title to my resume lol
 

jmhend

Bronco Guru
Joined
Dec 25, 2007
Messages
2,736
Oh man. Honestly, I have seen worse (heck I have worse in my driveway)..don't throw anything away and take a lot of pictures. It looks great for sitting as long as it did. Where are you located again?


Sent from my iPhone using Tapatalk
 

JeepGuy

Contributor
Bronco Guru
Joined
Aug 24, 2006
Messages
1,212
That is totally awesome and totally scary at the same time. The good thing is you will find just about every part on that thing is replaceable through the vendors on here, or in the classified down below.

Word of caution.... coming from a guy who just recently got back to wrenching on his bronco after having it sit for more than a few years... Try to focus on one issue at a time. I played the game of tearing it all down and losing interest due to lack of progress seen. These things are fun, but bottomless pit is an understatement if you let it get out of control.
 

admin

Administrator
Just your friendly, neighborhood webmaster...
Joined
Jan 1, 2001
Messages
38,757
Loc.
Phoenix, AZ
Congrats! That will definitely be a cool project for you and your daughter. Enjoy your time together. It will go by in the blink of an eye!

I noticed that fiberglass fender too. I haven't seen too many of those. The nice thing is it should be easy to patch. Even if you're going back to metal, patch up that fiberglass fender as a way of learning a new skill and practicing bodywork.

I echo JeepGuy's suggestion about focusing on one thing at a time. I have a '68 Mustang torn down in the garage and there's so much to do it's hard to get motivated.

Keep it simple. It will help keep you and your daughter interested in the build if you can actually make progress on one thing at a time. It's not the most time efficient way to go, but unless you're a restoration shop, it's better to chip away at it a weekend at a time as opposed to tearing it all down and having it sit in pieces for years.
 

admin

Administrator
Just your friendly, neighborhood webmaster...
Joined
Jan 1, 2001
Messages
38,757
Loc.
Phoenix, AZ
Don't have a clue at what most of this it is I'm looking at but not all it looks pretty lol.
Feel free to ask away about any part that doesn't make sense to you. The folks on this site have very keen eyes and can help spot what's original vs what's been added on over the years.
 

bsquared

Contributor
Sr. Member
Joined
Dec 4, 2010
Messages
961
That Bronco is beautiful! Already has power steering and I am guessing a Dana 44 front end. If rust is minimal, you have quite a gem to start with there.
Best of luck on the build and ask away if you have questions. We all live to Bronco!
Cheers, Bill
 
OP
OP
S

SuperBroncoDuty

Jr. Member
Joined
Sep 22, 2021
Messages
68
We need a thumbs up or a like button for comments. Everyone is super nice and so positive. I do want to thank each one of you. I do not know about Dana 44 etc.... Heck I don't know nothing about how a vehicle works and runs. I don't know what's after market or original. I'd like to post as many pictures as I can but I also don't want it to be a bother to anyone. So I've tried the whole turning by hand thing but to be honest, I didn't put much elbow behind it because I just don't know. I removed the spark plugs except for #8 because it's harder to get to. All the spark plugs looked about the same but that doesn't tell me much
 

Attachments

  • SPARK PLUG 2.jpg
    SPARK PLUG 2.jpg
    47.4 KB · Views: 56
  • SPARK PLUG 1.jpg
    SPARK PLUG 1.jpg
    48.7 KB · Views: 63
OP
OP
S

SuperBroncoDuty

Jr. Member
Joined
Sep 22, 2021
Messages
68
So then I decided to take the valve covers off but replaced the spark plugs to keep dirt and stuff from falling in the holes. Was going to put some oil on all that stuff but is there a way I can clean all of that before doing so? And how do I approach what's left of that gasket so it doesn't get all over the place?
 

Attachments

  • VALVE COVER 1.jpg
    VALVE COVER 1.jpg
    93.4 KB · Views: 64
  • VALVE COVER 2.jpg
    VALVE COVER 2.jpg
    103.1 KB · Views: 62
  • VALVE SPRINGS 1.jpg
    VALVE SPRINGS 1.jpg
    109.1 KB · Views: 67
  • VALVE SPRINGS 2.jpg
    VALVE SPRINGS 2.jpg
    133.4 KB · Views: 62
  • VALVE SPRINGS 5.jpg
    VALVE SPRINGS 5.jpg
    104.3 KB · Views: 55
OP
OP
S

SuperBroncoDuty

Jr. Member
Joined
Sep 22, 2021
Messages
68
On the top back of the passenger side valve cover is this pile of um......stuff lol. Not sure what all that is about the first pic looks pretty bad. What is that? The second pic, what is that thing that says motocraft on it is on the side of the carburetor. I'm going to rename my pictures to what each part is. And then there is this piece that says D4TE-9D475-A2A 028
 

Attachments

  • PART 1.jpg
    PART 1.jpg
    67.7 KB · Views: 64
  • PART 2.jpg
    PART 2.jpg
    96.5 KB · Views: 67
  • PART 4.jpg
    PART 4.jpg
    69.3 KB · Views: 67

fatboy

Contributor
Glad to be here.
Joined
May 15, 2006
Messages
7,006
Loc.
New Hampshire
This looks like your heater mixing valve:

ea5f408b5b32acc715e6ab8106a0e2d0.jpg


And this looks like your electronic choke:

4858c472d4d9560df027fddb980d008b.jpg


This looks like a vacuum port for something:

bddb9d5928f86db0958dab83517028c2.jpg


I'm sure others will chime in.


Sent from my iPhone using Tapatalk
 
OP
OP
S

SuperBroncoDuty

Jr. Member
Joined
Sep 22, 2021
Messages
68
Thanks FB. That was helpful. Now to research each one to see if they are good or if they need replaced
 
OP
OP
S

SuperBroncoDuty

Jr. Member
Joined
Sep 22, 2021
Messages
68
And at what point is one part more critical than another part during the "trying to crank or turn over stage?" I know I should be concentrating on actually getting it to turn over but seems like every single part plays an important roll with all the other parts. What and what not to clean. What and what not to replace etc.....
 
Top