• Welcome to ClassicBroncos! - You are currently viewing the forums as a GUEST. To take advantage of all the site features, please take a moment to register. It's fast, simple and absolutely free. So please join our community today!
    If you have problems registering or can't log into your account, please contact Admin.

Explorer OBD2 Harness Re-work

OP
OP
EFI Guy

EFI Guy

Sponsor/Vendor
TheEFIguy@gmail
Joined
Apr 14, 2013
Messages
1,083
Loc.
BFE
Sorry guys, I haven't been logging in much except to check private messages. I have added 2 new videos and a small update to the first post.

I will probably get around to making a part 2.5 later to answer any questions and show some more tips on wrapping and installing.
 

Green_Bastard

Full Member
Joined
Jan 4, 2014
Messages
257
Hi Garry,
As always, thanks for the updates. I plan on starting my firewall harness re-work when I get back in town this weekend.
 

Rickb1b

Sr. Member
Joined
Feb 29, 2012
Messages
447
Hey Garry, I followed the videos and everything works and is hooked up (well mostly, left a few like overdrive and high idle unhooked for now). However, the truck will start in any gear i.e. it looks like the neutral safety switch isn't working. Don't know if this matters but I hooked the reverse lights to the black with pink wire and the pink wire to the s post of the start solenoid. I guess I need to know the routing of power through the neutral safety switch so I can make it work and figure which wire I have in the wrong place. Any ideas?
 

chuzie

Bronco Guru
Joined
Jul 21, 2006
Messages
2,701
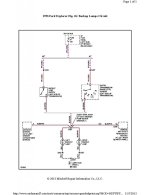
Does this help. Keep in mind these are for a 98.
 

Attachments

  • Pages from Explorer diagrams_Page_1.jpg
    Pages from Explorer diagrams_Page_1.jpg
    61.7 KB · Views: 548
  • Pages from Explorer diagrams_Page_2.jpg
    Pages from Explorer diagrams_Page_2.jpg
    73.9 KB · Views: 456

DirtDonk

Contributor
Bronco Guru
Joined
Nov 3, 2003
Messages
48,740
Glad you brought this thread back up. Don't know how I missed it originally!
It's great that you posted videos Garry. About the only thing we like better than pics of our Broncos and wiring diagrams, is videos!

I'll add my thanks and best wishes as well.
Maybe someday we'll get the chance to work together on some projects.

Best of luck and best regards,

PaulB
 

Rickb1b

Sr. Member
Joined
Feb 29, 2012
Messages
447
Chuzie, thanks for posting. Those are pretty much the same colors as my 2000 Explorer transmission. The diagram set me straight, I then called EFI Guy to confirm. Took me about 10 minutes to fix it.
 
OP
OP
EFI Guy

EFI Guy

Sponsor/Vendor
TheEFIguy@gmail
Joined
Apr 14, 2013
Messages
1,083
Loc.
BFE
Thanks for the kind words guys.
I updated the second post to add some trans tech for those of you using a different year trans.
 

stupidboy

Contributor
My wifes porn star.
Joined
Dec 29, 2009
Messages
5,790
Loc.
Morrisdale Pa.
I watched the videos a couple times and think I will attempt this myself. Thanks Gary, I just have one question about the resistor, How is it handled?
 
OP
OP
EFI Guy

EFI Guy

Sponsor/Vendor
TheEFIguy@gmail
Joined
Apr 14, 2013
Messages
1,083
Loc.
BFE
I watched the videos a couple times and think I will attempt this myself. Thanks Gary, I just have one question about the resistor, How is it handled?

You want to put it in place of the 2 pin EVR connector. Brown/pink on one side of the resistor, red on the other. That only applies if your PCM code starts with SLL_ or is JFX0.
 

stupidboy

Contributor
My wifes porn star.
Joined
Dec 29, 2009
Messages
5,790
Loc.
Morrisdale Pa.
You want to put it in place of the 2 pin EVR connector. Brown/pink on one side of the resistor, red on the other. That only applies if your PCM code starts with SLL_ or is JFX0.
Thanks again, I'll be sending you my email address to get the comp flashed, it is a SLL3.
 

stupidboy

Contributor
My wifes porn star.
Joined
Dec 29, 2009
Messages
5,790
Loc.
Morrisdale Pa.
I just finished up using this information to put an explorer engine in my sons 1985 toyota pickup. Thanks Gary.:-*
 

71BroncoSport

Jr. Member
Joined
Nov 2, 2013
Messages
78
Hey Garry,

Could you post some pics of where you installed you relay box? Preferably a 96 relay box and your fuse box supplying it?

Thanks!
 

Wyflyer

Bronco Guru
Joined
Apr 1, 2008
Messages
2,920
First start of my EFI explorer in the chassis. I posted this over in my other thread, but why not here too. Thanks Garry for all your help.


[youtube]y3MhAHdbl2I[/youtube]
 

904Bronco

Contributor
Bronco Guru
Joined
Sep 28, 2004
Messages
5,925
Loc.
San Martin, CA
Relay boxes... You mean like this?
 

Attachments

  • DSCN4314.jpg
    DSCN4314.jpg
    128.1 KB · Views: 566
  • DSCN2469.jpg
    DSCN2469.jpg
    116.3 KB · Views: 574
Last edited:
OP
OP
EFI Guy

EFI Guy

Sponsor/Vendor
TheEFIguy@gmail
Joined
Apr 14, 2013
Messages
1,083
Loc.
BFE
Hey Garry,

Could you post some pics of where you installed you relay box? Preferably a 96 relay box and your fuse box supplying it?

Thanks!

Ideally with the 96 relay box you would mount it against the fender, right about where Doug has his A/C accumulator in the picture above (Nice work Doug!). Then the fusebox mounts on the slanted portion of the inner fender right next to the starter solenoid.

Pretty much anywhere near the starter solenoid will work for either. I do it that way to minimize the amount of wiring to get power to the fuse box, you can just pull it from the battery side of the solenoid. I also like to bring the start signal wire for the solenoid out there too if it's running a 4r70w.
 

904Bronco

Contributor
Bronco Guru
Joined
Sep 28, 2004
Messages
5,925
Loc.
San Martin, CA
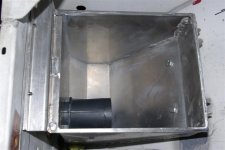
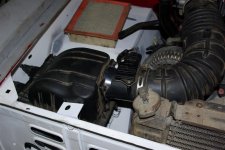
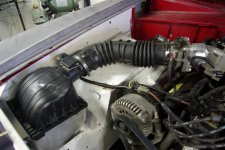
Ok, I got pinged to answer some questions on my build regarding air box locations.

I have pictures of my 68 and 71 builds with a plastic divider in place to prevent fan wash and try to keep fresh cool air for the engine.

The second set of pictures I download from this site. (I do not remember who) I like the custom work, but I lacked the skills to make it myself. And I did not want to mod the bronco fenders that much...
 

Attachments

  • Airbox 004 (Large).jpg
    Airbox 004 (Large).jpg
    103.7 KB · Views: 417
  • Airbox 001 (Large).jpg
    Airbox 001 (Large).jpg
    56.9 KB · Views: 421
  • Airbox 002 (Large).jpg
    Airbox 002 (Large).jpg
    75.3 KB · Views: 423
  • Explorer air box (Large).jpg
    Explorer air box (Large).jpg
    95.3 KB · Views: 434
  • Airbox 007 (Large).jpg
    Airbox 007 (Large).jpg
    92.8 KB · Views: 459
  • DSCN4312.jpg
    DSCN4312.jpg
    110.9 KB · Views: 454
  • DSCN2245.jpg
    DSCN2245.jpg
    146 KB · Views: 486

904Bronco

Contributor
Bronco Guru
Joined
Sep 28, 2004
Messages
5,925
Loc.
San Martin, CA
And if you want to run an Explorer fuel pump assembly in your Aero tank, this is what it looks like. You ask Aero to build it this way... You send them the Exp fuel pump assembly prior to them building it...

I have a 2001 motor in my 71 and it cleans up the fuel lines by not having to run an external regulator and return line by having the factory assembly which has the regulator in it.

Some stay away from the latter Exp motors with no return line, higher fuel pressures (60psi), smaller injectors (17lbs vs. 19lbs). The pressure regulation is done in the tank and the higher psi makes a 17lbs injector perform like a 19lbs.
 

Attachments

  • DSCN3445.jpg
    DSCN3445.jpg
    113 KB · Views: 385
Top